72 Challenger R/T/A

Friday I took the windshield out (mostly). It broke up as it came out and got glass everywhere. I wasn't too suprised about that though as it was completely spider webbed before I ever got the car. When it broke the glass got in the cowl, defroster ducts, under the hood, etc... basically everwhere.

BTW: The windshield frame has no rust whatsoever in the glass chanel. WooHoo! Finally, a good suprise for a change!

I had to remove some stuff to be able to take the glass out. I had to pull the upper interior trim pieces from around the roof and pillars. Rusty, check your mail box this coming week. ;)

Saturday I had to clean out the broken glass before I could do anything else. Then I started to finish grinding all the spot welds on the floor pans. I got through about 2/3 of it before I called it a day.

Afterwards I headed out to the local second saturday car cruise in. Unfortunately it could have been called a Mustang cruise-in this weekend. There were some nice rides there though. The only Mopar I saw there was a very clean red 93-95 RT/10 Viper.

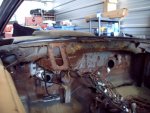
Today I finished the rest of the grinding and then coated the metal with some rust converter primer. After that dried I got to work on removing the dash. First the steering column went out. Next the dash itself. Lastly the heater box and the vent on the opposite side.

Every time I pulled something out of the car, more broken glass would come raining down. I had to keep taking breaks to use the shop vac to suck the glass shards and rust flakes up.

The wiring harness and the pedal support bracket are all that's left in there now.

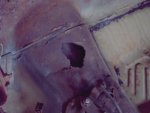
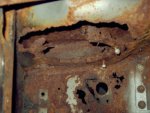
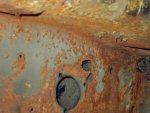
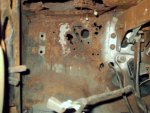
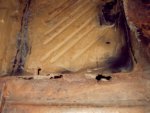
My goal was to get everything out of the way that would be in the way of welding the holes in the cowl. The cowl area where the driver side vent bolts to is the worst with almost nothing left to it. I also need to make a big patch behind the brake master cylinder and where the blower motor fan sticks out. The trans tunnel has a 4" hole that needs attention as well as the bad section on top of the tunnel between the passenger footwells. I have a friend at work who is a welder and he's offered to weld everything up for me. I just need to get the metal (no problem) and make the patches. The vent area will be the hardest as it has about a 1" lip that sticks up into the the cowl to prevent water from just running down into the interior, like it does now.

I'm probably forgetting something, but that's what I get for going a few days without posting.
 

Attachments

  • dash removed.jpg
    dash removed.jpg
    225.7 KB · Views: 27
  • holes - over front of trans.jpg
    holes - over front of trans.jpg
    196.3 KB · Views: 25
  • holes - driver side vent.jpg
    holes - driver side vent.jpg
    214 KB · Views: 54
  • holes - heater box area.jpg
    holes - heater box area.jpg
    208.9 KB · Views: 25
  • holes - driver side firewall.jpg
    holes - driver side firewall.jpg
    215.9 KB · Views: 24
  • holes - rear of trans tunnel.jpg
    holes - rear of trans tunnel.jpg
    208.2 KB · Views: 24
Last edited:
More fiberglass on the way for the Chally weight reduction program. I decided to go ahead and get the fiberglass dash from VFN after seeing how heavy the stock dash was when I removed it. The FG dash weighs only 4 lbs. They are made to order so it will take about 6 weeks for them to make it and then ship it out. Mounting it will require a little creativity, but I have a plan for that as well.:toot:
 

Attachments

  • 70-74 Challenger Dash.jpg
    70-74 Challenger Dash.jpg
    6.8 KB · Views: 24
Today I took a break from the interior since I'll be waiting on parts and my friend (the welder) doesn't have any spare time at the moment.

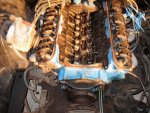
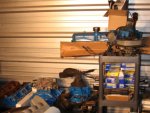
So today after work I started giving the 318 a little attention. I tore it down almost to a long block before I had to head home. All I have left to do now is pull the radiator, timing cover, timing chain and gears, rocker shafts, pushrods, lifters and finally the cam. Below is a pic of how it sits right now and another pic of the stack of parts that either came off or are waiting to go on.

I've decided to hold off on using the 302 heads for now after seeing how much more money and time I'd have to spend to get them ready to use. They need new valves, springs, retainers, locks, end plugs and a valve job. I'd also have to put a lot more hours of porting into them to finish the gasket matching and mild port blending I started. I'm not going to get rid of them, just save them for when I have another project that could use a nice little small block (68 Cuda fastback maybe?).
 

Attachments

  • sb torn down to long block.jpg
    sb torn down to long block.jpg
    241.4 KB · Views: 24
  • sb parts new and old.jpg
    sb parts new and old.jpg
    218.9 KB · Views: 22
Progress

Wow Paul,
it looks like you've been making alot of headway! havent been here much, ive been hanging out more on C-C.com, did you ever get the shifter set up completed??

Im not sure if ive asked before or if anyone else has, but would you be interested in selling the old dash pad from your car? id like to have one to turn in as a core when i get a new one. keep me posted!

Wally
:bravo:
 
[smilie=2:[smilie=f:

[IMG]http://moparnuts.com/forums/attachment.php?attachmentid=7780&d=1200355396[/IMG]

Us AZ types are not used to seeing that... you are a brave, brave man. Seriously tho good luck with it... it's gonna be WAY COOL!! :cool:
 
See that screw in front around the hole that is set off at an angle? Thats the angle the vent was hanging at when I looked up there... :doh:

I don't have much idea of the history of the car other than the guy I got it from had it in NY. The papers I found in the car said it belonged to a woman (her last name was... FERRARI!!!:huh:) in CT back in the early 80's. It had a CT college decal on the winshield that agreed with those papers. That's all I really know, other than the condition of the car leads me to belive it must have spent the majority of it's life in the salty/snowy/slushy New England area.:doubt:
 
Last edited:
Wow Paul,
it looks like you've been making alot of headway! havent been here much, ive been hanging out more on C-C.com, did you ever get the shifter set up completed??

Im not sure if ive asked before or if anyone else has, but would you be interested in selling the old dash pad from your car? id like to have one to turn in as a core when i get a new one. keep me posted!

Wally
:bravo:
Hey Wally, good to hear from ya! Yea, I've been cutting back on my online time in general so I haven't been around as much myself lately. This place is about all I ever check into anymore.

The shifter I made from parts of the two looks nice. I should be able to get it working smoothly with a little more work. The only thing I still need to work out is the stop detent hangs up when it is upshifted. I almost have it figured out. I probably have to polish the detent and remove any rough edges.

The old dash will be hanging around for a while so I can use it as a reference as to how I'll need to set up the FG one. After that I was planning on holding on to it for the parts car. It doesn't have a dash in it at all. If I decide to get rid of the parts car, I can get rid of the dash.
 
well, im glad all is well. things are good around here as well, bought a house so the dart is on hold. plans for the Challenger in the spring. good idea to have a complete dash for the other car, let me know if anything changes. otherwise, im sure i'll find a spare pad.
 
Yesterday after work I finished taking the rest of the old stuff off of the 318. The OEM non-roller timing chain had a LOT of stretch in it and would have started jumping teeth soon if I had kept using it. Given the condition of the chain, I was suprised to find that the nylon capped cam gear had only two teeth broken off and a few more were chipped. The solid crank gear still looked fine though.

I cleaned up the gasket surfaces and removed the grease and rust off the block as well. While I had the front of the block completely exposed I painted the areas I could finally reach on the front of the block and heads.

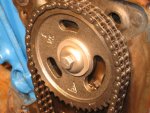
Next I wiped the new cam clean and applied the cam break-in lube to the lifter lobes and distributor gear. The rest of the cam got coated with oil. After stabbing the cam home I coated the lifter faces with the break-in lube, oiled up the outsides and then dropped them in their bores. The push rods got cleaned, oiled and checked for straightness before getting put back in place. I aligned the new double roller timing gear set straight up and set it in place (after a little wiggling to get it to mesh with the keyways).

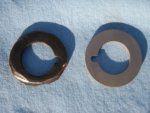
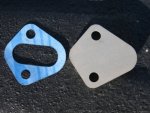
Since I don't plan on ever running a mechanical fuel pump anymore, I decided to modify the fuel pump cam lobe cup. I ground it down to remove the sides and part of the flat so it now resembles a thick washer with the small key cutout still in it. I'm not completely satisfied with how it turned out so I'm going to make one out of stainless steel on the waterjet at work Tuesday. I'll make a 1/4" thick aluminum fuel pump block off plate as well while I'm there.

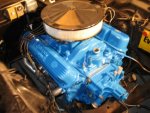
By this time it was getting cold enough for me to see my breath in the air and the rain was still coming down outside so I called it a day.Before I left, I had to toss the MP valve covers and the Weiand intake on the engine just to see what it looked like. I borrowed the air cleaner off the 511 to top it off and check for hood clearance. It looks like the top of the air cleaner is about level with th top of the hood. The T/A hood will allow me to run a 2"taller air filter with a regular flat base if I wanted to so it's all good there.

Pics will be posted later...
 
Cool keep it up Gomo!!!


BTW: How much for one of those fuel pump block offs? I mean if you want to make a second one...
 
I dunno? They're not expensive to buy, I'm just cheap when it comes to things that are that easy for me to make.
 
Today was a holiday so I had a bunch of time to work on the car today.

I finished cleaning the gasket surfaces up for the intake with a wire wheel in the drill. I had to cover the valley with a clean rag and plug the intake ports with some paper towels to keep the flying crud from getting where it didn't belong. Next I moved on to the valve cover gasket area. This time I used a razor blade though. I didn't have enopugh room to manouver the drill around to where I needed it. After carefully lifting the rag and paper towels out, I went over the whole area with the shop vac. I also used a flat screwdriver to scoop out the little bits that got stuck around the valves. I also pulled the distributor out and cleaned off the rear part of the block. The hold down bracket and bolt got sand blasted and painted.

The rockers got cleaned up next and then bolted back in place. They're only lightly bottomed out right now until I look up the torque specs for the bolts. I'll need to look up the torque specs for most of the rest of the stuff I still have to bolt back on anyway, so this is about all that I sort of bolted on today.

I tossed the intake and the valve covers in place so I could paint the part of the heads that weren't covered by the intake.

The valve covers came back off and I started cleaning them up by scraping, sanding and sand blasting until they were clean and smooth. This took most of the time I had today since I was trying to get them extremely smooth. I dusted them off and gave them a thick coat of paint. Since it was raining off and on today the humidity was very high. In order to keep the paint from going flat on me, I took the valve covers and set them on top of the halogen lights right after shooting them. The lights were hot enough to keep the moisture away and helped to dry the valve covers pretty quickly. They both ended up with a mirror finish so I was very happy with the way they came out.

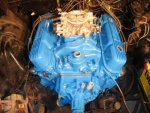
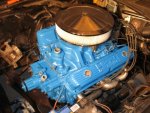
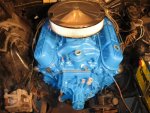
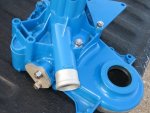
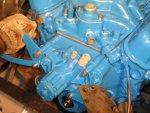
Lastly, I mocked up the engine to see what it will look like and also to help to keep some of the moisture in the air out of the block. The intake was still already sitting in place. So, I put the valve covers on, dropped in the new electronic dist and hung the timing cover and water pump in place with a few bolts. Then I took some pics for your viewing pleasure...;)

Let me kow if anyone needs any of this SB stuff that I took off. All I want for it is the cost of shipping plus the packing materials.
I have in good working condition:
- single plane 2bbl intake
- points dist with new points and condenser
- 2bbl carter carby with recent rebuild kit installed
- original valve covers (some dings)
- timing cover with timing marker
- 8 blade water pump
Maybe some other stuff too. Ask if you need anything.

The original cam had a unplanned meeting with the concrete floor so I wouldn't say it's useable anymore. The lifters went out with the cam so they're already gone. The timing set was toast so it got pitched out as well.

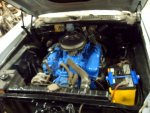
The first pic below is the way it looked before I started tearing it down. The rest of the pics are the way it looks right now.
 

Attachments

  • Engine compartment with fenders and hood on.jpg
    Engine compartment with fenders and hood on.jpg
    202.3 KB · Views: 34
  • sb final mock-up front carb.jpg
    sb final mock-up front carb.jpg
    236.8 KB · Views: 25
  • sb final mock-up left.jpg
    sb final mock-up left.jpg
    236.7 KB · Views: 159
  • sb final mock-up front.jpg
    sb final mock-up front.jpg
    231.2 KB · Views: 25
  • sb final mock-up right.jpg
    sb final mock-up right.jpg
    221.1 KB · Views: 29
Last edited:
I made some parts today so I was able to continue working on buttoning up the 318. Check out the first two pics below to see the results of my waterjet work. The cam washer I made to replace the fuel pump eccentric is 1/8" thick and the fuel pump block off is 1/4". Both are made out of stainless steel for long term durability.

While I was heading out to the storage unit I stopped off and picked up some stainless all-thread rod as well as a bunch of stainless washers and nuts. I started to replace the crusty original carbon steel fasteners on the front of the engine by making my own stud kit from the all-thread, nuts and washers. Since everything is just about new, or at least looking new, I didn't want to put the crap fasteners back on. Some of them were wrong for the application or close to breaking due to corrosion anyway. The next two pics are of the cam washer and the block off installed. Note the new studs holding the block off in place. This is how most of the rest of the engine will look. Some fasteners will still have to retain the standard bolt configuration like the intake bolts. Anyway, after a while fitting the pieces back in place I was able to get a lot of the studs made. The last pic is where it sits right now.

This mock up will have to come back apart at least a few more times before I'll have all the studs made. Plus I still need to clean up the alt, PS pump and it's remaining brackets. I'll also have to draw up a better lower alt slider bolt bracket. This one is too flat and hits the body of the alt except at the very end of the adjustment. I'm going to have to draw one up with a tighter radius. If I don't, there will be no way to adjust the alt belt. And since we don't have any carbon steel at work...:toot:

I'll need another piece of 3/8" all-thread rod before I can make the rest of the front studs. I have the stainless 5/16" and 1/4" all-thread rods, nuts and washers for the oil pan and valve covers already, so I'll work on those next time I get out to the shop.


I'm sure nobody want's to hear what the weather was like down here today. Let's just say I'm glad I didn't pack my shorts and t-shirts away for the winter. :p
 

Attachments

  • sb cam washer.jpg
    sb cam washer.jpg
    203.7 KB · Views: 21
  • sb fuel pump block off.jpg
    sb fuel pump block off.jpg
    213 KB · Views: 19
  • sb cam washer installed.jpg
    sb cam washer installed.jpg
    223.2 KB · Views: 17
  • sb fuel pump block off installed.jpg
    sb fuel pump block off installed.jpg
    242.2 KB · Views: 18
  • SB water pump and thermostat studs mocked up.jpg
    SB water pump and thermostat studs mocked up.jpg
    218.2 KB · Views: 20
I'm sure nobody want's to hear what the weather was like down here today. Let's just say I'm glad I didn't pack my shorts and t-shirts away for the winter. :p

*kicks gomo in the shins AND stomps on his toes*

Nice work, though! :bravo:
 
Hey, just a quick FYI: hardware-store stainless fasteners are insanely weak, including all-thread. As I recall, it's either Grade 2 or 3... so, you might want to measure your home-made fastener setup, and make sure you have replacement "ugly" bolts on hand just in case. Few things can ruin a road trip like premature departure of an alternator or power-steering pump. Sad to say, there's a reason ARP stainless bolts cost what they do.
 
All grade 5 stuff here including the intake bolts and nuts.;) At least thats whe they told me about the all-thread. The stainless intake bolts have the 3 lines on the heads so that sounds right.

BTW: The shop I get this stuff from is a small local company that is something between an auto parts store (Auto Zone, Napa, etc.) and a fastener company (Grainger, Fastenall, etc.).
 
Last edited:
Damn, I can't believe how nice that water jet stuff is. Awesome. :)

Yup, I really like that machine as well. It takes an average of 15 minutes to draw up a part, depending on complexity, and 2-3 minutes to cut it out. I can't set up a mill that quick, let alone cut the part out. The only downside is the surface finish on the faces is whatever the stock looks like. I prefer a milled finish but with these I just toss them in the sand blast cabinet for a minute to smooth it out. That way I can hide any pre-existing scratches. The sides where the waterjet cuts are usually fine unless the material is very thick (1"+) or the pressure starts dropping for some reason.

Ask XL or the 340 bro's what it looks like. They've gotten some of my handiwork already. BTW, can you guys (XL and 340 Bros) post some of those pics of those pieces I sent you? I think everyone's waited long enough to see what that old post was all about.:bwuhaha:
 
Y'all don't want to know what the weather was like down here today...:shifty:

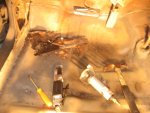
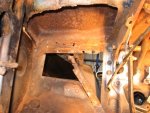
Suffice to say, it made me feel like tinkering with the car some more after work. So I switched gears again and got back to the rust issue. I decided to go after the worst area on the driver side. I tried to cut out the areas around the holes with an air body saw, but the metal was so thin it kept tearing. I eventually just ended up with a giant hole where there used to be a bunch of rusty little holes. :doh:At least I have access to inside the cowl area now without having to remove the entire top half of it.

I've been thinking of fitting a cage in the car and one of the things that I was looking at was the driver side vent was going to be in the way of the bar I wanted to run to the front rails. With the hole as big as it is, I should be able to move the vent over towards the steering column suport some. The front down bars are going to travel through the dash instead of in front of it like most cages. I basically want the cage to intrude into the car as little as possible. I'l look into getting it all measured up after I finish the rust repair and chassis mods.

Here's the pics of the carnage from today.[smilie=2:
 

Attachments

  • cowl and firewall scraps.jpg
    cowl and firewall scraps.jpg
    235.8 KB · Views: 25
  • cowl and firewall driver side cut out.jpg
    cowl and firewall driver side cut out.jpg
    227.4 KB · Views: 28

SiteLock

SiteLock
Back
Top