Rusty's not very quiet cuda progress

Since I have the new BIG cleaning discs coming soon I decided to keep the sand blasting to the places the 7" wheels wont go. It should it up the flat areas pretty quick.
2 rounds today all between the bottom frame rail & the primed metal, slow going but it was pretty nasty down there! 20211223_153216.jpg
 

Attachments

  • 20211223_120939.jpg
    20211223_120939.jpg
    5.4 MB · Views: 1
Tested out the 7" discs today, good thing I ordered the whole box blew thru 2 in a little over an hour, made a few clean spots & then just went around on the heavy parts to cut them down a bit, I think I have my winter project here! 20211226_152246.jpg20211226_152217.jpg20211226_150930.jpg
 
You may have already figured it out, Rusty, but the best way to get a longer life out of those discs is to not run them at high speeds.
I used to buy those and smaller ones by the case. Most of my "I-don't-care-I didn't-pay-for-them" employees liked to see how fast they could burn them down to the nubbins. Some of them set World Records, I'm sure. :(
 
I can't say what the rpm's are but mine has #'s, 6 is highest I run it around 4.
as you can see the one pad caught some of those rough transitions!
I did learn that on buffing, the hard way, burnt a few edges!
 
OK, I lowered to 3 & didn't see much difference in cutting so I went down to 2, still cutting good, so I left it there, now I can't say if the pads lasted longer but I guess my drill will be happy a while longer?

So yesterday when I came in I was covered in black sooty dust, I think worse than when I sandblasted, so today I put on my blasting face & started cleaning away!20211227_115635.jpg
Used up 2 more discs, showing a bit more metal, I went back a little with the torch to get some of the heavy undercoating I missed but ran out of gas before I got it all done, another trip to the supply house.20211227_143333.jpg
So looking at how much is left is depressing, so I got out the small drill & worked on the back foot pan, I wanted to at least have 1 lousy little piece I could call done!
might do a round of blasting if the weather is dry tomorro20211227_143351.jpg
 
Hard to say, it's all SLOW going, both play havoc with my carpel tunnel, even my christmas vacation didn't stop my right hand from waking me up in the am all numb & tingle!
 
Couldn't blast today all my floor tarps were wet, hung them up to dry & used the discs big & small till my arms fell off, I'm typing with my nose!
Will try again tomorrow?
seeing more clean metal but still a long way to go...........20211228_150312.jpg
About half the bottom edge & all of the top still to blast, it's nasty in there, here's one little spot...............20211228_150330.jpg
 
New order of 50 lbs of media arrived the other day so I worked with the new stuff today, I was going with the first 25lbs, trying to keep the other clean, but I shot it in about 20 mins, the cleanup takes longer, so on the second round I added the other 25 & shot for almost an hour, long day for me, got in a good 5 1/2 hours.
the worst is off top & bottom edges, still some areas I need a bit more but with snow coming I spent a little overtime moving everything in the garage & prepping the tent for snow.
I hope this works, I took all the tie downs off except 6, dropped the 4 corners, so the only place it can hold snow is the middle 6 or 7 feet, hoping that even if it's heavy the tie downs will pop before the frame gets bent!
Wish me luck on this gamble???

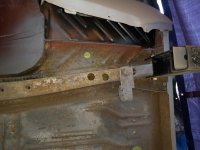
So if I can still get in there I'll work with the small drill a while , hit some of the little spots I missed & wait till I can rotate the car to the other side to wrap up the blasting.

At last I made a little progress!
20220106_152927.jpg
 
Tent made it thru the snow & then the wind ripped out 2 eyelets so I had to pull it down, will limit what outside work I can do.

Ventured out there today, went out early & started up the garage heaters, went back out about an hour later I may have added a degree!!!
I wire wheeled the door hinge bolts to get the last of the crud off & then cleaned up the rust area on the door, this is not gonna go easy. 20220112_131324.jpg

one patch with a little more tweaking might? work?
20220112_131338.jpg
Was trying to get that bend in one patch, I don't think I can message this into submission, there's just too many curves in too many directions
20220112_131353.jpg
Actually found a contour gauge in my stash, just not long enough to get that corner, think I might go with cardboard templates & a 3 or 4 piece e patch? 20220112_133057.jpg
 
do yourself a favor...pickup a "shrinker stretcher" from harbor frieght....worth every penny when your doing stuff like that...dont bother with the stupid stand tho..just get the 2 unit set
 
This is probably the last car I will ever do, will make do with what I have the money will go in the car itself, it will be harder & take longer but time is plentiful.

Got it pretty toasty out there today, started with my cardboard template, got lucky & my first curved cut was right on, then cut the metal & started the bending process ............20220113_132142.jpg
Started pounding errrrrrr I mean messaging it into shape.........
20220113_142117.jpg
A few more trims & it's getting close, now I have to fire up the air tools to cut out the old metal.

have no idea what I will do with the rest of the bad spots but it's a start.

Also lost the bottom edge of the fold, that is gonna be a problem!
20220113_144046.jpg
 
that turned out real nice, i suspect due to the curve, had you trye dto keep more of the edge you would have just ended up with huge gaps anyway
 
Nice work so far.
I've found with rust like that, the way you're doing it is easiest, unless you're a highly skilled fab guy with lots of expensive equipment. :)
A word of caution: when you're welding those pieces in, keep an eye out for "pulling" of the steel inward. Keep checking the outer skin with a long straightedge as you go.
I've seen guys do some beautiful looking patches, only to find that the door edges got pulled too far to do anything with, short of cutting and re-welding.
 
Looking at it I'm thinking of panel glue for that outside edge with the fold, after I fit the pieces, glue the whole edge & get the fold back over(if it doesn't fall off!!!) & then start spotting?
 
Looking at it I'm thinking of panel glue for that outside edge with the fold, after I fit the pieces, glue the whole edge & get the fold back over(if it doesn't fall off!!!) & then start spotting?
I wouldn't... I'd be willing to bet that the outer skin is pretty thin, and the edge is already split.
 
Oh crap, I did it already ( before I read this) & yes the skin is thin, I have a patch on the outside about 2 inches off the bottom & front edge, guess I'll see what I end up with tomorrow, not sure if I will work, the deep freeze is coming back?
 
Mixed results today, got the small patch tweaked to "close enough" 20220114_140940.jpg
Missed by quite a bit on the bends on the 2nd one, also the flaps were way short..........20220114_141425.jpg20220114_141434.jpg
Old metal or what's left of it cut out & failed patch flattened out to template the next try..........20220114_153730.jpg
Mucho bigger flaps! 20220114_152005.jpg
 

SiteLock

SiteLock
Back
Top