Rusty's not very quiet cuda progress

A little set back on the progress today, was planning to get the back of the doors ready for the seal coat so I could hit those when I did the spots I missed on the shell.
1st door I had stripped the whole back to do the rust repairs, I thought the other door was solid, was just going to rough up the old paint & shoot over!
What had showed..............20220511_151355.jpg
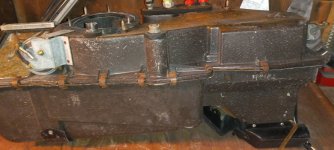
When I removed the lower door seal a nasty surprise was awaiting me! 20220511_151407 (1).jpg
Now I'm stripping most of it, it will set me back a few days!

Before that I did manage to finish the 180 sanding & went up to a round of 240, hoping I'll be at 400 & ready for paint after the next round.
 
spent the first few hours on the sidetrack door job, finished stripping it then painted the rust converter where I could in side, then poured some in & rolled the door around to try & get the back of the hole area & all the lower seams.
then I continued sanding with the 240 on the roof till I started hitting the black seal coat, almost all the guide coat is off, a few small spots where there's a little left I can't feel the dip when I run my hands over them, hoping the next round will be enough to get me to 400 ? dark spots are the black seal coat.............20220512_125106.jpg
here's one of the small lows............20220512_125154.jpg
Went back to the door & blobbed on the JB weld, will sand that out tomorrow, might need another coat I pulled out my hole saving punch to clean it off & moved the cardboard & the big part of the hole drooped in a bit?
 
Little detour this am, decided to get the lawn mowed before the rains come & it's a foot tall!
then I messed with the JB a bit more.
you can see the spots that sunk in when I moved my hole saving punch.20220512_183906.jpg
After sanding, looks like I got enough stuffed in under there to firm it up a little. 20220513_131914.jpg
Now this is a new one on me, never saw metal split like this before, there's one in about the same spot on the other end of the door but smaller20220513_131822.jpg
Other end JB'd20220513_131847.jpg
stuffed some paper in the screw holes & JB'd the bigger one & got another coat on the sunken holes20220513_144422.jpg
Sunday gets me the 48 hours for the converter to set but looks like rain, maybe Monday I can finish the seal coat?
 
So glad I didn't waste today, rain was forecast, when I went out the sky was pretty dark & cloudy, figured I'd at least get everything cleaned up. Within a half hour the sun was blasting with nice fluffy white clouds, I said to myself self, shoot the darn prime & hope it dries before it rains, well it never did rain & I got quite a bit done.
Seal coated all the spots I missed on the shell & did both doors.20220515_151749.jpg
cleaned the gun & mixed up some Hi build, got 2 coats on the roof & hit both ends of the doors where they will show.
ran some thinner through the gun & mixed up enough for one more coat, 3rd coat on the roof & shot the leftovers into the guts of the doors, surprised how much it actually was able to hit in there.
wasn't even half way down the roof when the first bugger got stuck! 20220515_135722.jpg
One more bug on the 3rd coat, good thing it's primer.
Put on the guide coat & the endless sanding will begin again tomorrow. 20220515_151719.jpg
 
I started with the worn down 240 grit to knock it down a bit, then switched to 360 & got everything pretty close cept on one C pillar. Have not broken through yet & will switch to 400 tomorrow & hope I get the rest of the guide coat out without breaking through.
go back a few pics to the last coat, looks about the same!

So my friend stopped by, agreed that I'm close, but he seems to think I have to go to 600 before I paint, on the other car I think I only went to 400, he thinks that will show.
what do you guys think?
 
Jass you out there, I'm going to be starting to order parts, the list will be long, would it be any benefit to you if I order through you, what the benefit for me would be is your knowledge of the parts business , I'd be sure to get the right parts & good brands.
 
OK senior moment, that reminded me I have to order the front fender soon, so I can mount it & that door I worked the bottom of to get the bodywork right.
which is better Goodmark or AMD for proper fit & quality?
I think both are around 599?
 
One long hard fought battle is over, now I can concentrate on the larger war. Finished off the roof in 400 & the top of the quarters.
Even put on my glasses for a close up inspection, all black is out & only a few tiny breakthroughs on the edges, I think there's enough left on there to go to 600 if I have to, that's still a question.
the bigger battle will now be to go over all the pieces I clear coated to hold last year with a round of 400 to get them ready for paint, Might shoot the bottom & the interior in between all this just to see some blue on it! 20220517_141512.jpg20220517_141601.jpg
 
was sanding down all the oversprays & scratching up the clear on the quarters, moved over to the doors & to get a break from sanding I decided to replace the nutsert for the rally mirror that was spinning.
to my surprise it just lifted out, wow this is going great, so I get the new one with the bolt(allen head) & nut they give you to compress it.20220519_131824.jpg
After nine walks back & forth to the garage I found a wrench I could some how get my arm in the door & hold the nut & an allen key set that gave me a little more leverage to tighten the darn thing.
it took a long time, 1/4 turn at a time, very hard to get any leverage. got it ALMOST tight, it was squeezed against the metal but could still spin when the bolt broke, now I'm not that strong & the position I was in would not even let me use what little I have left yet it broke! 20220519_122239.jpg
Did with the help of some of my small train bits manage to get a hole drilled in the shaft, then moved up to a bigger bit, of course it was to big for my smallest easy out & too small for the next one, ended up drilling the sert out!
That's what's left of the bolt stuck in the nut in the back.20220519_132017.jpg
So it looks like for one lousy sert I have to buy a 70$ tool!
amazon did save me 10 bucks off eastwood price plus shipping was free.
Although I did order my fender there, that's 200 shipping! nut sert tool.jpg

& how was your day!
 
was sanding down all the oversprays & scratching up the clear on the quarters, moved over to the doors & to get a break from sanding I decided to replace the nutsert for the rally mirror that was spinning.
to my surprise it just lifted out, wow this is going great, so I get the new one with the bolt(allen head) & nut they give you to compress it.View attachment 23836
After nine walks back & forth to the garage I found a wrench I could some how get my arm in the door & hold the nut & an allen key set that gave me a little more leverage to tighten the darn thing.
it took a long time, 1/4 turn at a time, very hard to get any leverage. got it ALMOST tight, it was squeezed against the metal but could still spin when the bolt broke, now I'm not that strong & the position I was in would not even let me use what little I have left yet it broke! View attachment 23837
Did with the help of some of my small train bits manage to get a hole drilled in the shaft, then moved up to a bigger bit, of course it was to big for my smallest easy out & too small for the next one, ended up drilling the sert out!
That's what's left of the bolt stuck in the nut in the back.View attachment 23838
So it looks like for one lousy sert I have to buy a 70$ tool!
amazon did save me 10 bucks off eastwood price plus shipping was free.
Although I did order my fender there, that's 200 shipping! View attachment 23839

& how was your day!
That bites.
I've had that happen more than once... frustrating.
The tool is much better. I had a Wurth nutsetter kit for years, paid for itself dozens of times over just in lack of frustration.
 
Besides the shear madness of buying a tool that will never be used again for one lousy nut.
maybe I'll try & ebay it after the mirrors are on, with my luck I'd sell it & have another strip on installation of the mirrors!
 
Any thoughts on grit to stop at before paint, think I did the other car in 400, looked good to me, my friend thinks I should go to 600 before paint?
 
Was taking a break from the sanding/car today but the tool arrived this AM, I do like amazon!
So after I did the lawn I actually read the instructions, first thing out of the box is a big orange warning not to use too much pressure on the small one you may break the stud!!!
So to be safe I used their shorter nutsert & did it little by little, then went to tighten up the 3 old ones & could not get it to thread in far enough, so I retapped all the threads & got one done, the other I had to play with the locking nut on the tool to get pressure on the sert, managed to get the last spinner without any new disasters!

Anybody want to by it cheaper then brandy new! 20220520_153018.jpg
 
Wow, that's almost buff-able!
Guess I'll find out how much primer is left on there.

So I get a notice from eastwood & I click in to see what's going on & what comes up but the smaller version of that tool for 40 something bucks, if it wasn't for bad timing I'd have no timing at all!
 
tore apart the heater box today, it had 1 broken stud in behind the heater core, the darn cores heat & A/C look pretty good no sign of any corrosion .
The stud is going to be interesting, it's welded to a plate & riveted to the box, I guess I could make a plate,weld a bolt to it & then grind the head down a bit(not sure if it would hit the core)
drilled out the plate.20220522_144340.jpg
have to come up with something to replace this? 20220522_145013.jpg20220522_145022.jpgThe box also has some cracks in it, what do you fix this with some kind of epoxy putty? 20220522_144359.jpg
 

Attachments

  • 20220522_132517.jpg
    20220522_132517.jpg
    3.2 MB · Views: 0
  • 20220522_144316.jpg
    20220522_144316.jpg
    3.6 MB · Views: 0
getting to the point I will have to start buying parts, starting with the heater box kit. bushings, bearings, floor plugs, brake lines, fuel lines & a million other odds & ends
where are some good places to buy , I did a lot off ebay last time, but that has changed, year one seems pricey, what good ones are out there?

detroit muscle (they seem to have a lot of the gaskets & plugs)
shocks, tie rods & bushings I can probably just hit a regular parts store?
will also need a new gas tank & sender.
 
busy couple of days in car land, yesterday I got everything ready to shoot the bottom & hit the door I did the metal repair with 3 coats of high build, 1st bug got me mid shoot, got him out before the second coat, this guy survived it was dry enough for him to walk around!
Do they like the smell of paint as much as I do?20220523_142146.jpg
Guide coat on back to endless sanding tomorrow.20220523_151553.jpg
Today was a painting marathon, shot the bottom with 2 coats of blue, looked good enough so I stopped there & got ready for 2 coats of clear. about 3 hours later I can now say..................

THERE BE SOME BLUE! 20220524_152200.jpg20220524_152215.jpg
Had enough extra to hit inside the cowl/fire wall area. 20220524_160605.jpg
 

SiteLock

SiteLock
Back
Top