You are using an out of date browser. It may not display this or other websites correctly.
You should upgrade or use an alternative browser.
You should upgrade or use an alternative browser.
Rusty's not very quiet cuda progress
- Thread starter mopar_man
- Start date
RUSTY Cuda
In over my head!
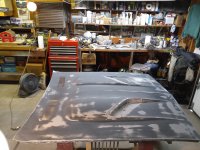
Been sanding on the hood for a couple of days now, started at 240 to get the worst off, did a little glazing putty on some lows I wasn't sure 2 more coats would fill ,then hit it with 360, started showing more gray but not hitting metal, trying to get this to working only 400 , so I got my glasses out, moved the quartz light around a bit, gave the whole thing a round of 400 & tried to get out any sanding scratches that looked deeper.
picked up another gal of gray primer & today at 50 something out I can get the garage nice & toasty to shoot it, should be back to one color (AGAIN!!!) in a few hours!
ignore the scoop backs, those will never be flat again!
picked up another gal of gray primer & today at 50 something out I can get the garage nice & toasty to shoot it, should be back to one color (AGAIN!!!) in a few hours!
ignore the scoop backs, those will never be flat again!

RUSTY Cuda
In over my head!
Sick of this dang hood, well I'm getting there my self, shot the 2 coats of high build & had some left in the gun, so I mixed enough for one more coat but added in some extra thinner to hopefully lay out a little smoother?
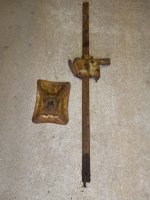
This time I'll wait till it sets up a bit before I shoot the guide coat, left the heat on will go out in an hour or two to shoot the guide coat, then tomorrow it's back to endless sanding. Went out to cover up the compressor & the ole jack caught my eye, now it wasn't exactly clean when I got it, but sitting outside for another 10 years didn't help, got the other car's looking like new, hope I can do that here too, this will keep me busy a while, hopefully just when the rotisserie arrives!
  From that to this I hope!
This time I'll wait till it sets up a bit before I shoot the guide coat, left the heat on will go out in an hour or two to shoot the guide coat, then tomorrow it's back to endless sanding.
 Went out to cover up the compressor & the ole jack caught my eye, now it wasn't exactly clean when I got it, but sitting outside for another 10 years didn't help, got the other car's looking like new, hope I can do that here too, this will keep me busy a while, hopefully just when the rotisserie arrives!
  From that to this I hope!
RUSTY Cuda
In over my head!
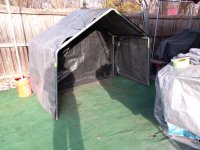
Finished off the sanding pretty quick today so I went out back & put together another blasting "tent" , a while back I cut off a bunch of the short pieces out of the bent long ones, then loaded a pickup truck full of tent & old rusty 'Cuda parts & took em to the dump, rather than leaving the piles out there to collect snow & get in my way.
Supposed to be nice tomorrow, if it doesn't rain I will get the jack & base blasted.
Also emptied out all the stuff I was leaving in the car, vacuum, lights, tools, it's a pain bringing everything out to work, but can't be spinning the car with all that on the floor, Now I have to rearrange the garage again to get it all up off the floor! It never ends!

RUSTY Cuda
In over my head!
Got a call from the trucker, the rotis is coming Tuesday & an email from the cuda buyer, the ship sails tues, big day in the ole classic car arena.
So I'm in another 1850, but they had the adapters for an ebody, so if all goes well the car will be a spinning by the end of next week.
So I'm in another 1850, but they had the adapters for an ebody, so if all goes well the car will be a spinning by the end of next week.
RUSTY Cuda
In over my head!
here's the shipping link , sitting in the port, it's gonna be cool watching the dot cross the pond!
AL SAFAT, Container Ship - Details and current position - IMO 9349497 MMSI 636017670 - VesselFinder
Hey 69.5 check out the name on the ship!
AL SAFAT, Container Ship - Details and current position - IMO 9349497 MMSI 636017670 - VesselFinder
Hey 69.5 check out the name on the ship!
RUSTY Cuda
In over my head!
No blasting today, with the chance of rain I couldn't take the chance, wet media is a no no!
But it did look like a blast went off in the garage, I had stuff strewn all over the place , decided to build another section of work bench / storage shelf. This ones 4 wide by 3 deep. I can work on bigger stuff here.
Tried to put stuff from the old A/C work back in the dead corner & the stuff I use more up front, now I still have a ton of sorting out to do, but the main objective will be to get the door glass hardware & roof trim stored somewhere to get the back bench cleaned off a bit.

RUSTY Cuda
In over my head!
Stretch
Hey! There’s no easy button for a body like this!
I love mine! Just remember to make sure its high enough to clear the sides and roof when you rotate it. Make sure to have help the first time you rotate it. Make sure its balanced well when you rotate it. It will roll with little effort when it is balanced correctly.
Also, I was amazed at how much the balanced changed on mine when I added the sub frame connectors. Then again when I added the spring relocation pockets.
If you need to rase the center of gravity remember to rase the car too. Rasing the cars center of gravity with it upright moves it closer to the floor when you rotate it upside down.
RUSTY Cuda
In over my head!
I had a tough time rotating the other one, if I ever get this together & the car on it hopefully I can figure out the center of gravity. I read the book today, they also have a video, so if I get stuck I can take a break & watch someone who knows what there doing build it!
RUSTY Cuda
In over my head!
It went together fairly well, one of the slip over pieces was bent I had to bash that out a tad, so I get it all kinda in place, I have to center everything to keep the balance. so I pull out the adapters I bought & hit a little snag, I have to call them to verify, but I think they sent 2 drivers side front adapters, the bolts are offset & i twisted & turned & stood on my head, all to no avail, just can't see any way for it to do the passenger side?


 ?
?
I would think the plate has to be opposite for the other side?


In the rear I have to get the bushings out of the spring mount to get that adapter, so I'll work on that while I wait for the other mount.
I'll mount the jacks when I'm ready to use it.


I would think the plate has to be opposite for the other side?


In the rear I have to get the bushings out of the spring mount to get that adapter, so I'll work on that while I wait for the other mount.
I'll mount the jacks when I'm ready to use it.

RUSTY Cuda
In over my head!
OK confirmed should be opposites, there supposed to call me to confirm shipment of the parts .
Just got the call they will UPS another whole set, & said keep the others, mann they just throw it away, cost more to handle than to make another piece?
More scrap metal for my town!
Just got the call they will UPS another whole set, & said keep the others, mann they just throw it away, cost more to handle than to make another piece?
More scrap metal for my town!
Last edited:
RUSTY Cuda
In over my head!
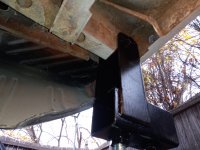
Got a little more prepared today, cleaned out & re-tapped & re-threaded the front bolts & nuts that are used for the adapter . In the back I removed the bushings, but now there's a humongous hole where the bolt goes................
But even if I could find a good sleeve the bracket itself (with the cross bar) doesn't look like It will go high enough to center??
Not sure what will happen there with 1000lbs or so hanging on it???


But even if I could find a good sleeve the bracket itself (with the cross bar) doesn't look like It will go high enough to center??
Not sure what will happen there with 1000lbs or so hanging on it???


RUSTY Cuda
In over my head!
It looks like it will be pretty close to the bottom of the whole, dang I just threw away on old garden hose that popped on me!
RUSTY Cuda
In over my head!
RUSTY Cuda
In over my head!
Fired up the wire wheel, I just got a couple of dewalt wheels, 1" & 3/4" , they are a ton better than the ones I got at the hardware store, I think those were 1/2" & started shedding wires almost instantly, the dewalt shot me a few times today but nothing like the cheaper ones.
Anyway there's some pitting on the parts but should be presentable when painted.
Have to order some por 15 gray for the base & the mechanism it came out great on the other car & is tough stuff!


Shot the shaft with eastwoods aluminum blast..............
Anyway there's some pitting on the parts but should be presentable when painted.
Have to order some por 15 gray for the base & the mechanism it came out great on the other car & is tough stuff!


Shot the shaft with eastwoods aluminum blast..............

RUSTY Cuda
In over my head!
Wow the Por 15 went through the roof, glad I'm not trying to do the whole car like last time, 40 bucks for a pint!!!!!


