Rusty's not very quiet cuda progress

Hey Doc before I start making you crazy I want you to know that I do appreciate your knowledge & input, I have learned a lot over the years!
It's not making me crazy a'tall. It's not my car. ;) I just hate to see so much work potentially being done in vain. I'm definitely impressed with your work in terms of making it look a ton better than it did. You rarely cease to amaze and are more than welcome to straighten panels on one of my projects should the opportunity ever present itself. Nice work indeed.

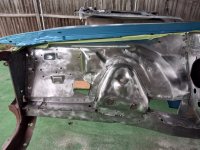
Now with that said, here's the mess I made, I have it to a point that I can live with, a friend was over & we did a lot of measuring & think frame rails & shock towers are in the correct positions, the inner fender definitely is NOT.
Starting up front she's back at least 3/4"...
Think being the operative word here. In my case, I wanted to know. I didn't want to figure out later that the car was bent and potentially "oil-can" (and hence shit-can) a $600 roof panel and $8,000+ worth of bodywork fixing a tweaked chassis... or find out the car dog-tracks.

It isn't possible to deform one part of a welded metal structure to such a degree without deforming other component parts of said structure. I could accept that the bending at the firewall would've been taken largely by the right-angle flange to which the inner fender is welded. However, it also ripped free of the shock tower and deformed itself between spot welds, which to me is much more worrisome.

I think this car was hit in a few places, I ran into some funky bends in the metal in the rear... tried my best to put em back to original positions when I was welding in the trunk floor patches & installing the new drop offs
That would've been my cue to have the car straightened before proceeding. It might've saved you a bunch of effort putting them to what you think are original positions. Multiple instances of collision damage introduce the possibility of a snowball effect on the finished car. Having a car "racked" is not terribly expensive; the shop that did mine usually charges around $600-$800. I had to provide the specs from the factory BSM due to the car's age. I got lucky and was charged less, but after seeing the results--again, I can't describe what changed but even Stretch remarked that the car "looks different"--I'd have paid $1,000. It's cheap peace of mind.

That lower gap at the inner fender/firewall joint would bother me every time I opened my hood, especially knowing I was only 56 spot welds from making it right when I had opportunity. I drilled more spot welds than that just on my drip rails, and more than three times that many for the entire roof job. Stretch and I did another 200 or so on the Valiant--a car I know was/is crashed hard and did not have straightened. It's a beater, intentionally so via the basement budget, and I simply don't care enough. I might if it's hard to align or drives wonkily.

I understand--I'm so sick of drilling spot welds and messing with W2 valvetrain I could vomit. Concerning the latter, only the thought of potentially destroying hundreds of dollars in virtually irreplaceable parts finally overcame the denial that I could make the first heads work. I'm now swapping out the heads for a factory-engineered, known-working solution--at great effort and expense. I know it's right, and any failure is on my basic mechanical skills rather than those as a wannabe engineer with a "it should be good enough" attitude.

It's your car, and as long as you're happy with it that's all that counts. If you are, then my picky ass is of no concern. 😁
 
You'd have to cortort quite a bit after everything is back in the car, I know the feeling every time I walk around the other car & spot another defect in the paint, my friend just says, your too hard on yourself, it's a back yard paint job & pretty darn good for your first, half the people that look at it won't even see most odf them, so chill out & forget about it!
 
If you have access to a FSM with chassis specs, a nice level floor, four axle stands (two adjustable if possible), a couple of lengths of straight 2" angle, and a good measuring tape, you can do just as good a job measuring the chassis as any modern collision shop.
It'll take longer, for sure, but I'd absolutely recommend it here.
Something just ain't right...
 
Hey Resto good to here from you, I guess I'll have to blow the dust off the old service manual , if the chassis stuff is even in there, we have cross measured the bay, shock tower to rad support & to the firewall, fire wall side hard to be sure if that's an even surface & between frame rails all the way back to where they start to angle apart , all that seems square & true.
 
youve actualy go a few options here

a solid trailer makes for a GREAT chassis checking rig assuming it doesnt flex, or..atleast doesnt flex much,, just get it level, the other option is to make a quick n dirty chassis dolley to get it moved to a level surface even if its just long enough to check the squareness, a couple 2x4s or 4x4's and some good HF or trailer wheels does wonders

the last option gets crude but is 100% workable, and that is you make a wood/steel platform thats "just" enough to take measurements from and jack stand off of, how you do it is up to you, when i shortened the milano chassis for the lloyd i had to make a floor rig to compensate for the uneven and unlevel floor of my shop, i did it out of simple 2x2x.065 square tube, and then placed whatever i had to under it to the floor(in your case dirt) to get it level

"if" you have an FSM the specs should be in it burried in the back

the thing about engine bay "tweaks" is the k member keeps everything moving "square" so it tends to offset the square in such a way that anything short of the FSM measurements will tend to show square but isnt always the case
 
Cross-measuring and side-to-side measuring is only half of the equation... and it can be rendered useless if enough slight damage distorts everything, as I think the case is here.
The absolute first step is ensuring both rockers are on an even keel , metaphorically-speaking. If they don't show as being on the same plane, you've can't go any further till they are. In unitized construction, the rockers are the basis for everything.

Then the front rails need to fall within factory spec, which can be a rather broad number compared to today's zero-tolerance machines.

A trailer is a great idea. Two lengths of I beam will also work, or some 8 x 8 posts that are true.
 
yeah theres really dozens of ways to do it, when i started researching back yard and garage ways to do it i came across the RR track jigs they use to stretch limos and just kinda ran away with a "light duty" solution
 
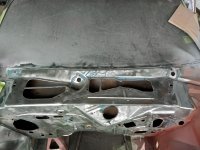
Add some fuel to the fire another tweaked spot, bottom of rad support drivers side.
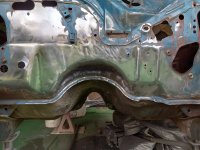
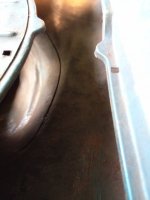
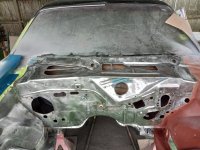
20210913_121250.jpgdid a little more cleanup, fire walls not too bad, couple of spots along that top seam will need some attention. 20210913_121414.jpgDon't see any more holes down in the cowl, fixed a few inside the cabin............20210913_121401.jpg
 
Got that support banged out pretty good & made a few more clean spots in the bay, another month or so & maybe I can climb out of there! 20210914_105432.jpg20210914_105332.jpgPut a coat of JB weld over the welded edges to try & make it less of an eye saw (sore) I'm gonna need a big brake booster to hide it!20210914_135716.jpg
 
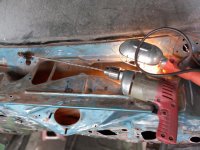
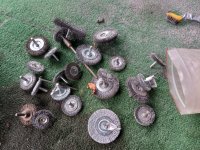
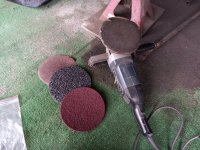
I hit whatever the 7' wheel can get with the eastwood (3M I think) abrasive wheels & the thin red wheels, use 4' abrasive (again 3m) wheels on the small drill, then it's wire wheels by the hundreds. even a couple of rube setups .
for the tight corners..............
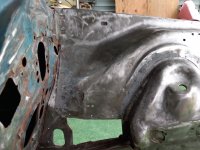
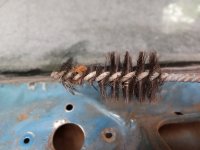
20210916_111117.jpgmade these out of old boiler cleaning brushes I had from the good old working days. cut em down & stuck em in the drill, I was trying to do some damage in the cowl. 20210916_115706.jpgBrush lasted about 10 mins.20210916_115713.jpgIt did get some of the loose stuff out, this is gonna be a royal pain in there! 20210916_124631.jpgGot the nasty inner fender primed.20210916_124654.jpgNow it really shows where I bashed it with the hand sledge to try & get it down & over, not sure if I'm gonna go nuts & try to get some of that out, at this point I want to finish the bay cleaning, might go back later.20210916_124725.jpgDidn't even try the nasty stripper here because I have the other side of everything primed. I really hate that mess even more than wire wheelin!
 
Here's the rest of the arsenal, the red ones don't do much.............. The 3m abrasive wheels are of course best when new with that nice sharp edge, but it doesn't last long, bout 7 bucks a pop too!20210916_144905.jpg
good ole wire wheels, the little ones cut the best..........20210916_144938.jpg& for those tight corners.......20210916_144924.jpgconnected up a few more clean areas!20210916_153451.jpg
 
Question here, I know I'll never get inside that cowl very clean, but I do want to flood it with something to slow down the rust, on the 73 I did por 15 in there, I have a quart of brush on rustolium primer, would that be good enough, or is there another product made for this ?
 
of ALL the rust proofing stuff out there..dont use rustolium..period

my current goto is "zero rust", its what most of he trailer manufacturers around here use, its tough and cheep, the other goto is "chassis saver", but youll want to spring for the more bigrig/"industrial" version not the "car" version as its thicker and tougher

ive got an eastwood wand tool for spraying into cavitys
im not sure my method is "right" but ive proven it to work

first pass ill use the wand to get in everywhere with 120psi of air running thru it till little to no crap comes out, next ill load it up with a thinner or acetone etc and hose it, this for me is to remove any oils and dirts possible, next pass i call my primer, ill take whatever coating im useing and thin it to the consistance of water and hose everything, the idea for me anyway is i want it to be able to seep into the tineys of nooks and crannys, and basicly coat everything till its running out of everywhere making a huge mess, after that sits for 24/48 hours ill go back and thin once again but just thin enough to spray thru the wand nicely , and once again ill coat everything

the proccess has proven to work for me atleast but i dont live in the rust belt either, but one of the cars i did does now and that car was finished over 20 years ago with it being my test bed for alot of refinement in how i do things and its driven almost daily..last i heard it was in kansas or oklahoma being well loved


oh and look on ebay for "roll lock" knockoff 3inch sanding discs, you can get an assload of em for CHEEP, they work better than a wire wheel imo...25 or so for 10$, ive seen huge assortment deals of 25 of each grit 75 total with the arbors for 25$ shipped, they also make a mini 1inch? version thats great for tight spots
 
Last edited:
Bad timing, I've got everything I stripped coated coated with rustolium rusty metal primer!
I bought the undercoat gun, used that to get in the rockers & frame rails on the other car, again with por15.
did these rockers with thinned rustolium & did get it to drip out of every crack on the bottom, & after making sure the drain slots were clear.
I'll go check out those discs, anything that makes stripping easier works for me!
I'll look up the rust stuff too, but I do not want undercoating, my bottom will be painted car color!
 
eh, i did my ramcharger in the rustolium shit and its never seen the road since doing it and EVERY bit of it is chalky and or lifting...i stripped that bastard clean enough to eat off of, and alot of the rustolium was then coated with bedliner...which the rustolium is lifting UNDER...maybe in those 10+ years they have improved..or maybe i got it too clean?

im with you 110% on zero undercoating, imo the only place it makes sense is wheel wells where rocks WILL get flung, and even then id do like a tinted undercoating or paintoverable undercoating

the "zero rust" is sold at every single steel yard and trailer supply house around here, its basicly sworn on as the goto, its also IDEAL for painting things like the back sides of bumpers, where you just need a coating that wont be seen i also like it for inside roof's and doors, you can thin it to your hearts content and still end up with something crazy , and even in full sun it puts up a solid fight, its also got some fancy salt spray rating too..typical in stock colors is primer red, semi gloss black and white, tho ive seen fire red bright yellow and bright orange and high gloss black, i think those are more special order?
 
Well I figure I have about 2 years before I paint the car, but I've already shot primer/sealer over it & actually painted the back of a few parts, so the test is on, I hope I don't have to strip this whole car again!
 
So today I used my last 7" abrasive wheel. was well worth it even at 25 bucks a pop, got as much as it could on the other inner & the fire wall in about a half hour20210917_121031.jpg20210917_123241.jpg20210917_123248.jpgThen I put on my last 4" & got whatever that could reach, almost there.20210917_144934.jpg20210917_144943.jpgOrdering a bunch more wheels & 50lbs of media for the blaster, I'm definatly going to use it in the cowl, trying to figure a way to used it on all these little corners but in such an open area my town will be covered in media, gonna play with some drop cloths & tarps tomorrow & see if it's possible, I have about 30 or so lbs left after doing the interior?
Gotta pull the fender to get to the top of the inner, but that should go quick, mostly flat & the 7" can be used on it.
 
goto home depot/lowes
grab some pvc pipe and couplers, get a handfull of t's and 90s i "think" last time i did it i used 1inch tho 1.5 works better on bigger projects ,
DO NOT GLUE ANYTHING, get a roll of the thickest CLEAR plastic you can
and grab a roll or 2 of "real" duct tape, you know the stuff that sticks so well that if you goto rip it with your teeth and it sticks to your lip it rips a layer of skin off?

build yourself a mini paint booth so to speak, just around the area you want to blast

this will save your media so you can continualy re-use it, but with some good cleaning can also be used to paint booth for primer etc, the reason to not glue anything is then you can change shapes and such for working with various sections of the car....ive got the remains of paint boothing an entire "short bus" and can tell you it works VERY well, bonus points if you can raise the sides of the base enough so that your media pools in the middle so you can just re-use on the fly..but i never found a good way to do that unless your blasting a door or fender
 

SiteLock

SiteLock
Back
Top