Rusty's not very quiet cuda progress

Ok so this time maybe I invited the murph :doh: anyway, dragged out an old trunk seal to make the flange for the rubber seal, all I had left was half of one(off two floor sections, never found the one off the 73) anyway, trace it out, cut it up, bend it,paint it & go out & get the tank ready, sender & grommet go in without any incidents :) slide my flange & the floor seal over the filler tube & put the tank in, screw down the neck & go to fasten the floor seal & there's a gop at the top, ok maybe I have it front to back, well I turn it around in there(no easy task) & realize this rubber is pretty stiff, take a close look & there seems to be metal reinforecment under the rubber:huh: , anyway i'll be damned if I'm gonna take everything apart again & waste my home made flange, so in it goes!:shifty:
 

Attachments

  • 450 mark out flange_1994.jpg
    450 mark out flange_1994.jpg
    59.2 KB · Views: 11
  • 450 flange bent_1991.jpg
    450 flange bent_1991.jpg
    46.9 KB · Views: 12
  • 450 flange installed_1989.jpg
    450 flange installed_1989.jpg
    51 KB · Views: 14
& the tortion bars were also on the list for today, one fought me, the other slid right in, new booties & clips put to good use! :D Rich.
 

Attachments

  • 450 t bars in_1985.jpg
    450 t bars in_1985.jpg
    56.8 KB · Views: 16
Threw out at least 4 (empty :toot: ) boxes, rebagged & remarked everything in the garage, eng to trans bolts never did turn up, but my mechanic hooked me up so thats done, my attempt the steering couple kit next! then she'll be ready to roll(well if I push real hard.............on the bumper :shifty: )
A tad cleaner on this side!
 

Attachments

  • 450 consoladated & remarked whats left_1982.jpg
    450 consoladated & remarked whats left_1982.jpg
    43.4 KB · Views: 17
RUSTY Cuda said:
try to avoid the "HUNTS" for missing stuff in the future:doh:

Rusty, trust me, THAT will NEVER happen! I've been at this gig for a long time, and believe me when I say the hunt for missing stuff is part and parcel of any car related stuff. :)
 
:shifty: My house looks more like a Charger than my Charger does.

I wish I had read this about 5 years ago:

"I did alot of planning before I started my restoration. Because it's my first, I wanted to do it right.

First.....do not underestimate how much space a disassembled car takes up. I equipped my garage with tons of storage space.....not even close. Had to build huge shelving units in our basement....honestly looks like the back of a parts store. Can't say the Wife was pleased.

Every cabinet, shelf and storage area was given a code....that code is key to finding the part again. If you asked me where such n such part was I'd have no idea, until I opened up my laptop with my project plan on there and it tells me exactly where every piece is.

Digital camera is a must....one that takes video is a bonus.

As I took off each part that part was assigned a Task Number....for each "Task" I tracked if it was off the car, where it was stored, what needed to be done, what parts are needed, are they ordered, were they received and general notes on the task at hand. I take literally thousands of pictures. And I file them by the same task number. Thus if I'm looking at Task 245 and I want to look at the pictures I look under Task 245 in my pictures directory. KEEP BACKUPS!!!!

I took the approach of working each Task to completion before moving on...meaning I take something off, restore it or replace it before moving on. Eventually you get more comfortable and you end up multi-tasking.

Take it one step at a time. Most resto attempts fail, in my opinion, because they are so disorganized that it becomes a nightmare and they lose interest. "

I cut that from a post by Dodge Don over on dodgecharger.com
That's another Canadian guy doing a Charger resto - a 1970.


Way to plug away at it Rusty. I bet it feels good tossing those empty boxes.
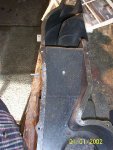
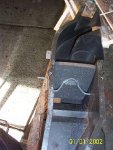
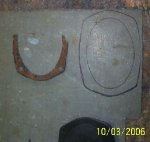
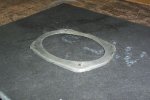
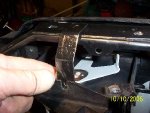
 
Got the heater benzel touched up & painted the speaker cover, plain ople flat black, looks ....... o......k..........?
 

Attachments

  • 450 touched up heater cont_2002.jpg
    450 touched up heater cont_2002.jpg
    40 KB · Views: 12
  • 450 speaker grille be black now_2001.jpg
    450 speaker grille be black now_2001.jpg
    38.8 KB · Views: 11
Last edited:
Got the dash back together AGAIN, got some armour all on that flat black while cleaning the plastic trim pieces, almost matches the dash :)
As for the mess left hanging out the back, [smilie=2: a job for a later date!
 

Attachments

  • 450 front of dash_1997.jpg
    450 front of dash_1997.jpg
    36.6 KB · Views: 16
  • 450 rear spagetti_2000.jpg
    450 rear spagetti_2000.jpg
    46.1 KB · Views: 16
Anyone know if this is the correct spot for the heater brace?
 

Attachments

  • 450 right place for brace_1998.jpg
    450 right place for brace_1998.jpg
    36.2 KB · Views: 16
Recognize the one knob custom operation do ya!:shifty:
I did get a set, i think there in the basement, anyway any chance of me getting a pic of my engine compartment with an un burned connector on the eng harness??????[smilie=f:
 
short time for the car today, but I got a bit done, steering column is in!
 

Attachments

  • 450 steering column _2007.jpg
    450 steering column _2007.jpg
    43.9 KB · Views: 17
Acorse I beat the piss outta the new coupler seal, nothin ever goes 10 percent:rolleyes: 
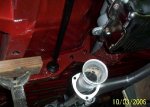
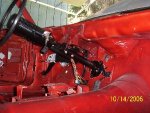
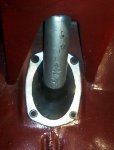
but it's in ,guess I'll deal with that later!
 

Attachments

  • 450 vent  e brake & column_2006.jpg
    450 vent e brake & column_2006.jpg
    50.3 KB · Views: 15
so by the time I chased all the nuts & bolts, all else I could put on was the e-brake pedal assembly. now I'm in a panic, can't turn the friggen wheels, :wtf: was about to get the pry bar & sledge hammer out [smilie=i: instead the brain freeze thawed & I went in the house & got the keys to unlock the friggen column!!!!!!!!!!:eek:

anyone know what these two studs on the top of the brace are for, looks like a nasty place to try & get to later? :huh: Rich.
 

Attachments

  • 450 studs on column mount_2004.jpg
    450 studs on column mount_2004.jpg
    49.8 KB · Views: 18
Not too far from Nodda as far as sitting in the car making all the vroom vroom noises!! :bravo: Keep it up man!! Looks good!!
 
Got the last piece needed to complete the heater box, along with some new splash shields, LL baseball championship game rained out, so the hours were spent rebuilding the box!
 

Attachments

  • 450 new goodies, splash shields & heater box cardboard_2021.jpg
    450 new goodies, splash shields & heater box cardboard_2021.jpg
    32.6 KB · Views: 9
hope I gopt this in right:huh:
 

Attachments

  • 450  hope this is in the right spot_2016.jpg
    450 hope this is in the right spot_2016.jpg
    46.4 KB · Views: 11
  • 450 praying I got this right_2018.jpg
    450 praying I got this right_2018.jpg
    44.5 KB · Views: 10

SiteLock

SiteLock
Back
Top