You are using an out of date browser. It may not display this or other websites correctly.
You should upgrade or use an alternative browser.
You should upgrade or use an alternative browser.
Rusty's not very quiet cuda progress
- Thread starter mopar_man
- Start date
RUSTY Cuda
In over my head!
RUSTY Cuda
In over my head!
Throw some of those bounce or downy dryer sheets around, mice hate 'em. Get the poison out before you start seeing them. Make sure they have water too, helps 'em digest dinner. If you set them up early you won't have dick around with 'em all season.:2thumbs: Poor mouses.
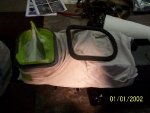
Cool you can get the bits and pieces for heater box.
Cool you can get the bits and pieces for heater box.
RUSTY Cuda
In over my head!
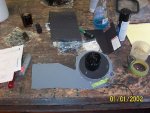
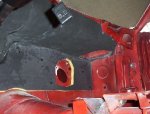
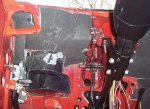
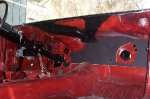
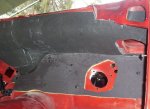
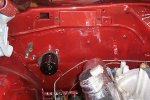
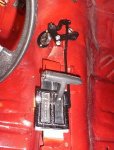
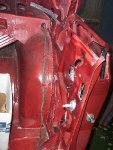
K finally got the fire wall pads mounted, had to drill out 3 holes for the pins in "new metal" areas, that & getting the what I thought was done heater box done shot the few hours I had yesterday.
Spent most of today insulating the cowl, cut up my 1/2" duct liner & glued that on, had to piece in some of the angles, but I won't dis the job it aint pretty but it's functional!:shifty:
Spent most of today insulating the cowl, cut up my 1/2" duct liner & glued that on, had to piece in some of the angles, but I won't dis the job it aint pretty but it's functional!:shifty:
Attachments
RUSTY Cuda
In over my head!

RUSTY Cuda
In over my head!
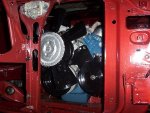
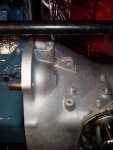
well didn't get anywhere near what I wanted to done, but some progress was made! decided to get the starter first, I did acually get up early, of course none in stock, be in tues, but I got some fuel line, a filter & a box a clamps. My fuel lines, dip stick & tranny dip stick should also be in this week! when I got home from nappa there was a no heat call, so it's 11am before I actually get out to the car! :huh: So after the tapping & chasing of the threads a few pieces went on the eng.
Attachments
RUSTY Cuda
In over my head!
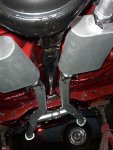
Got the drive shaft in & then had a 3pm walk through with a cust  buy the time I get home I'm racing to tighten the last few bolts:gaga: my steak is gettin cold :doh: by the time I wolf that down it's gettin friggen dark:wtf: I hate daylight savings time, much rather go to work in the dark then come home in it! pop a few picks tarp it up for the night!
:hmmm: Maybe the rain will hold off till late tomorrow so I can get a little more done:huh: Rich.
buy the time I get home I'm racing to tighten the last few bolts:gaga: my steak is gettin cold :doh: by the time I wolf that down it's gettin friggen dark:wtf: I hate daylight savings time, much rather go to work in the dark then come home in it! pop a few picks tarp it up for the night! :hmmm: Maybe the rain will hold off till late tomorrow so I can get a little more done:huh: Rich.
Attachments
RUSTY Cuda
In over my head!
RUSTY Cuda
In over my head!
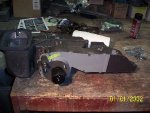
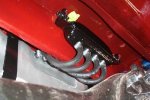
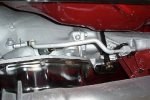
was gonna put on the right side header, but that will be a fight , so I moved on the the trans linkage, got the top in, just not sure about the front spring, looks to go there in the manuel, but hangs on an angle???
Attachments

RUSTY Cuda
In over my head!
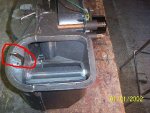
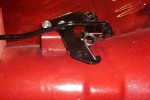
Got my new switch in & hooked up the lower linkage, this seems ok, now I got 4 bolts left over, the ones I originally used to bolt the trans to motor, but they came from a bag marked linkage, they do match up to where the inspection cover goes, but the car had none!
Attachments

RUSTY Cuda
In over my head!
RUSTY Cuda
In over my head!
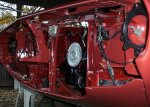
strung some wires from front to back & the front light harness, do the seat belt wires come out the drivers side between the two fold over flaps(starting at the emergency brake corner? )anyway, thats about as far as I got today! Rich.
Rich.
Rich.Attachments
Lifting points?
lookin awesome, Rusty!
lookin awesome, Rusty!
greg340 "GREGGLES"
sleeping in a vat of jello
thats lookin real good. I still have to get that harness to ya
RUSTY Cuda
In over my head!
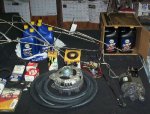
Might be gettin a little crazy here, but lookin at what I bought & ordered today I'm not too far from firing this baby up:huh:
Greg 340 commin over for a "car" day mon or tues, so I'm getting as much stuff ready as I can! might be jumpin the gun here, but as I put the stuff in & see whats missing or not ready I'll have a better idea!:dgt:
Right now I'm :giggedy: ,hope it don't turn too [smilie=l: Rich.
Greg 340 commin over for a "car" day mon or tues, so I'm getting as much stuff ready as I can! might be jumpin the gun here, but as I put the stuff in & see whats missing or not ready I'll have a better idea!:dgt:
Right now I'm :giggedy: ,hope it don't turn too [smilie=l: Rich.
Attachments
gomopar440
Livin' my life...one gas station at a time.
Here's a tip for you on the mini starter. You can ditch that black plastic blocky thing on the wire terminals. It will help get the starter wires further away from the exhaust if you do that. The wires would have been touching the Heddman Shortys on the 318 If I hadnt done that. I also rerouted the wires so they came to the starter terminal posts from the firewall to keep them even further away from the hot exhaust. You'r exhaust may require something different though depending what you use.
That blocky thingy serves no useful purpose that I can think of.:huh:
That blocky thingy serves no useful purpose that I can think of.:huh: