You are using an out of date browser. It may not display this or other websites correctly.
You should upgrade or use an alternative browser.
You should upgrade or use an alternative browser.
Rusty's not very quiet cuda progress
- Thread starter mopar_man
- Start date
RUSTY Cuda
In over my head!
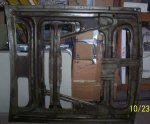
Paint stripper didn't work to good on the rough surface so the wire wheels came out again, remembered I had some coil cleaner(for my alum a/c coils) so I tried that on it, full strength even loosened up the paint, maybe a layer of aluminum too[smilie=2: a guick round with the wire wheel & a couple of 80 grit tapers for the tight spots & she's almost ready for paint!
Silver would be close enough right???(I have some laying around!)") Rich.
Rich.
Silver would be close enough right???(I have some laying around!)
Rich.Attachments
Robertson_Tech
Dopameans and SodaPals proud dad.
RUSTY Cuda said:Paint stripper didn't work to good on the rough surface so the wire wheels came out again, remembered I had some coil cleaner(for my alum a/c coils) so I tried that on it, full strength even loosened up the paint, maybe a layer of aluminum too[smilie=2: a guick round with the wire wheel & a couple of 80 grit tapers for the tight spots & she's almost ready for paint!
Silver would be close enough right???(I have some laying around!)
I eather leave alone or shoot with Al and clear coat but sliver should look good.
Da-ho
not even
Best wishes from this way, if its got the right pan AND a windage tray dump it in.:helpme:RUSTY Cuda said:She was running when I got her, had good oil pressure ,drove it around the yard to move it once in a while before I started rippin into her, sounded solid, a little smoke but it had been sitting for years, haven't done the compression test yet, but she's going back in as is & I'm getting out the rosary beads! Rich.
68R/T
I got drunk and swallowed my teeth, now
RUSTY Cuda said:.... a little smoke ....
Might be a good idea to throw in some new valve seals while it's outa the car...:hmmm:
")
RUSTY Cuda
In over my head!
The oil pan has to come off, its half rust & half chrome, gonna strip it & paint it eng color, so I'll check for the tray at that point!
Whats a valve seal, I could look it up but that would imply that I know where to look!
Would they fork up just from sitting around, there supposed to be worked, hardened seats, 3 angle job, chit like that, I have the list somewhere?
Yea I'm a motor head, they just left out the motor part!
"pit bull" It's been a war, I think I lost already, but I'm gonna finish it anyway!:wtf: Rich.
68R/T
I got drunk and swallowed my teeth, now
RUSTY Cuda said:Whats a valve seal,
Umbrella shaped seal that goes around the valve "stem", under the springs.
There are different quality of seals available, the cheaper ones, (neopreme) are known to harden and crack after only a couple years time.
Even the most expensive aren't more than $1 each.
Not difficult to change but time consuming.

Robertson_Tech
Dopameans and SodaPals proud dad.
RUSTY Cuda said:Would they fork up just from sitting around, .
They sure will best way is to use a valve spring tool that will work with heads still on remove spring and replace seal.. The ( better) seals need to have machine work done to install and can be a PITA just use stock.. I pulled valve covers of a 440 that had sat it did not have duel springs and I thought the seals looked OK well a few hundred miles later I am pulling little chunks of broken rubber out of pan... It started to smoke when throttle closed.
Da-ho
not even
I ended up long blocking a 5.2 last yr for a guy that bought a salvage motor that went through a fire. The valve seals had gotten hot and crumbled up and got washed down into the pan and plugged the pickup screen. Thats all it takes to lose oil pressure and ruin a good motor.:dgt:
RUSTY Cuda
In over my head!
[smilie=2: Hmmmmmm I guess i get the point, new valve seals go on the list, guess thats why I'm an a/c tech & not an auto mechanic! Rich.
Rich.RUSTY Cuda
In over my head!
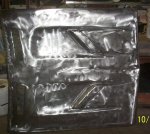
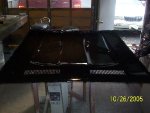
A tad dissapointed in the results , not so much the product but in my failure to concoct a system to make it work, seemed to work well the first day or 2 as I moved the tubing around the areas it flowed on got clean, the last few days it didn't do squat, I guess if I bought 20 or 30 gals more it would be done, but for that price I could have dipped & ecoated the darn thing!
Got bout 5 gals out of the tank when done do I dropped in a few small parts to see if it has any life left, I think I just had too much area(rust) for the 10 gals I bought!
Got bout 5 gals out of the tank when done do I dropped in a few small parts to see if it has any life left, I think I just had too much area(rust) for the 10 gals I bought!
Attachments
RUSTY Cuda
In over my head!
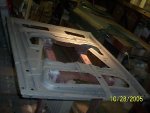
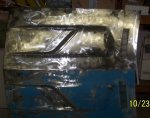
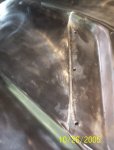
The skin was a bit easier, put the pinch lip in first so that came out pretty clean, the rest I went over the flat areas with the 7" cleaning disc & the back is about ready for rust proofing, just gotta work the weld lines(folds) wth the wire wheel!
underside!
underside!
Attachments
RUSTY Cuda
In over my head!
Robertson_Tech
Dopameans and SodaPals proud dad.
Scoops replaceable? Or removeable?
RUSTY Cuda
In over my head!
I wish!!!!!! It's the hood itself where the inserts mount, got some time today, so I'll go out & play, ordered the por 15 & some eng paint last night, so hopefully but the end of next weekend it will be rustproofed & ready for body work!
RUSTY Cuda
In over my head!
RUSTY Cuda
In over my head!
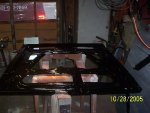
Got the rest of the top stripped, worked the dents up front a bit more & etched & por15 the underside, the frame was dropped at the sandblasters today, should be ready for the weekend, so I'll be huffin a bit more por15!
Attachments

RUSTY Cuda
In over my head!
Well I finally did something the easy way, (paid someone else to do it!) :dgt:
Got the frame back today, nice, only 2 pinholes came through & the pitting wasn't bad. She's por 15'd on the side that faces the hood, hopefully a coat on the other side tomorrow & I can put it back together & start the blockin process AGAIN!
Got the frame back today, nice, only 2 pinholes came through & the pitting wasn't bad. She's por 15'd on the side that faces the hood, hopefully a coat on the other side tomorrow & I can put it back together & start the blockin process AGAIN!