You are using an out of date browser. It may not display this or other websites correctly.
You should upgrade or use an alternative browser.
You should upgrade or use an alternative browser.
Rusty's not very quiet cuda progress
- Thread starter mopar_man
- Start date
RUSTY Cuda
In over my head!
I only wish, still got tons a body work to do& I seem to keep adding to that(chips & scratches) but I can't clear in the yard so it's going together first! still got a year or two(nothing on the interior is ready) before I can drive it to a paint booth but It does feel good putting stuff on!
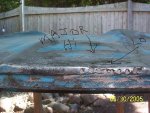
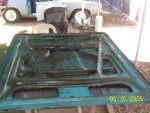
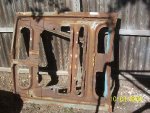
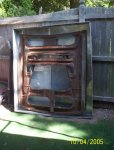
Now, with that said I finally got up the guts to start strippin the back up hood to see what I have there!
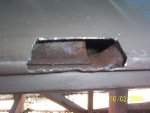
The main damage first! old fashioned dent puller, so I got some weldin to do, worst rust was around the scoops, pass side should clean up ok, got three holes on the drivers side so far! (still more rust to get off???)
Now, with that said I finally got up the guts to start strippin the back up hood to see what I have there!
The main damage first! old fashioned dent puller, so I got some weldin to do, worst rust was around the scoops, pass side should clean up ok, got three holes on the drivers side so far! (still more rust to get off???)
Attachments
RUSTY Cuda
In over my head!
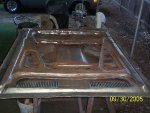
Borrowed C'mans stud gun & slide hammer & had at it, got if fairly close, the pass side "ridge" tapped down nicely, might cut up the old hood for the scoop area, gonna skin it (or de skin?) & see if it can be saved, if not, parts for the backup! I do have a third hood, some good skin(was bought to rescoop the 74's hood) so other patch options there!
Attachments
RUSTY Cuda
In over my head!
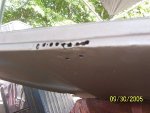
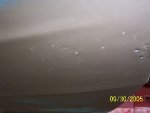
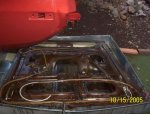
I think I have to weld up those holes, might be too much to lead, since my welders at the C'mans I decided to flip it over & see whats back there before I get too happy!
Well so far no holes, a bunch of slightly pitted areas & a ton more cleaning up to do!:dgt:
I thought I was done with this crap(at least on big body panels! )
)
Stripper! RUST removal! :wtf: Rich.
Well so far no holes, a bunch of slightly pitted areas & a ton more cleaning up to do!:dgt:
I thought I was done with this crap(at least on big body panels!
)Stripper! RUST removal! :wtf: Rich.
Attachments
divingtigger
Well-known member
Looks like yours will be finishing just in time for mine to begin. Looking good, I only hope that mine looks half as nice as your does when I'm at that stage. Where did you get the tent and for how much?? Saw them at Costco awhile back but of course when I want one they are sold out for the year
RUSTY Cuda
In over my head!
I think it was max tool, one of those catalogs, think 250-300ish with shipping??? I could dig out the reciept if ya need ? Rich.
RUSTY Cuda
In over my head!
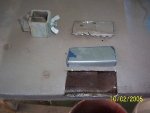
Did a little more cleaning on the backup hood & decided to deskin the old hood & see what the final disposition will be! Well to keep it simple here I will just say all i could save was the scoop areas, which is what I really needed anyway!
Attachments
divingtigger
Well-known member
Thanks I'll look them up. Costco actually had one yesterday but it was too wide for where I'm planning to put it and it had a wood frame. I would much rather have a metal frame like yours. Don't bother on the receipt, I'm sure I can find their website.
RUSTY Cuda
In over my head!
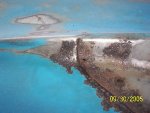
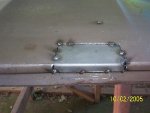
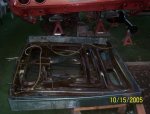
Started on the easy (is anything easy?) patch first, gave me a good look inside, this hood WILL be de-skinned, thinkin bout makin a dip box a my own & using that "safe" rust remover?
Attachments
RUSTY Cuda
In over my head!
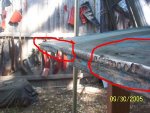
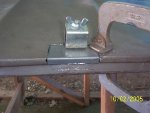
Spotted & then ground out, I have a feling the scoop area is gonna give me fits!
Might need a little more weldin on the bottom edge, when I flip iot for the de-skin I'll touch up if needed! Rich.
Might need a little more weldin on the bottom edge, when I flip iot for the de-skin I'll touch up if needed! Rich.
Attachments
RUSTY Cuda
In over my head!
RUSTY Cuda
In over my head!
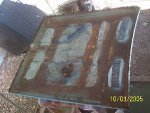
Made the "tank" today, but have not soldered the center seam yet, may be a little problem with quantity of liquid needed, gotta get it down to 5 or 6 gallons, the estimate bob 69bee came up with is 62 gals(without hood in for 4" deep) well at 30somethin a gal + shipping, full aint gonna happen, have a little transfer pump, maybe I can rig up somethin to just keep it wet???
But this has been more fun than wire wheelin! :dance:
But this has been more fun than wire wheelin! :dance:
Attachments
RUSTY Cuda
In over my head!
Rusty's domaflatchie shop can't open till next week, called the place & can't pick up the rust stuff, so I ordered 10 gals,shipping came out to a little less than the gas for my truck, but the stuff would be soaking now! :doubt:
Guess I'll get on soldering that seam on the tank & have it ready for the rust remover, then I will go about rigging up some kind of circulation system!
That shoud be a project to delight even the Murf! [smilie=2: Rich.
Guess I'll get on soldering that seam on the tank & have it ready for the rust remover, then I will go about rigging up some kind of circulation system!
That shoud be a project to delight even the Murf! [smilie=2: Rich.
RUSTY Cuda
In over my head!
The shop is open! Rube & me (goldberg that is) spent the day jury riggin stuff, a few minor flaws in the plan!
First, 5 gals didn't even put a 1/4" into the tank, then I found a little leak in my seam:doubt: , so the idea of buying 30 or so gals of this liquid gold didn't thrill me, so I angle the tank, get a nice puddle along one side & procede to set up a pumping system!
drill out the bottom of a condensate pump I had with a bad float, got out some 3/8's tubing & made some holes in it!
Attachments
RUSTY Cuda
In over my head!
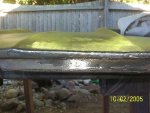
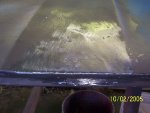
So I drag the stuff out back & realize theres no room in the tank(which I made close to the size of the hood to keep the fluid level as low as possible) so I turn the hood the other way, hangs over a bit on top, but the pump now fits on the side, & jury rigged up some clamps to try & spread the flow!
This is gonna take a long time, at least a few hours in each spot, turning the hood a few times, maybe in a week or 2 the rust will be gone!
This is gonna take a long time, at least a few hours in each spot, turning the hood a few times, maybe in a week or 2 the rust will be gone!
Attachments
RUSTY Cuda
In over my head!
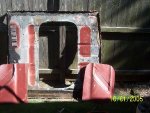
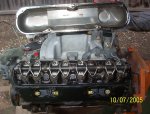
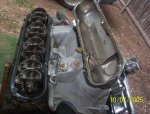
On the brighter side(I hope) I popped a valve cover & it looks pretty clean in there, maybe it was rebuilt "shortly" before storage ! :doubt:
A little rust on a couple of rockers, doesn't look too bad? Rich.
A little rust on a couple of rockers, doesn't look too bad? Rich.
Attachments
Da-ho
not even
looks ok inside
So you have yet to hear this one run then? Drain and refill with ATF only and fire it up. After its had a chance to warm up good, drop the red and refill with some good multi grade and see where your idle oil pressure is. That will give you a good idea of the condition of your bearings and oil pump. I always try to ground hop them before disassembly- saves time in the long run as far as finding out what needs attention.
So you have yet to hear this one run then? Drain and refill with ATF only and fire it up. After its had a chance to warm up good, drop the red and refill with some good multi grade and see where your idle oil pressure is. That will give you a good idea of the condition of your bearings and oil pump. I always try to ground hop them before disassembly- saves time in the long run as far as finding out what needs attention.
RUSTY Cuda
In over my head!
She was running when I got her, had good oil pressure ,drove it around the yard to move it once in a while before I started rippin into her, sounded solid, a little smoke but it had been sitting for years, haven't done the compression test yet, but she's going back in as is & I'm getting out the rosary beads! Rich.