Rusty's not very quiet cuda progress

Been moving parts around, got the back of the doors where I could try & clean those up again, most will be covered but there's a little over spray & buffing mess on areas that will show, I hope I don't have to shoot those again, painted a little more hardware , after staring at that stuff a while I decided to take advantage of another nice day & started sanding out the peel on the quarter, looks good cept for my light touch up where I tried to fill a hole top rear light spot. 20221026_151521.jpg
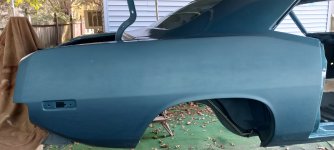
At that point I went back to the front fender where I buffed the side with the peel in, since it's coming out everywhere else I went back & got it up to 2000 ready for a rebuff.
Another day with no catastrophes YEA! 20221026_151454.jpg
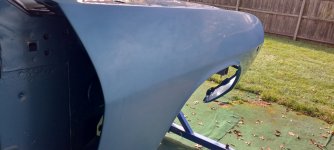
 
went ahead & started buffing, got the roof & one side done in compound A , I think my 5 footer is little by little becoming a 10 footer, picked up a lot more junk on the top of the quarters , missed some halo last round of sanding & got a few more off color spots.
The only bright spot ( So Far ) is the roof, I'm not even seeing any dirt spots, I hope that continues!20221102_151857.jpg20221102_151912.jpg
Might as well take advantage of this weather, around 70 all thru the weekend.
 
I've been through this, just a little worse this time, I will live with the results, just upsetting when you put SO MUCH effort into something & it keeps blowing up in your face!!!
So today I finished all the parts out there with the compound, decided to try a round of swirl remover on the roof to see where it's at.
Pretty good, might be a few areas that need a bit more but I think I'll finish everything up & leave it for winter this way I can buff it out after it's all together & get any mark the covers leave over the winter.
So this is the worst blotch on the roof, the close up makes it a bit bigger than it actually is & it's way out in the middle, hopefully not an eye catcher. only found a couple of tiny dirt spots so far.
light spot & smear to the left of my head! 20221103_144045.jpg
 
That all looks damn amazing to me. The spots that only "you" can see being the painter and builder of the car will most likely go unnoticed or at best ignored while appreciating the over all work on the car! (y)
 
Yea, I did have a few mess ups on the other car, but never had trouble with the base coat matching, this blue just won't match up?
Anywho....................
Got a round of swirl remover done on everything, checking out the line for the touch up on the quarter , definitely shows, but I know it's there & eyes go right to it, not bad from a few feet away.20221104_150901.jpg
Hard to tell in this pic but that little back section is part of that lighter rear touch up.
20221104_150950.jpg
On a better note, the fenders are looking pretty good, if it wasn't for that leaf hitting the drivers side I'd call both "Near" perfect! 20221104_150159.jpg20221104_150222.jpg
 
Just when I thought I'd do something easy, murphy jumps right in, was cleaning a few parts for a coat of black, did the tail panel & went over to the hood scoops, guess I got lucky that I only sprayed one, cause when I went to wipe it down the darn prime started coming up, so I waited till today, sanded a ton on that one cleaned those 2 dry & then shot the black, when I saw it still needed some sanding I shot a 3rd coat, tomorrow I'll sand it down again & hope to get to smooth!
There are a couple of small spots on the tail panel that need a little sanding too.
Now I hope this paint isn't too shinny couldn't get the tail panel paint mixed, so I'm trying base black with a satin clear? 20221106_131554.jpg20221106_131621.jpg
 
Question for you guys, anyone know how the front handles comes off the glove box door, I can't see any push pin or screw ???20221105_144828.jpg
Loosened the screws & it flops around but no way to get it off? 20221105_144837.jpg
 
I don't remember exactly but I think it involves using the key to turn the lock and then you can release a pin or spring to get it out.
 
You are correct, I actually googled it & a nice vid popped up, even with that mine is still not apart.
somehow my push level is not in the hole on the bottom I didn't find it till I took out the screws, there's another hole on the side, clipped the latch up put the key in (which doesn't seem to do anything?) depressed the lever & it won't come apart, even tried prying a little.
my knob only moves 1/4 (or less) turn, enough to open it but no movement the other way?
Now I'm wondering if someone forced it in the wrong position?
The door does look like it was painted before!

I did flood the whole thing with WD40 before I came in, see what happens tomorrow?
 
So after quite a bit more sanding I got the black on the parts, now I'm praying I don't screw up the clear, I bought a spray bomb of satin with the hardener. went good all the way to almost the end, tail panel is good to go, the can was getting light & like a dummy I went back to the scoops & it did some tiny blobs in one spot & a bit thick on a spot on the other one, at that point I HEAVED the can into the trash, not sure what sanding will do to it but on the scoops I may go to matte clear anyway, that's just regular spray bomb?20221107_154628.jpg20221107_154605.jpg
even the tape line on top that I thought was gonna be a problem turned out ok , even the ends where I had to improvise because the tape pulled off some blue isn't that terrible?20221107_154829.jpg
 
Started rummaging through 1000 boxes looking for parts & hardware. Trying to get the trunk lid hardware together to get that on before winter.
Even with all boxes marked as to content it still takes a while.
In the mean time I had located the ash try & glove box door so I could start painting the dash, well both are giving me a problem, can't get the lock mech. out of the door & the ash try was a rusty disaster, so that went into the tumbler, could only get 1/4 at a time, so 2 days later I got the front & some of the sides pretty clean but not much action on the rust down in there , working the wire wheel now! 20221108_135228.jpg
Don't know why it looks so dark the front is perfectly clean bare metal. 20221108_135217.jpg
Think I'll be looking for a trunk lock, the little flapper under the key hole looks to have parts missing all I have is the slot piece & a small spring? 20221108_122841.jpg
Needed something positive before I closed up shop, so I stuck the scoop insert in, lookin good! 20221108_135904.jpg
 
back to stripping, thought I had this done, interior trim was rusty in spots, so I built a little blasting booth & started on that.20221110_122555.jpg
did a little test on the leaf springs, the original plan was to buy new, now I'm not so sure blasting test took quite a while......... 20221110_142622.jpg
So I got out the big angle drill & tried some 7" wheels, took the loose rust off pretty quick , think these will be a combo job both methods. 20221110_152424.jpg
Also did a test on those nasty heat shields, small area took forever.....20221110_141110.jpg20221110_141529.jpg
Where those are I may just get the worst off & blob some paint on?

Did manage to finish off the interior trim! 20221110_145335.jpg
 
About the same while I was out there, I got lucky so far, the new blasting "tent" is mostly under the big tent & the top tarp all drapes down the outside so no water got in, which will make getting back at it a lot quicker, see what happens if the wind picks up, was none today.
Did work out there, got out the 24 grit grinding discs to try those, they did much faster work than the others , actually started seeing a little clean metal, will go back to blasting for the rest.
Not sure I can save these rims, they have been out there more than 10 years, really want 15" rally's, the first car came with these 14s, I have 2 in the garage I had picked up cheap?
I also have the aluminum slots that cam with this car, but not a fan of those, see how deep the money pit goes before I do wheels & tires? 20221111_150749.jpg
 
Another 4 hours of blasting, got the ash try pretty good.............20221112_122121.jpg

Even a nook I couldn't get into with the drills.........20221112_122137.jpg
Think I got the springs "close enough" to blob some paint on..............20221112_150443.jpg
Not so sure it was the right choice, these look to be original? 20221112_150429.jpg
Heat shields are getting close to good enough & the rims look like they can be saved but it will take days of blasting, the backs are worse than the fronts were......................
gonna see if there's any used 15's out there (and how much moola it will take) before I waste my time? 20221112_150357.jpg
 

Attachments

  • 20221112_152409.jpg
    20221112_152409.jpg
    1.1 MB · Views: 2
Repop 15" rallyes will likely be considerably cheaper than OE, especially if you figure in time & materials.

My duster has a set of those in 15x8 on the rear. I blasted all 4 and hit them with some rustoleum. I didn't try nearly as hard as you did and it still took forever.
 
Did a quick search on ebay last night & none of them showed up.
Time I have plenty, money maybe not so much, this fixed income stuff sucks, gonna have to start the parts buying soon, don't even have an estimate of what all I need. If I ever get the motor to jerry that's a quick 4K out the door.

did a few more rounds of blasting, got the heat shields to "good enough" & the front of one rim pretty good, most of the deep pitting will be covered by the trim rings.............20221114_150720.jpg
had a little left in the bucket so I tried to make a little clean spot on the back...............20221114_150750.jpg
One more bucket full for today, my 3/4 full spackle bucket is now down to about 1/2 , it's been working great this time no clog ups, tempted to pull out the other bucket that was clogging me up a lot & see if that is any better now?
Gotta take a look at the 2 "dry" ones I have in the garage look like, then I'd only have to do one more nasty one?

So I had a brain fart, thinking of doing these in the matte black finish like the tail panel & scoops may try one & see what it looks like.

About 30 mins to get here........................20221114_155028.jpg
 
Sticker shock, year one has them, 15x8's 209 a pop, with the trim rings & center caps looking like 1,600 ish for 5 + a ton for shipping?
See how that motivates me.
I probably need the rings & caps anyway.
 
Sticker shock, year one has them, 15x8's 209 a pop, with the trim rings & center caps looking like 1,600 ish for 5 + a ton for shipping?
See how that motivates me.
I probably need the rings & caps anyway.
Yep, Coker has them too IIRC. They're not cheap but they are easy.

I bought new centers for my wheels. IIRC it was either $40 or $50 each. Ouch. About the same price as the headlight buckets I bought to avoid trying to repaint those and screwing it up. I had some beauty rings that are close enough that I could use them.

Both the centers and buckets were OER, and aren't anywhere near perfect but good enough for my hunk-o-junk.
 

SiteLock

SiteLock
Back
Top