Rusty's not very quiet cuda progress

I was looking at some 3m equipment on amazon. No idea if this is any good, but the reviews look great for someone into garage sprayed restorations. At some point, I'm going to try my hand at painting more than just a fender. Is this just more junk? :

3M hvlp sprayer
It's pricey for a composite-bodied gun that sounds like it's aimed at today's throw-away mentality...
 
It's pricey for a composite-bodied gun that sounds like it's aimed at today's throw-away mentality...
Thanks, looking at some devilbiss stuff but no idea what is decent. Also, my 20 gallon compressor only does 5.2cfm, so would likely need to upgrade that. Ah well, painting is a long way off anyways :LOL:
 
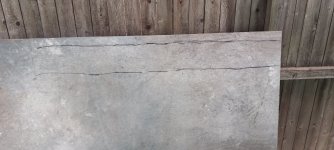
So now I'm trying to find things to get busy & stop moping around ( My mother passed away last week) yesterday I did the yard work & today I forced myself to try out that paint gun, so I drew a long 6" stripe on a piece of plywood & shot on that till I thought I had the spry right20220925_143052.jpg
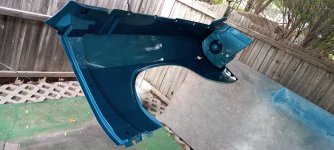
First pass I did under the top of the fender, whoa , got to move a lot faster with this, laid down a big run area, but also it was looking blotchy? I had also lowered my pressure at the regulator to 35 (suggested pressure)
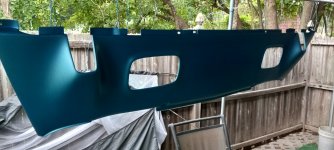
lowered the fluid down & shot the rest of the back of the fender, then did one pass on the top of the rear valence, also very blotchy , at this point I got out the old gun & tried to adjust that to the lower pressure, still blotchy, so I went back to 45, reset my gun to what I had been using & put one full coat on the valance & got lucky it evened it out.
Now the back of the fender can look bad, all I need back there is rust prevention, so I went ahead & cleared that.
Picture looks a LOT better than it is.20220925_161615.jpg
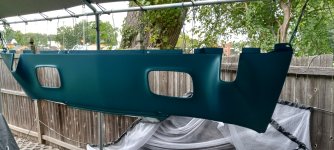
That gun did make it look a tad darker than the rest, lighting was bad (low) when I took the pic, but then after a month of messing up & redoing to learn the new gun I decided to try & stay with the old gun so all the panels will match.

Still need one more coat on the valance, I'll do that & the clear when I shoot the doors! 20220925_161633.jpg20220925_161645.jpg
 
Thinking the eastwood guns may be devilbiss I perused the site, no mention of manufacturer on their guns, but to my surprise they had a few other brands, most were rather cheap, but Iwata was in there. the 300 model with 1.8 or 1.4 tips was 389 (less cup)
the 400 model again less cup was 625.
400 bucks I might do but now after the experience today with a different color with a different gun, I'm afraid that a better gun is also going to change the color, which pretty much means I have to paint everything over AGAIN, is it worth it????????????
 
Last edited:
So far better results today, besides the fact I had to wait almost 3 hours for them to finish mowing the fields behind me! So getting up a little early was a waste of lazy time.
Now even the old gun was shooting a little weird, got some of that blotchy stuff it the first coat & definite tiger stripes on the door again & that was shooting the long way, so second coat I shot the short way & went back to long on the third, not picking up much variation in the blue now, since it was so late I decided to stop & sand off a little dirt spots on the door & side of the fender, tomorrow I will shoot the last coat on those & then clear everything.
valance is ready for clear can't see any dirt on that. 20220926_145440.jpg
Top of the fender is good, a few dirt spots on the side. 20220926_145508.jpg
One more coat on the doors after I sand the dirt spots, hopefully that will at least cut the number of those down? 20220926_145620.jpg
 
Pretty good day today, mucho bettererer results, yea there's still some dirt in the paint, used more than I thought I would, had to do 2 more coats on the doors the fender made it with one.
Shot the clear much better, made one pretty good run on the fender that I hope that will sand out like the others & leave no mark?
on the valance I don't see any dirt of course that's the piece that will be way down low!
Not sure what coat the dirt is in I'm hoping some will sand out?

Now the dark areas are shadows! 20220927_155302.jpg
Shows a little of the metallic in the sunlight20220927_155239.jpg
Some peel to deal with but not seeing any dirt. 20220927_155448.jpg
So I go out after the second coat & one of those things that hangs from the trees got on the side of the fender, almost had it out just one tip was stuck & then it laid back down, ended up breaking it into 3 pieces to tweeze out, it made some dark areas, I think I may try my air brush to save the fender???
Has a nice reflection off the shine! 20220927_155536.jpg
Shame rest of the fender looks pretty good! 20220927_155506.jpg
I went four nice wet coats of clear if I burn through this time I'm gonna sledge the whole dang car into scrap!
 
Been sanding on the shell for days now trying to get that ready for another shoot, in the meantime I worked that fender a bit, got the drips out, this time they left a slightly darker outline where they were? the spot where the tree thingie hit stayed dark & does show when wet & shinny.20220929_144829.jpg
did a much better job of laying down the clear, quick hit wit 400 got most of it out on the top side section.
top looks nice............20220929_162728.jpg
peels not too deep.20220929_162748.jpg
 
Spent part of the session cleaning up the shell & moving stuff around outside, thinking about closing in some of the tent to cut down on the breezes that flow through?.
Rest of the time I got 1 door up to 2000 another small victory, no mishaps & not too much dirt.
Now I have to watch the weather need a fairly warm day with low wind to do the final shoot of the year. 20221002_152738.jpg
 
Today's adventure was to try & close in the open to the yard side of the tent, used 2 tarps for the back & the open side, those should survive the next few days (wind) looks like thurs. & fri. may be my last painting days?
Not sure if the clear one will survive?
If I'm lucky this will at least cut down the dirt a little?
???
???
???
??
Also took out the leaf blower & tried to get as much sanding dust out of there as possible, this time I will wet down my fake grass carpet. 20221003_143913.jpg
It got a bit dark with the 2 tarps, tomorrow I'll try & rig up some lighting.
The clear was put on the sunny side for that, today was overcast hope a little light will get in on the painting days? 20221003_151640.jpg
tried to roll up the plastic one, but the front was already flapping in the breeze before I came in. 20221003_153108.jpg
Retreated into the garage & sanded out the second door, again no mishaps or burn throughs, ready to buff! 20221003_165854.jpg
 
more prep done, today I hung every portable light I own, hoping with some sun tomorrow I'll be able to see a little?
then I washed the entire shell with soap & water. 20221005_125433.jpg20221005_125528.jpg
Shame I have to shoot this again, after washing it looks ready to buff! 20221005_132812.jpg
Here's why! the mess I made trying to patch in the C pillar. 20221005_132822.jpg
Moved inside & started buffing out the doors, couple of rounds of the first compound.............. 20221005_145135.jpg
 
That C pillar is gonna haunt me FOREVER!!!!!!
First the outline of my last touchup is showing through as a slight darker outline, gave this area an extra 2 coats of blue to no avail.
In this pick it shows as a dark line angling up as you go towards the rear. 20221006_153706.jpg
You can only see it from certain angles?
On top of that I butchered another touch up attempt right below that where I tried to get some dirt out!
In this pic it shows up as a light line? 20221006_153915.jpg
So I stopped at 2 coats of clear gonna sand out those touch ups & hope for some miracle to fix those, the outline I will live with.
Jambs & quarters look good, do have one blob on a quarter. 20221006_162926.jpg20221006_162951.jpg
Tried to get a pic of the blob all I got was me with a much needed halo at this point I was ready to cry! 20221006_153908.jpg
Roof looks pretty good too!
 
This may be the first time I've seen the setup you're working in.

If you were working a clean paint booth you might find you're a pro :D
 
Would definitely help!
Spent the day sanding out the bad spots, scuffed up all the clear I'm shooting more coats on, now I'm trying to come up with another touch up plan, one spot on the roof I messed up & that C pillar.
Might end up shooting the top again, I'll run a coat or two over the screw ups & if I get halos I'll just shoot the whole top AGAIN!!!!!!
 
rustys-workshop
getting closer to trying another shoot, taped off the side with the bad c pillar , if I get a halo where it meets the roof I'll have to shoot the whole top .20221008_132504.jpg
blending the top of quarter body line should be ok, I'm worried about where it goes down in the back, not as sharp a line?
Figuring murphy's law I taped off the other side too!20221008_132522.jpg
Once the blue is on I'll remove the tape & shoot clear on the hole shell.

Got the swirl remover done on the doors, take inventory of 1/2 the car up on the shelves! 20221008_141414.jpg
Now if I get through the final glaze without a screw up the doors will be done. 20221008_141455.jpg
 
This paint job is truly trying to kill me!
things were going pretty good , got the blue on & started on the clear, first coat went on well, as I started the second coat some areas looked dry, upon closer inspection the blue underneath started to alligator on me & it happened on quite a lot of the roof, looks like I will not get this painted before winter I'll have to take the whole top way down & basically start over!
Start sanding tomorrow & see how far I get.
the disaster.............20221010_153206.jpg
I guess if there's a bright side to the day I got the back of the hood & trunk lid fixed up, so there both done. 20221010_160438.jpg20221010_160513.jpg
 
Spent the day sanding away on the top areas, knew I had a lot of coats to remove so I hit it hard with 80 grit,
trying to get down to the first blue paint, on that C pillar I want to get below all 19 of my touch up tries, don't need any more crazy lines showing through.
got all I could with the 80 & then went to 220 to get the scratches out, maybe a few more areas I can hit with the air tools then I have to hand sand all the nooks & crannies on the top of the quarter.
then a few rounds of 400 on everything & maybe just maybe I'll be ready to shoot again!

depressing sight! 20221011_154537.jpg
 
No blue today!
The seal coat didn't lay down anywhere near where I could shoot over it, so I mixed up some high build & shot on 3 coats, hopes of having this painted tomorrow are dwindling.
Will go out after dinner & see if I can get the sanding started, if it gums up I'll have to wait till tomorrow?
Well at least I made it to square 2.
guide coat on ..............20221015_144256.jpg
 
Fast foward a week or two......................

Well guys the clear is on, you can see that line but really have to look for it...........20221021_152137.jpg20221021_152032.jpg
The touch up on the top is a couple of shades light, first line is the mix in point second is a reflection. 20221021_151907.jpg
Roof is looking pretty good ............20221021_151957.jpg
& that pesky C pillar is finally ok!


20221021_151945.jpg
 
Busy couple of days, got the cleanup done pulled all the tape off the car & even got the lawn mowed & the first of the leaves cleaned up.
Today I actually put something on the car! yeepee ky a! it felt good, I know it's only the first of thousands but it's a start.
These babies needed a TON of tweaking..............20221023_125343.jpg
Break line was a little easier to tweak (top) 20221023_150400.jpg
May still need a little massaging but I think they are pretty close, while hunting for the brake line hardware I found some other hardware that's not painted yet, good garage work.
Now I got a couple of warm days coming gonna try & get the tail panel, hood scoops & dash ready for some black paint??20221023_150413.jpg
 

SiteLock

SiteLock
Back
Top