My 71 Duster work in progress

If that stud moves down only 1/8" in the K-member slot, it'll make a world of difference
I'm pretty sure they're both already sitting in the bottom of the slot. It's hard to tell though, I need to drop the nuts and washers off and look again. I think that's part of the problem. To move over, one side has to move down, and it can't.

The only other possibility is that Doug's somehow completely blew the manufacture of a CNC-bent header (or two), or shipped you wrong parts. The former is possible but unlikely, and the latter is easily verified since the part number should be stamped in the header flange.
I abandoned it being the header a few days ago. The flange is stamped D-453 so they're the right parts. Based on the replies at FABO,, more have had success installing without dings than have had to ding them. The people who had problems seem to be having them in the same places I am - it hits the torsion bars and the steering box/coupler.

We were also doing this with the car on the ground; in other words don't try such silly shit with it on jackstands
There is no suspension under the car right now. If I put it on to do this, then I have to take it all back out again (at least the driver's torsion bar, which cascades into other parts) if I end up having to pull the header again to beat on it. The instructions say to just drop the drag link. Yeah sure. Maybe if I had a lift and was 30 years younger. I've had it mostly together then back apart again once since this started and I'm trying to avoid that happening again if possible. Might be unavoidable. Right now I'm planning to take more parts off, not put them on.

I agree this would be a lot easier if the car was on the ground. Until I had to crawl under it to do something, and there's plenty of that left to do. I'm standing on a "kick-step" stool trying to do this so there's as close to zero leverage as possible.

FWIW I've noticed that every time I let the SOB down, no matter where it is when I start, it settles to where it's laying right against the steering box. It always wants to move to that side. Maybe putting the trans back on the jack and removing the x-member would help Something I have not tried yet is to raise it up, move it as far toward the passenger side as possible, then tighten the stud on that side's mount before letting it down. That's hard to do alone but it's something I've got to try.

At one point out there, I attained enlightenment. I never should've started this at my age and in my tiny garage with no lift. Time/age doesn't care if you respect it or not, and it will never respect you no matter what. This has to stop. But first I have to get past the current disaster.
 
Here's the next plan for now ... take the nuts/washers off the bottom studs so the engine can "float". Shove/pry it as far right as possible, then shove shims under the driver's side mount so it doesn't tend to slip down the face of the V and kind of hold it there, then tighten the other side. At that point if I'm lucky, the engine will be as far right as it is ever going to go.

I'm unsure about the shims, those probably need to come out before the driver's side is tightened so the engine can rotate downward when it settles, but at the same time, that's going to throw the engine off level. It's easy enough to try both.
 
Just a quick though: When we did the Valiant, the torsion bars were in place but not fully installed so we could move them back and forth. We wedged chunks of 2x4 into the front suspension to hold the car up. It sat at about normal ride height. I believe they were between the control arm and the snubber mount. It kept us from having to deal with exactly what you're describing.

Oh, and "dropping the center link" isn't a thing on my car, since it goes through the oil pan. It's "remove the entire thing" or leave it there; there's no middle ground.
 
Just a quick though: When we did the Valiant, the torsion bars were in place but not fully installed so we could move them back and forth. We wedged chunks of 2x4 into the front suspension to hold the car up. It sat at about normal ride height. I believe they were between the control arm and the snubber mount. It kept us from having to deal with exactly what you're describing.
Cool, thanks for the idea. I'm actually hoping we less than XL people won't be shoving things around to where there's worry about it falling off a stand.

It may end up on lower stands at least temporarily so I have at least a little leverage but who knows? I'm an idiot who always thinks my harebrained ideas are going to work until they don't.

I do foresee having the engine/trans completely unbolted again before it's over. No stress there /s, but it sure seems like things need to move everywhere.
 
That harebrained idea did go as planned.

Passenger side, all the way up and toward that side (no slot showing)
20240517_182930.jpg

Driver side, all the way down and toward the passenger side

20240517_183148.jpg

Still no joy.

20240517_183242.jpg

I forgot to check but from underneath before this it looked like the transmission was running at an angle from the driver to passenger side so I don't think there's any movement toward that side under there.

I guess the headers are coming back out again for another beating. At least I went ahead and dropped the z-bar out so that's done. Tried to slip the coupler off but the header's in the way so the header has to be partially removed first. Then I"m going to go inside, take the 3 nuts off the column hanger under the dash and yank the whole thing back out of the way again. You can see what kind of condition that column's in so sliding it in and out of that floor mount thing isn't going to hurt anything. I'd rather take things apart again than to fight around it.

On the positive side, the header paint's going to get heat treated there.
 
Well, it moved... we'll call it a draw.

Loosen the three column hanger bolts on the dash, then loosen the three bolts holding the toe plate to the firewall. Can you slide the column over to the left on the firewall and gain anything at the coupler? Just a thought; as I recall the toe plate is a pretty sloppy fit leaving some room for adjustment. You may have to loosen the two flange nuts as well, but I'd say don't fully disassemble anything. Pull hard to the left and tighten a couple of the toe-plate bolts whilst holding. See if you get anything out at the header. Maybe not, but it's worth a try.
 
Stretch mentioned today that he thinks the K itself can be moved a bit on its bolts. He said there are some cars on which moving it is required to perform an alignment. Whether that applies to old, solid-mounted-K Mopars I don't know, but he did mention prying it diagonally or to one side. Whether that'll work I can't say, but I thought I'd mention it. I thought it was pretty solidly piloted to the frame rails by the bolts, but he said it will move a bit.
 
Moving the column plate around did nothing.

Gina noticed the bellhousing to engine parting line doesn't look square to the firewall. It looks like the tailshaft needs to go toward the passenger side. I checked and the trans was already cocked around off center a little in the cross member, tailshaft toward the passenger side. From above, it's turned counter-clockwise.

So I took the crossmember down, raised the front of the engine a little, left the trans on the jack, and pushed the tailshaft toward the passenger side until it hit the tunnel. Got out, let the engine down, and now the coupler will turn, but rubs and pushes the engine over a little as it goes. Why is it floating? I don't know. But it sounds like the k-frame must be cocked, in the opposite direction? So moving it clockwise (from above) seems to be needed?
 
Wouldn't moving it clockwise exacerbate the problem at the coupler? You're literally pushing the back of the engine toward the column in doing so.

I was over at the storage area, opened Door #2, and this Hurst stick was starin' me in the face. It's definitely not an OE A-body unit, but the overall layback appears to be similar and the fact that it's on an A-body transmission is promising. It might fall easier to hand and be more comfortable to shift than the shorty stick.

100_5975.JPG


I pulled the boot up over its head so you could see the whole thing, but I didn't have a tape measure with me. There's a T-handle on the top that can go with it if you're interested. It looks to be in good shape other than needing a good cleaning. The boot is ragged aftermarket junk, which means I'll probably end up using it somewhere. 😄
 
So I measured from where the front edge of the k-frame meets the bottom of the frame rail out to the most outside point on the rad support. Should that be the same on both sides?

I didn't try to be precise, hell that's impossible. I used a carpenter's adjustable square, holding the tip of the rule on the k-frame and using the square to mark the distance. So I think it's repeatable, it has been 2x for me.

Passenger side: 7-3/8, Driver side: 7-5/8.

1716070004423.png.
 
It's no surprise if the car's been hit. It's 52 years old. It would be more of a surprise if it hadn't, to be honest.

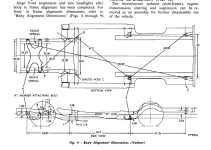
What you need to do is take some of the measurements shown in the BSM and see where you land. The tolerance is 1/4", so it's not exactly a precision game. The first measurements I'd make in your shoes would be from the center of the LCA opening in the K-member ("B"--you'll have to fudge this, obviously, probably at the torsion-bar socket) to the gauge holes in the front crossmember (labeled "C" and "D"). Barring the estimation game, you could also simply measure diagonally from the rear K-member bolts to both C and D, as well as directly between C and D. You might also want to check from C/D to both E points, which are about the center of the front leaf spring eyes. If you're able, you could also check to see if the center-to-center line between C and D is square with the rockers.

I don't think I'd worry too much about the BSM measurements directly as I would comparing the similar measurements. If you're within 1/4", you should be OK. If not... you know anyone with a porta-power and floor anchors?

As I mentioned, Agnes had been hit very hard in the right front at one point. To wit: The driver's side of the dash has a "knee" dent, the same-side door has an interior dent, the passenger's-side frame is still wrinkled, and the front corner of the engine bay on the same side has been bashed out with a ball-peen hammer (no, I'm not joking--it's quite visible in photos). Despite what was clearly an energetic hit, when we installed the new driver's front frame rail we were still able to be within 1/4" on B to D, "other B" to C, between C and D, and from the front of the K to both rear shackle hangers despite the RH front frame buckle. Whether Agnes had the frame pulled at one point I can't say, but we sure didn't do it.
 
You're right I don't know if it's been hit but I haven't seen any wrinkles anywhere or indications that it's been hit that hard to cause this cluster. Remember it started with no carpet, and I've brush painted 80% of the undercarriage. I remember there being wrinkles at the rear kick up but those seemed factory.

It didn't drive bad at any speed either.

you know anyone with a porta-power and floor anchors?

Of course not, but that's not going to be needed. Once I work up some old man strength I'm going out, bolting the mounts to the k-frame and bearing the weight on the picker, and backing four bolts out. I've already disconnected everything (again) down to even removing the rotors. Less weight can't be bad.

Any chance you could take a quick measurement on Agnes just to compare the length of frame toward the front starting at the k-frame? It doesn't really matter exactly where you measure, so long as you do it the same on both sides. I mostly need to know is if other cars are equidistant there, or not. In other words, I don't want to go through all that heavy work just to find out there is nothing unusual about my car not being equal there side to side.
 
I took the k-frame loose and got it really close to the same distance on both sides. Fat lot of good it did me as far as the headers go.


I ended up with the distances to the front edge of the frame rail the same, but as far back as it could go. Once I got it cooperating with me, I bolted up the transmission and used that to center and set the front to back. I don't know how I managed to pry the whole thing back, but I did.

There's about 3/8" of shims on the driver's side to accommodate raising up the passenger side to move it that way. I might have to fuss around with it more yet, I noticed at one point the TB was laying on the passenger side header so it could use to go downward a tad.

Part of me wonders if now that I've got it all squared away better if I could just go back to letting it sit in the middle. But I'm not in a hurry to loosen anything up to find out LOL.
 
Last edited:
I was outside for a few hours (after you apparently found mojo) and completely forgot to measure. I was literally just going back out to take measurements, but checked here to make sure I got the right ones. :LOL: In fairness, I saw your prior post asking about half an hour before you posted the video.

Speaking of the video, that power steering really works well! :unsure:

3/8" seems like a lot, especially with the other side hitting the header. I think the one in Agnes is about half that.
 
3/8" seems like a lot, especially with the other side hitting the header. I think the one in Agnes is about half that.
I checked, its not hitting the other side, TBs slipped right in with clearance to spare

I still have a clearance problem though, on the driver's side. There's enough room to spin the coupler if you don't put that retainer clip thingy on the end of it. I either need another 1/8", a small well placed dent, or leave the retainer clip off.

1716202722727.png

The seal is already missing.
 
Also, the engine's about as level side-to-side as my floor, jack stands, and frame, and the floor is level side to side - we hired a union crew to pour it.

It's good enough right now - as in it's steerable - but I don't want to move on until it's right because I don't want to put things together just to take them back apart. Again.
 
Also, the engine's about as level side-to-side as my floor, jack stands, and frame, and the floor is level side to side - we hired a union crew to pour it.
Union guys built my Mopars. It's not a great testament. 😄

You absolutely need the seal and crimp cover on the steering coupler, but I'm sure you know that. Otherwise, you'll have steering-coupler cooties. Nobody wants those.
 
Yes those perform an important service. If anything would ever happen to get to that basically ungettable place that is covered on all sides from splash and spray, well that would not be as per design.

I still remember a time when they'd get knocked off and stay off.

Thinking about it though, I'm pretty sure there's no hole in the bottom of it so if you did get water in the coupler there would be no way for it to drain away on it's own. Which could be problematic over time.

I looked at one how to rebuild it thread and after seeing what came out of that one when it was apart has me considering pulling it back out, cleaning/greasing, and changing the seal if I have to. I do not think there is even a seal in it right now. Also I think maybe if I clip the metal cap part at the corners the coupler will still turn and be better than it needs to be as far as sealing it goes.
 

SiteLock

SiteLock
Back
Top