72 Challenger R/T/A

Hey Wally, I'm heading out to the UPS store right now (before it rains again). I'll PM you with the shipping info when I get back.
 
Sunday I got some more stuff moved out of the way in the garage and then got to work on some of the interior panels. Prep took a bit longer than usual with the sandblaster broke right now, but I got the green A-pillars and kick panels cleaned up and painted the darker grey color. They all had some black gooey, goopy shit on them. Probably from a very sloppy winshield install sometime in the past. It took a while to get all that stuff off there. I had to wipe the panels down with some acetone to make sure the paint would stick. The kick panels look, well, like they've been kicked around a bit. I'll have to redo the surface on those and repaint them. You can see the discoloration on the one on the right in the pic.

I didn't have my camera with me so I'll have to get some pics of the panels added later.

Monday was a waste as the heavy rain and thunder/lightning were pretty bad around here. I didn't want to try to paint in weather like that as I knew it wouldn't dry properly.
 

Attachments

  • grey A-pillar covers.jpg
    grey A-pillar covers.jpg
    230.9 KB · Views: 18
  • grey kick panels.jpg
    grey kick panels.jpg
    227.7 KB · Views: 18
Last edited:
Fixed the sand blaster today, now I can get back to cleaning stuff up.

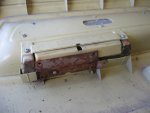
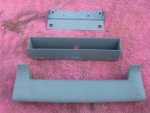
I pulled the console out and disassembled it completely. The door I cleaned up in the blaster to get the surface prepped for paint. I'm using the charcoal grey paint on the entire console. The wood grained, pot metal insert will be replaced with a piece of 1/8" carbon fiber later so I'm not bothering to clean that. I've noticed that this Duplicolor paint isn't very even. I'm going to repaint over it all later and let this just be the primer since it does stick well to the plastic.

PS: Wally, Here's the pic of the front of the console showing the mounting holes for the cassette deck. The ruler IS lined up with the edge of the console but the camera makes it look like it's off by a bit.
 

Attachments

  • cassette deck holes 1.jpg
    cassette deck holes 1.jpg
    239.6 KB · Views: 13
  • grey console door.jpg
    grey console door.jpg
    205.1 KB · Views: 13
  • cassette deck holes 2.jpg
    cassette deck holes 2.jpg
    205 KB · Views: 15
Last edited:
BTW: In that first pic, the edge of the console was actually right at the 5" mark. You can't really tell in the pic because of the curve of the console, the angle of the camera and the ruler was too thick to bend. Same for the last pic but the ruler started at the console edge even though it looks like it's past it by a bit. The part of the ruler near the holes is pretty accurate once you know where the ruler is in relation to the edges.
 
Got out of work a little early today so I used the spare time to get more done to the chally.

I got back to work on the console first. After cleaning the dust, dirt and crud I then smoothed over the worst of the scratches and the holes from the cassette deck. Once the holes were leveled off, I put some tape across the tops ot the holes. Then from the inside I used some of the glass beads from the sand blaster to fill the holes up. Then I used some super glue to solidify the beads in place. When it dried, I flipped it back over and peeled the tape off. Then I put a drop on the top side of each hole to lock the beads in place solidly. After the glue completely dried, I used a file to level the tops back down and then sanded it a little to remove the scratches. Last step was to carve some squiggly lines onto the repaired holes to blend them in with the surrounding areas.

After that was done, I sand blasted the console door, parts and screws. The metal parts go a coat of some cast iron grey paint I had lying around. Then I dusted it off the plastic pieces and painted and reassembled everything.

The ash tray is being left off and I'm going to put a 12V power port and a 120V outlet (via a power inverter) mounted in an aluminum or stainless filler panel. That'll be another project for the water jet at work when I get the time.
 

Attachments

  • console holes repaired.jpg
    console holes repaired.jpg
    204.2 KB · Views: 14
  • console holes repaired close up 1.jpg
    console holes repaired close up 1.jpg
    217.4 KB · Views: 12
  • console holes repaired close up 2.jpg
    console holes repaired close up 2.jpg
    228.8 KB · Views: 13
  • console holes repaired and painted.jpg
    console holes repaired and painted.jpg
    205.8 KB · Views: 17
  • grey console door closed.jpg
    grey console door closed.jpg
    206.9 KB · Views: 14
  • grey console door open.jpg
    grey console door open.jpg
    203.6 KB · Views: 13
  • grey console pass side.jpg
    grey console pass side.jpg
    240.7 KB · Views: 15
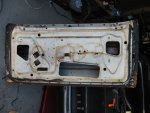
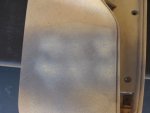
After the console, I started pulling the spare door apart. I needed the glass (or so I thought...) and the outside lock/handle assembly to swap onto the door I got off the parts car (that's on the car now). The glass in both pass doors it turns out is the green tinted glass.:doh: Soooo, I need to find a non-tinted passenger door window now.:doubt: At least I have two tinted windows I can trade for it.:rolleyes:

I kept taking the door apart anyway. I got it completely disassembled after a while and came to the realization that this door was not original to the car either. The tinted glass was one clue, and the fact that the inside of the door was all white.

I want to see how hard it would be to remove the heavy inner door brace and how much weight it would actually remove from the door If I cut it out. Even completely empty, the door shell has to still be about 40-50 lbs.

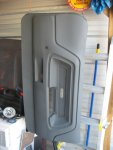
The door panel was in ok shape (chalky on top though) so I cleaned it up, smoothed the rough spots as best as I could and painted it. You can still see where the plastic had dried up and flaked off of the top edges. It'll work for a driver until I can get some better panels.

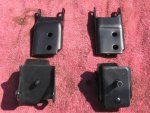
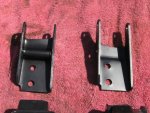
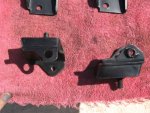
I also got some engine mounts recently and test fit them to the brackets. I had to trim some of the metal (1/8")back so the mounts would sit flat on the brackets. Does anyone here know which of these brackets goes on what side of the block? And do they go in front of or behind the mounting ears?

EDIT: The engine mounts are for the 440/511.
 

Attachments

  • door panel inside.jpg
    door panel inside.jpg
    208 KB · Views: 12
  • grey door panel arm rest pass side.jpg
    grey door panel arm rest pass side.jpg
    230.2 KB · Views: 12
  • grey door panel pass side.jpg
    grey door panel pass side.jpg
    195.9 KB · Views: 17
  • door shell pass side black.jpg
    door shell pass side black.jpg
    232.5 KB · Views: 14
  • engine mounts 1.jpg
    engine mounts 1.jpg
    231.6 KB · Views: 13
  • engine mounts 2.jpg
    engine mounts 2.jpg
    235.8 KB · Views: 12
  • engine mounts 3.jpg
    engine mounts 3.jpg
    239.1 KB · Views: 12
Last edited:
This project is looking awesome Paul. i WISH i had an open shop so i could pull my car apart and do al of the attention to detail that you are doing. Kinda makes me want Grey interior. Thats gonna look great!! Im not sure i read, but what color will the cars exterior be when you are all done?

Great job filling that console! :gaga:

:bravo: i think the seats are here, but i havent stopped past my parents house yet. thats where i have everything shipped. :toot:
 
Thanks for the compliments. Some of the stuff/repairs I'm trying is just guessing and experimenting. This fix seems to have worked out good on the console.

At the moment, the plan is for the majority of the car to be viper blue with the hood, spoiler, side stripe and rear window louvers to be semi-gloss or flat gunmetal grey.

Just keep pluggin away at it and you'll get it done...

BTW: It just so turns out that that girl with the Chally is a waitress at my favorite resturant... ;)
 
If I recall, the console plastic is a form of ABS and superglue won't form a solid bond. The one method that I have had very good luck with is to use fiberglass resin.
 
It's fate I tell ya.

Naw, I'm just fine with the girl I'm with.;)

I'll help her (the Chally girl) out with some parts but that's it. She needs a dash guage cluster for her car right now because hers has a Dakota or Ram dash sombody stuffed in there.:doh::dgt: I've got a 71-74 guage panel and switch panel that I'm going to offer to her. If needed, I'll show her how I did the guage setup in my 70 panel if she can't find a set of standard guages for it.
 
Made some stuff for the new (to me) sb MP cast valve covers. There are three holes opened on the valve covers but only one baffle inside one of them. I don't like running without baffles if I can help it. I'm not sure where to go to buy those baffles as I've never seen them for sale anywhere. So, I just made some up out of some scrap 1/16" stainless. I used the one original baffle as a template and made the others to match.

The other day I got some engine mounts in. I went out and got some grade 8 nuts and bolts locally to mount them up. Then one of the studs in the mount started to twist and the whole stud started turning inside the mount.:mad: After a while I was finally able to get the nut back off and remove the POS engine mount from the bracket. On a whim I tried the local parts places to see if they could get the engine mounts. The first store wasn't able to help but the second one said they could order them and have them in by the morning. The kicker was that they were also $5 cheaper than the set I got off Ebay.:doh: After I picked them up today I headed over the the shop and mounted them up with no issues. The new mounts had splines (like a wheel stud) keeping the same thing from happening again. These mounts went on fine with no further issues. BTW, thanks for the tip BeeP! It was pretty simple to figure out once I was able to get all the pieces together and look at them for a sec.

The last item for this post was the 70 switch panel I got the other day. First thing I did was to use a dremel to open the optional hole up so I can use the rear defrogger switch. Afterwards I cleaned it up and painted it grey (paint color is still uneven:doubt:). I have a friend working on something special for the lable that goes in the middle of the panel. I'll wait to see how it comes out first before I say anything else about it though.:toot:
 

Attachments

  • sb aluminum valve cover stainless baffles.jpg
    sb aluminum valve cover stainless baffles.jpg
    207.9 KB · Views: 17
  • engine mount installed driver side.jpg
    engine mount installed driver side.jpg
    219.8 KB · Views: 18
  • engine mount installed pass side.jpg
    engine mount installed pass side.jpg
    187.3 KB · Views: 13
  • grey switch covers 70 and 71-74.jpg
    grey switch covers 70 and 71-74.jpg
    192.7 KB · Views: 17
  • grey switch cover 70.jpg
    grey switch cover 70.jpg
    191.3 KB · Views: 18
Cool on the baffles. The m/t's I pulled off my car didn't have baffles either. wtf. I can't think of one reason not to have them in there.:huh:
 

SiteLock

SiteLock
Back
Top