What are you working on?

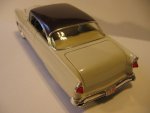
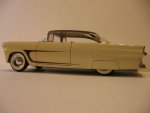
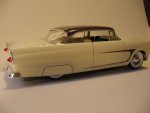
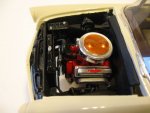
Started this back in August, finished it this morning.
Lots of fun customizing something on this scale. I'm a cheap bastard so I used whatever I could find to make things work: copper wire, nail polish, speaker grill, left over car paint, ... :)
 

Attachments

  • feb 23 1.jpg
    feb 23 1.jpg
    41.4 KB · Views: 33
  • feb 23 2.jpg
    feb 23 2.jpg
    44.3 KB · Views: 33
  • feb 23 3.jpg
    feb 23 3.jpg
    31.4 KB · Views: 33
  • feb 23 4.jpg
    feb 23 4.jpg
    40.5 KB · Views: 33
  • feb 23 5.jpg
    feb 23 5.jpg
    33.8 KB · Views: 33
  • feb 23 6.jpg
    feb 23 6.jpg
    37.3 KB · Views: 33
  • feb 23 7.jpg
    feb 23 7.jpg
    62.5 KB · Views: 34
Temp was up to 56 f today so I got a little ambition and started the seeDAN and one of the bikes. Took the seeDAN for a short cruise. :toot:
 
Yesterday I spent at the office, catching up on stuff.

Today I'm installing a new thermostat and doing other household chores...

Probably go back to the office tonite.
 
It was nearly 60° Fahrvergnugen here yesterday, so I set the valve lash on the Valiant and buttoned up the valve cover that had been off for about 10 years. I'd already done an oil/filter change on it Tuesday. It's quiet as a church mouse now--it's hard to tell it's a solid-lifter engine, actually. I also set the idle mixture on it, but it had already fouled one of its ancient plugs and is currently doing its Chevy Colorado impression on 5 cylinders.

I popped the cluster out to see if I could figure out what's happening with the non-functioning temperature and fuel gauges--just screams "voltage limiter", doesn't it?--but changing the limiter didn't bring either one to life. Of course, I don't know if that limiter was any good either. I'd already changed the temp sender and verified that it's good, but I didn't have the means to check the gauge at that instant. I'm certain the fuel gauge is just plain shot anyhow since the needle isn't visible. Previous owner said the gauge had never worked, so I'm guessing I'll need to replace it. It's '69 Valiant only, of course. :doh:

No one showed up to buy the car, so it looks like it's sticking around awhile. As if to confirm this, the master cylinder failed yesterday. :wall: The car still stops well, but the pedal sinks... and so it begins. :doubt:
 
I have been considering doing the 4 speed conversion to the wagon as of late. So I thought I may as well drag in the A833OD tranny I had back behind the shed for a quick check over. Well I picked it up and as I was carry it I would hear..."slosh"....gear oil doesn't go slosh! So pop open the side cover and the friggin thing is almost completely full of water! I had drained the oil out of it I guess, and some where the water was weeping in slowly over the last couple years.

Thankfully everything was coated in gear oil residue, so there was just some surface rust starting here and there. Spent a couple hours cleaning out the case, and tailshaft, and using the compressed air gun to blow the water out of the gears etc. After it was mostly dry I dumped in a bunch of old, but new, ATF. Then spun everything, and got it shifting through the gears nicely. Figured the detergent properties of ATF couldn't hurt things. Left it full of the ATF and managed to find room "inside" the shed this time for it. ;)

I also found a nice, but slightly broken non-console Inland shifter handle. The threads where the Knob attach were broken off, so I got it super cheap! If the 4 spd conversion goes ahead I plan on running a Hurst mechanism, so I will make an adapter for the handle to mate to the Hurst mechanism. So I will cut it and weld on a new section of threaded rod to attach a new knob. One installed it should look like a factory inland shifted car, but with a way more reliable set-up below. :2thumbs:

Now I just have to find a decent priced BB belhousing and parts.
 
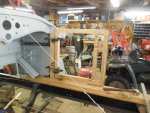
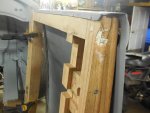
Well the door frame fits!!!

DSCN1782 resize.JPGDSCN1783 resize.JPGDSCN1784 resize.JPG


I need to final fit the hinges but it fits and all my gaps are even and square. Man I'm happy about that!
 
Nice job! :)
Are you fitting the door skin and attaching it to the frame?

Yes and no. I'm making sure it fits the wood frame and the body lines match up but I'm going to let the body guy do the final fit. I'm just putting in enough nails to hold stuff in place. He will be straightening and doing the final fit.

To be honest I really don't know how to go about installing the skins. The panels are bent around a strip that gets nailed to the frame. The door skin gets bent around that strip. I don't have any body tools. I have no idea how to "open up" the door skin to get to that strip with out damaging the door skin and making a ton of extra work for the body guy. If there are tools you think I should buy to be able to fit these skins and you are willing to give some advice I'll have at it. I was thinking it would be a lot easier for the body guy to straighten the skins out if they are not mounted to the frame. The nail heads are between the skin and the strip. The less bending of the skins at the nail strip the better is what I'm thinking.

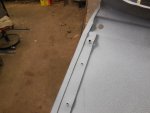
Here are a few pics to try and help you see what I'm talking about.

DSCN1786 resize.JPGDSCN1787 resize.JPGDSCN1788 resize.JPGDSCN1789 resize.JPGDSCN1791 resize.JPG
 
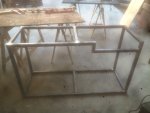
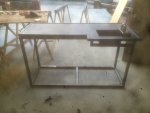
This is no coach work in an Oakland, but I built a mobile brake/carb rebuilding table. Months ago I mentioned some science tables I fell into. I took one that looked very purposeful with a sink in it, and built up a stand for it. Ultimately I'll mount a vise near the sink, and remove the faucet and gas outlet and plug those up. Oh, and hang a proper bucket under it to catch the schmoo. image.jpegimage.jpegimage.jpegimage.jpegimage.jpegThe first three shots were taken with my sawdust filled phone. The last one may have been the result of forgetting to measure twice, and welding the leg to the frame first.. It adds character, shuddup. image.jpeg
 
Cows, I'd love to stick one of those in my '86, but that would involve swapping transfer cases and spending money I don't need to. Surprisingly, the main sticking point would be messing with more 4x4 parts, which are heavy, cumbersome, and are designed with the sole purpose of crushing fingers and ribs.. Also, I don't off-road enough to justify it. I'll just be jealous of yours instead..
 
This is no coach work in an Oakland, but I built a mobile brake/carb rebuilding table. Months ago I mentioned some science tables I fell into. I took one that looked very purposeful with a sink in it, and built up a stand for it. Ultimately I'll mount a vise near the sink, and remove the faucet and gas outlet and plug those up. Oh, and hang a proper bucket under it to catch the schmoo. View attachment 18981View attachment 18982View attachment 18983View attachment 18984View attachment 18985The first three shots were taken with my sawdust filled phone. The last one may have been the result of forgetting to measure twice, and welding the leg to the frame first.. It adds character, shuddup. View attachment 18986

if it were me.....
keep the faucet..hook up a recurculation pump off of a bucket
keep the gas line as an air hookup with a short hose
 
The bucket would be full of bad gas and caliper effluvium.. Not sure I want to wash with it. The gas line I'd thought of, but because my "shop" is spread out between my basement and my my "garage", the table will be moving around.. I've got compressors in both, so I'll just drag the closest air hose up to it. That decision is usually made by weather and proximity to this little guyimage.jpgThose scales tip depending on the season.
 
Stretch, I don't know of any specific tools to buy for spreading those door skins. I've got a couple pairs of Vise Grips I modified for doing such a thing and some sheet metal pliers - Malco tools I think - that work great.
Truthfully, though, that's a job best left to the guy who will ultimately end up doing the metal work. It's soooooo easy to get things all bent out of shape and it takes a LOT of work to right it. The skins mount just like modern day skins, only those flat flanges attach to the frame first. And you're right: those skin edges will only bend back and forth so many times.
If you can, take some time to watch and talk to the metal guy when he puts them on. Betcha it'll be well worth your while... :)
 
The bucket would be full of bad gas and caliper effluvium.. Not sure I want to wash with it. The gas line I'd thought of, but because my "shop" is spread out between my basement and my my "garage", the table will be moving around.. I've got compressors in both, so I'll just drag the closest air hose up to it. That decision is usually made by weather and proximity to this little guyThose scales tp depending on the season.

the idea is you have your main hook into the bench like it was a tool....then use the gas port for a short say 2-3 foot very soft plyable line...the bench ancors the big hose while giving you a shorty thats easy to manuver and wont get hung on on anything..and the pump would only be for washing when you need it not all the time
 
Huh, that would be a better aesthetic than just blocking off holes.. And useful. You win. I'll add that project to the list
 
short hose= less work to fight with and more manuverability for working
and a recuic pump could pump hot water from a bucket, cleaning solution, beer..anything you want to stick the hose on the other end into
 

SiteLock

SiteLock
Back
Top