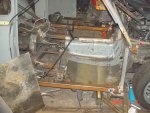
tiny...aka 1958 lloyd

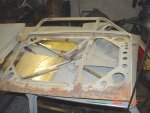
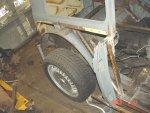
with some long winded chats with resto about floor pans we came to the conclusion that rolled beads in the pans probably wernt needed...besides ive no realy way to do it anyway...tho like resto said i could always make a channel in a 2x4 and hammer in some bead rolls

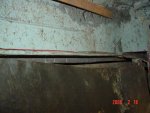
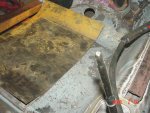
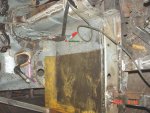
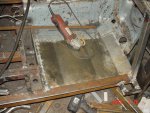
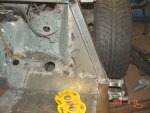
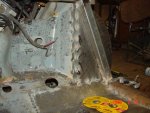
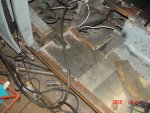
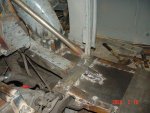
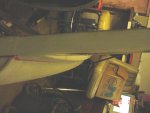
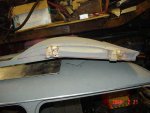
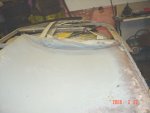
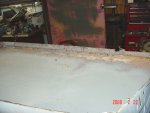
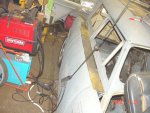
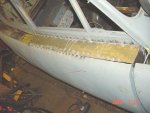
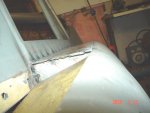
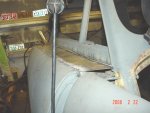
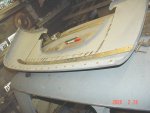
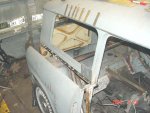
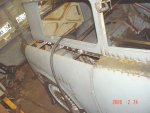
note the 1/8 inch i cut the old floor pans back to expose the FACTORY FULLY BOXED rail ..this 1/8inch cut back gives me a MUCH more solid point to weld the new pans to

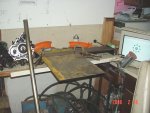
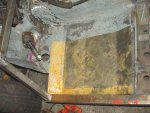
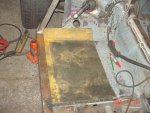
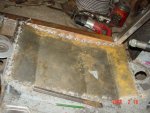
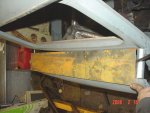
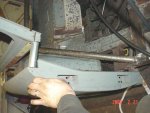
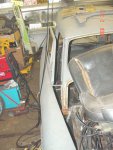
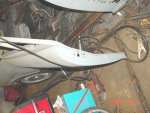
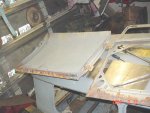
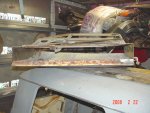
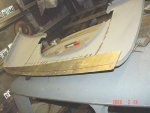
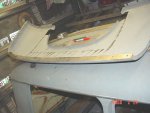
anyway the front floor pan sections are only 24inches long and 14.5 inches wide with 3 bends....god am i glad my wife got me a brake for xmas or this would have been ALOT harder to do the old fashion way...even the the brake is only a 30inch its better than nothing...10 mins later 2 more or less matched pans.....its rather hard to bend a sheet to "exact" ..i just kinda do it by feel as well as a smaller thinner piece of steel bent to ruff shape that i compare to..then fine tune it to the correct shape by hand
 

Attachments

  • 1-Picture 200.jpg
    1-Picture 200.jpg
    109.4 KB · Views: 10
  • 1-Picture 201.jpg
    1-Picture 201.jpg
    90.2 KB · Views: 9
  • 1-Picture 202.jpg
    1-Picture 202.jpg
    86.6 KB · Views: 8
  • 1-Picture 203.jpg
    1-Picture 203.jpg
    85.4 KB · Views: 9
  • 1-Picture 204.jpg
    1-Picture 204.jpg
    88.9 KB · Views: 9
  • 1-Picture 205.jpg
    1-Picture 205.jpg
    82.8 KB · Views: 8
  • 1-Picture 206.jpg
    1-Picture 206.jpg
    100.8 KB · Views: 10
quick test fit and there close..very close..a lil fine trimming of the edge of the old pan on the rails...and a lil fine tune hand bending to fit

stitched in and flush..strong and solid 18guage pans..mind you being its a suicide door car these front pans will get more weight on them than "normal" pans due to the way you have to step in and out of a suicide door car

thinking for tomaro i may start skinning the firewall
 

Attachments

  • 1-Picture 207.jpg
    1-Picture 207.jpg
    110.5 KB · Views: 10
  • 1-Picture 208.jpg
    1-Picture 208.jpg
    107.9 KB · Views: 10
  • 1-Picture 209.jpg
    1-Picture 209.jpg
    108.1 KB · Views: 8
  • 1-Picture 210.jpg
    1-Picture 210.jpg
    109.2 KB · Views: 11
  • 1-Picture 211.jpg
    1-Picture 211.jpg
    104.7 KB · Views: 11
  • 1-Picture 212.jpg
    1-Picture 212.jpg
    115.4 KB · Views: 10
first 2 pic's imm trying to figure out how to fill the 4inch gap

next set...more floor pan work
 

Attachments

  • 1-Picture 1341.jpg
    1-Picture 1341.jpg
    79.8 KB · Views: 14
  • 1-Picture 1342.jpg
    1-Picture 1342.jpg
    84 KB · Views: 14
  • 1-Picture 1343.jpg
    1-Picture 1343.jpg
    95.7 KB · Views: 12
  • 1-Picture 1344.jpg
    1-Picture 1344.jpg
    108.6 KB · Views: 11
  • 1-Picture 1345.jpg
    1-Picture 1345.jpg
    90 KB · Views: 10
so was i...i walked out there pondered for a second and did it...i also started on the rear floor pans

tomaro im probably going to attack the rear fender 4inch gaps..i bounced some ideas off resto and figured out what would be best.....when in doubt i bounce off resto
 
did some more floor pan and rear floor pan work today
 

Attachments

  • 1-Picture 1352.jpg
    1-Picture 1352.jpg
    102.8 KB · Views: 11
  • 1-Picture 1353.jpg
    1-Picture 1353.jpg
    95.3 KB · Views: 10
  • 1-Picture 1354.jpg
    1-Picture 1354.jpg
    102.6 KB · Views: 11
For some reason when i saw those gaps I was thinking some louvers across the top would look cool there. Easy to picture in my head, but hard to describe.
 
considered it and ruled it out for the time being..10-1 odds are it will end upi with recessed jag gas caps neer the rear tho
 
ok well im about to dive into the doors..this is NOT going to be simple by any means...the pic's will prove that

anyway i built up the new frame for the hinge plates and door sill area as well as made provisions for the new seal surface and shoved the "stock" hinge area out 4 inches...this will allow me to maintain the correct door to fender alignment as well as re-use the "stock" hinges without binding up on the rear fender..notice the mimicked line of the new frame to the seal edge of the stock unit...the lip on the stock unit will be cut off shortly
 

Attachments

  • 1-Picture 1357.jpg
    1-Picture 1357.jpg
    85.8 KB · Views: 12
  • 1-Picture 1358.jpg
    1-Picture 1358.jpg
    91 KB · Views: 12
  • 1-Picture 1359.jpg
    1-Picture 1359.jpg
    97.7 KB · Views: 12
  • 1-Picture 1360.jpg
    1-Picture 1360.jpg
    94.1 KB · Views: 16
  • 1-Picture 1361.jpg
    1-Picture 1361.jpg
    85.1 KB · Views: 17
  • 1-Picture 1362.jpg
    1-Picture 1362.jpg
    97 KB · Views: 11
  • 1-Picture 1363.jpg
    1-Picture 1363.jpg
    77.3 KB · Views: 14
as you can see by the previous post the door MUST be widened 4 inches PERIOD...theres no way around it

note that the door at the top has a HUGE amount of curve to it makeing the widen that much harder to keep perfect at 4 inches

next are the lines im thinking would be best to cut at
 

Attachments

  • 1-Picture 1364.jpg
    1-Picture 1364.jpg
    96.4 KB · Views: 13
  • 1-Picture 1366.jpg
    1-Picture 1366.jpg
    68.6 KB · Views: 13
  • 1-Picture 1367.jpg
    1-Picture 1367.jpg
    78.6 KB · Views: 14
Are the door glass lift mechanisms attached to the inner or outer side of the door? If the inside you should be ok. But if they are attached to the outside panel, you're gonna have a bunch more work cut out or you.
 
hmm seems my post didnt post

well the old "stock" mechanics of the window were attatched to the inside of the door only(one worked the other was dieing and they were dainty as hell)...mind you i will be going with a power setup most likely from a dodge minivan for simplisity....

even the brace that runs from the top of the door to the bottom is ONLY attached to the inside of the door...

as a bonus of widening the door i will finaly have room to let me cut out the wing window and go with a SINGLE piece of glass for a MUCH MUCH cleaner look
 
Sounds like you already got it under control then. Good thinking on removing the vent window too.:2thumbs:
 
i originaly wanted to lose the wing windows due to NO seals availible..hell i couldnt even make seals to make them work...so i was going to have "fixed" glass as i didnt have room in the narrow door to have a striker pin AND a slideing window...with the wider door it makes room to have the striker in a better location AND lets me remove the wing window....actualy with the narrow doors i was having a hard time figureing out how to have a inside door handle as there was no room for it
 
well ive said it before..ill say it again..jumped past another point of no return

sliced open the passenger side door and started the 4 inch widening.....its tricky but no worse than most of the stuff ive already done...funds are TIGHT very TIGHT and im about out of wire in the wire feed(40$) and have limited amounts of 18guage sheetmetal(50$ for a 4x8 or is it 4x10?)..soo i ripped what i had into 4foot 4inch strips ..its enuf to do both doors and "start" on the rear fenders

anyway we last left off i had marked the lines for the cuts....i ran a dirty x-brace on the door to maintain squareness, i sliced on the lines and did a quick test fit to make sure the 4inch was maintained the full length of the door..even tho the fenders are mostly just mocked into location

next up is the sliced door halves...this door is the WORST panel on the car for rust..most of the lower edge is rotted out..with this door slice ill be able to just cut it out and change the 4 inch strip to a 5inch

new sides tacked into place
 

Attachments

  • 1-Picture 1368.jpg
    1-Picture 1368.jpg
    91.4 KB · Views: 12
  • 1-Picture 1369.jpg
    1-Picture 1369.jpg
    84 KB · Views: 12
  • 1-Picture 1370.jpg
    1-Picture 1370.jpg
    89.3 KB · Views: 11
  • 1-Picture 1371.jpg
    1-Picture 1371.jpg
    56.4 KB · Views: 11
  • 1-Picture 1372.jpg
    1-Picture 1372.jpg
    64.8 KB · Views: 9
  • 1-Picture 1373.jpg
    1-Picture 1373.jpg
    87.1 KB · Views: 11
  • 1-Picture 1374.jpg
    1-Picture 1374.jpg
    73.7 KB · Views: 11
a quick test fit of the other half of the door reveals some trimming required

starting on the welding of the 2 halves back together..over trimmed in a few small spots..no big deal to fill in with some small strips

another GOOD look at that lower edge rot..thankfully the worst of it is in the flat section
 

Attachments

  • 1-Picture 1375.jpg
    1-Picture 1375.jpg
    91.1 KB · Views: 12
  • 1-Picture 1376.jpg
    1-Picture 1376.jpg
    86.1 KB · Views: 11
  • 1-Picture 1377.jpg
    1-Picture 1377.jpg
    89.7 KB · Views: 11
  • 1-Picture 1378.jpg
    1-Picture 1378.jpg
    87.5 KB · Views: 10
  • 1-Picture 1379.jpg
    1-Picture 1379.jpg
    84.2 KB · Views: 10
  • 1-Picture 1380.jpg
    1-Picture 1380.jpg
    90.7 KB · Views: 10
  • 1-Picture 1381.jpg
    1-Picture 1381.jpg
    93.2 KB · Views: 11
camera battery needs charged soo heres where i stop shooting pic's for the moment

both sides of this door are tacked and surprisingly square..i was expecting "some" tweaking required..

dropped the door back into the fender(mind you the hinges are still bolted to the door i just drop them into there pockets but dont bolt em to the body)...the fit is amazing..and even tho the fenders are not perfectly lined up or spaced i dont think i will need to releave the front edge of the door for fender clearing as it clears right now!!!


dropped some 4inch strips on top of the gap in the top of the door and fender for you people who have a tiny imagination...im loving how aggressive and tasteful the body is looking...glad its got the bite to back it up
 

Attachments

  • 1-Picture 1382.jpg
    1-Picture 1382.jpg
    90.7 KB · Views: 10
  • 1-Picture 1383.jpg
    1-Picture 1383.jpg
    90.9 KB · Views: 14
  • 1-Picture 1384.jpg
    1-Picture 1384.jpg
    99.3 KB · Views: 12
well the camera charges fast and i pressed on..did the top of the 4 inch door skin...the last few shots are with the aluminum trim lightly re-polished

i know the curve "looks" very sharp but its not its actually its a smooth perfect curved roll :giggedy:..the 4th shot shows it best

essentially the door is done..just need to patch the bottom edge and fill some gaps..well all the hard work is done anyway
 

Attachments

  • 1-Picture 1385.jpg
    1-Picture 1385.jpg
    83.1 KB · Views: 11
  • 1-Picture 1386.jpg
    1-Picture 1386.jpg
    77.8 KB · Views: 9
  • 1-Picture 1387.jpg
    1-Picture 1387.jpg
    67.5 KB · Views: 9
  • 1-Picture 1388.jpg
    1-Picture 1388.jpg
    58.4 KB · Views: 10
  • 1-Picture 1389.jpg
    1-Picture 1389.jpg
    81.6 KB · Views: 13
  • 1-Picture 1390.jpg
    1-Picture 1390.jpg
    72.6 KB · Views: 14
the start of a HUGE jump forward
first off pulled the fender..note the new door jamb setup

layed the fender of the room and traced the edge onto a 4foot 4inch piece of 18 gauge

mark and trim one side

stuff the cut piece under the lip and trace the other edge as well as the mounting holes

drill and trim the other edge off

the end result is a copy of the lip on the fender...now mounted to the body
 

Attachments

  • 1-Picture 1401.jpg
    1-Picture 1401.jpg
    102.6 KB · Views: 11
  • 1-Picture 1402.jpg
    1-Picture 1402.jpg
    79 KB · Views: 10
  • 1-Picture 1403.jpg
    1-Picture 1403.jpg
    79.6 KB · Views: 9
  • 1-Picture 1404.jpg
    1-Picture 1404.jpg
    75.5 KB · Views: 9
  • 1-Picture 1405.jpg
    1-Picture 1405.jpg
    73.3 KB · Views: 9
  • 1-Picture 1406.jpg
    1-Picture 1406.jpg
    74.2 KB · Views: 10
  • 1-Picture 1407.jpg
    1-Picture 1407.jpg
    102.1 KB · Views: 10
time to mock the fender back up..note the 1x4 strips on the roof drip rail

use the 4inch strips to brace and space the fender at the correct position..this will double as a way to keep the fender from flexing

the next 5 shots were "mostly" taken for me to use as a second set of eyes looking down the body lines makeing sure everything is in perfect alignment...the camera doesnt lie and allows you to zoom in on stuff you cant entirely see

note the fender is up 1/4 inch :doh:
 

Attachments

  • 1-Picture 1408.jpg
    1-Picture 1408.jpg
    89.1 KB · Views: 11
  • 1-Picture 1409.jpg
    1-Picture 1409.jpg
    85.9 KB · Views: 11
  • 1-Picture 1410.jpg
    1-Picture 1410.jpg
    69 KB · Views: 9
  • 1-Picture 1411.jpg
    1-Picture 1411.jpg
    77.8 KB · Views: 10
  • 1-Picture 1412.jpg
    1-Picture 1412.jpg
    59.2 KB · Views: 10
  • 1-Picture 1413.jpg
    1-Picture 1413.jpg
    66.9 KB · Views: 10
  • 1-Picture 1414.jpg
    1-Picture 1414.jpg
    73.6 KB · Views: 10

SiteLock

SiteLock
Back
Top