Signet-ficant Other

Getting that car out was a major undertaking, make no mistake.
  • There were five engines in the way, one of which was a complete 340 shortblock standing on end (on blocks). I had no way to move that one, so it had to go on a home-made wooden engine dolly that came with my 318. I had no way to lift it, either, since my engine crane is at Stretch's place. That involved tilting the engine partially onto the dolly whilst making sure the latter didn't try to rear up or roll away, then lifting the aft half of the engine and trying to slide it on the dolly. LA shortblocks are heavy when you're bent over and have no lifting mechanisms.
  • Making room for the engines was mostly just time-consuming. It involved moving three 4-speeds and two crankshafts. I made enough room for today's crew to get around the car with three engines stashed alongside the passenger's side, but once I had some momentum I really wanted to keep it, which meant "I think I can move it myself."
  • The car had not moved since I tested my winch back in 2015 or '16. The brakes were pretty rusty. Of course, somewhere along the line I lost track of my snatch block, so I was unable to use the winch to pull the car out. For a car that doesn't weigh very much, it was all I could do to move it--I had my feet propped against the winch base (hitch) because I'd just slide otherwise. I got it moved about six feet, enough to get the floor jack under the K and roll it the rest of the way out on the jack.
  • The doors were resting on a custom-built ledge specifically for them, obstructed by yet another engine (my 360) and one of my parts racks. The rack is about 7' tall, 4' wide and 18" deep. It has five sets of iron heads on it, couple of intakes, and a bunch of other stuff. It's on wheels, but it's heavy. Experience has taught me to move such things slowly, only partially due to the possibility of it tipping (most of the heavy stuff is down low). Ever have a wheel collapse or fold under on something you're rolling? That was the big fear. Lose a wheel on that rack and there was no stopping it.
  • Once the doors were accessible, I was reminded how heavy they are to move alone. Not as bad as my Trans Am, but not a whole lot better. I managed to get those outside and neither dent them nor fold the corners before gently setting them on the grass, interior side down. They probably weigh enough to crush their own outer skins. 😁
  • The valances had to be removed from the wall (they were screwed in place for safe storage) which required another parts-rack move (this one much lighter) and the header panels got completely disassembled. I sent both with the car, telling Jim "I think the green one's better, but there are a couple of broken bolts in that one. Either way, I'm not averse to having two shiny black header panels." Stretch immediately added, "Deer," to which Jim replied, "Yeah, those are definitely a big problem up here."
  • The T/A hood did not go with the car. I was unsure of its safe transport in the trailer (I should not have been once we had everything else loaded) but I'm going to be in Jim's neck of the woods anyway late this month or in December. I want to bring my engine parts to a shop in his area for balancing, and perhaps some other machine work. I'll bring the hood to him then.
I was out there until almost 2AM, and was at it again around 7:30AM today. The trailer still had to be completely cleared of spare wheels, tires (not including the ones in the tire rack up front, which Stretch grabbed later), my generator, both hoods, and a bunch of engine parts and tools. It got swept and vacuumed, and while the shop vac was out I sucked up all the blasting sand/dust/dirt ouf of the Challenger itself. Stretch and the rest of the crew showed up around 11AM, a couple hours later than expected. That was actually great, because I'd had enough time to make it little more than a "load the car and go" scenario... but of course, we had to stand around bench-racing for quite awhile. By the time I watched the trailer drive away, I was exhausted and sore all over--after waking up exhausted and sore all over. A couple of hours later I could no longer resist a nap, nor could the dog--she'd been allowed to be off the chain while everyone was here, and spent a good part of the time hanging around/harassing Jim's wife ("Hey! She's got a heart on her butt!").

So the car's gone, I'm physically and mentally wasted for the moment, and I've got a big hole in the garage where an E-body once sat. There's also more shelf and wall space with the doors, headers, and valances gone. That's room I can put to good use, and hopefully I can get the Valiant in there for some much-needed work once I've done some re-a-wrangling of all the crap in there.

100_4062.JPG


I've got a bunch of work ahead of me, obviously, but with the furnace going like gangbusters and some room to move, it should go pretty quickly. Somewhere in all that mess lurks a couple of light fixtures I've been meaning to hang for quite some time but never had the room to work. I may also use the space to clean up and photograph some parts I'll never use and have been meaning to sell... like that brand-new decklid, the old hood (which is in pretty sad condition) and the console/shifter that came out of the Challenger. I certainly won't be ridding myself of any drivetrain parts in the near future.

We NEED pics! ;)
Go polish your head, Mr. Clean. I said "a bit" not "dramatically". Remember with whom you're dealing here. 😄
 
Taken fairly early this morning. The blocks of wood ahead of the tires were absolutely unnecessary; it wasn't rolling anywhere without quite a bit of assistance. Hopefully the next time you see it it'll be black with yellow stripes.

100_4054.JPG
 
time to make a no falling hazzard, no tripping hazzard, no nothing can bump ding fall over or look at sideways area to park it when it gets home

last time i had a wheel let go it was supporting an engine hoist with 354 AND castiron auto......the caster was never seen again, the mighty hemi came down crushed the engine hoist FLAT and broke the exhaust manifold.....there was no stopping it
 
Last edited:
I was rolling a former co-worker's tool cab/chest combo across the shop floor years ago, when a castor decided it didn't want to go any further.
The crash was the loudest sound I've ever heard, bar none.

Luckily, no one was hurt, It was a good-sized tool box.
The top chest was pretty much destroyed, and it took us a couple hours to get all the drawers opened and the tools put back in their-supposed location.

When I built the chassis for my cabinet combo, I welded angle legs forward of each wheel. They don't interfere with movement, but the hope was that if a wheel did let go, the legs would support the chest.
Luckily, I've never had to find out if they worked or not.

I've rolled that monsterous cabinet around some pretty expensive vehicles over the years...
 
So, after sitting outside neglected for the past three years (and by order of the local PD) Agnes was finally allowed back in the garage today. It wasn't too bad a squeeze, but the place is pretty tight at the moment. I can get all the way around the car, though.

100_5896.JPG


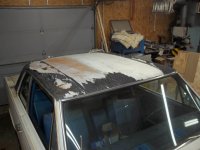
A few years sitting outdoors hadn't done the vinyl top any favors. One might think the neighbor kids were picking at it and ripping off sections, but I think it pretty much just blew away in small sections.
100_5902.JPG


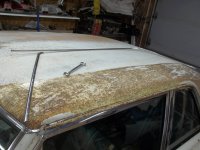
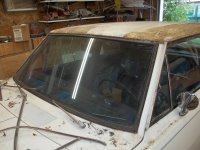
I decided to just rip the rest of it off, cutting around the front and rear windows plus the drip rail mouldings with a utility knife. She's almost completely bald now, although there's a lot of glue and a few vinyl remnants that need attention. I need to get the mouldings off to complete the removal.
100_5931.JPG


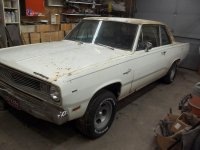
I've gotta be honest. I didn't think I'd like it as much without the vinyl--despite how much I hate vinyl in my deepest heart--but I actually prefer the clean top. A simple clean-up, some sanding, and shoot it to sorta-half-ass match the body, right?

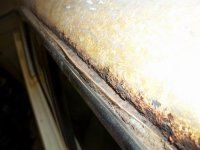
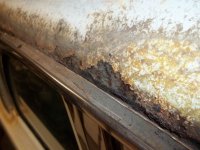
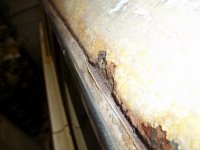
Wrong. R-O-N-G wrong. It seems that white Mopars that had vinyl tops have some kind of vendetta against me. I went through this on the Challenger, though on a grander scale. Starting at the front, let's take a journey down the RH drip rail:

100_5906.JPG

100_5908.JPG

100_5910.JPG

100_5918.JPG


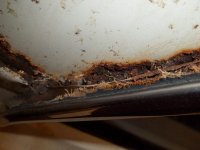
At the back edge of the quarter glass, we have this disaster:
100_5924.JPG


And this is what's left of the roof-to-quarter-panel seam. Yes, that's lead that delaminated from the body in the seam, creating a nice spot for moisture to sit after it soaked through the vinyl. This was not visible through the vinyl, which seemed to be holding it fast to the roof. It popped out when I peeled the top, and I did not pull or pry at it whatsoever. Top glue is heady stuff, I guess.
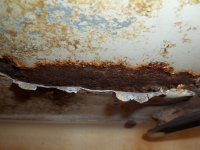
100_5925.JPG


So much for finishing the new heads, slapping 'em on the engine, and lettin' 'er rip. I'm not sure how to handle the situation, because although the car's kind of a piece of crap (intentionally), this definitely demands attention. Am I going to find a roof and replace this one? Hell no. Once was enough; I don't need another merit badge in roof replacement. I've e-mailed the Right Honorable Mr. @restoman with these pictures for potential ideas that involve neither a new/used roof nor slapping in plastic filler and hiding it with a new vinyl top. Those are the two extreme solutions, and I'm a fan of neither. Especially vinyl, about which I've waxed acidic enough in the past that my disdain for it is far from secret.

She's gonna be indoors longer than expected. Sigh.
 
cut patch weld, cut patch weld etc etc etc !

!st cuda had a roof like that, I wonder how it's doing in the UK where it's damp all the time?
 
Remove moldings, wire brush on a drill, rust inhibitor of your choice, thin layer of bondo, then finish with rattle-can of your flavor.
 
oof yeah white cars man..the 68 i had did the same exact thing,...ditto for the galaxie i picked up for parts decades ago...i think its just the way white is under the tops..or it gets sprayed too thin?!?!?!?
 
After consultation with @restoman and Stretch, the "bottle opener" method seemed to be the way to go for drip-rail moulding removal. Well, I couldn't find a bottle opener. I found one of those little plastic keychain ones that Heminet used to give away back in the '90s, but after taking off the corner piece, it broke. I was sad. I'd had that since 1997 and it opened countless beers back in my drinkin' days.

What else could I use? Well, the miracle-for-the-moment cure was a 5/8" line wrench, believe it or don't. It worked a treat on the driver's side:

100_5941.JPG


However, that was not the case on the rusty RH side, where all the seam sealer was lifting. The line wrench couldn't get traction and was sorta crimping the bottom of the moulding. I renewed my search for a proper bottle opener, and found one way at the back of the top of my fridge, unused for more than a decade I suppose (I used the Heminet one for Coca-Cola bottles, which still require an opener here). Being very careful and heeding Resto's advice, I got it off using a lot more caution than I had on the driver's side with the line wrench. I didn't damage the moulding, per se--I can still reinstall it and it'll look fine--but it came off with a severe twist to it.

I found a new hole, a pretty severe one, and the two small holes of which I was aware became one large hole. It's pretty bad. For the new hole, I'm pretty sure I'll have to cut away part of the drip rail itself, patch the roof, then re-weld the drip rail. It's about 1" in diameter and goes right up to the drip rail.

Having had enough of this nonsense, I switched gears and walked my dog over to my storage area to play with the '71 Challenger a bit.
 
Last edited:
That good ole rust tends to do that, what starts out as a pin hole falls away to reveal a much bigger problem.
It's all a time & effort deal & how much you feel like puting into it?
 
but it came off with a severe twist to it
I think they all do, then snapping it back on the roof holds it in the right place.

I remember breaking my bottle opener taking the trim off one or another of the 69s. I also remember having a ton of church keys but not one of the right kind of openers. It was kind of like getting a bowl of soup when all you have is a fork.

That good ole rust tends to do that, what starts out as a pin hole falls away to reveal a much bigger problem.
And what is already a big problem just gets bigger as you pick at the scab.
 
I think they all do, then snapping it back on the roof holds it in the right place.
Yep, it'll go back on fine. However, the driver's side parts are still arrow-straight, which is easily seen in the photo. The line wrench definitely worked better, but because of the rust and lifted seam sealer on the passenger's side, the line wrench couldn't get the same bite on the edge of the moulding. The top side has to sit down in the drip trough. Had I been able to get the seam sealer out of the RH side first, I'd have never needed the bottle opener.
 
Last edited:
I took the all windshield and backlight reveal mouldings off the ol' girl tonight. That was a new experience for me, never having done it on a gasketed-glass car previously. Miracle of miracles, I didn't damage any of the chrome nor did I break any of the clips. Why is that a miracle? Well, the last person who put a windshield in her decided it'd be a good idea to urethane the lower corners of the windshield, then reinstall the chrome while said urethane was still wet. Never mind releasing those clips, simply finding them was a chore. It's fortunate that no clips broke, because replacing most of them requires removing the glass, something I'm loathe to do.

Why, pray tell, did I take off more chrome than necessary? Well, if I'm gonna be addressing rust, I might as well find and correct anything around the window frames too, and there was a lot of built-up crap beneath the two upper/side mouldings around the backlight that concerned me. It was mostly old plant matter from being outside for many, many more years than I've had it. Luckily, I found no rust a'tall around either window. This was one of few times in my life that further investigation didn't result in making more work for myself! While I was inspecting those areas, I found a couple of tiny spots where the paint was chipped. Underneath the white was metallic blue paint. What the... ? No way. After a moment's thought I realized it's overspray from painting the interior. That isn't something they ever did on the E and later B-bodies with which I have more experience, since the entire inside of the car was covered with panels of some sort.

With the chrome out of the way, one would think it'd be pretty easy to dig out the remainder of the vinyl top, and one would be mistaken. The reveal-moulding clips are screwed to the body after the vinyl's installed, meaning said vinyl is pinched between the clips and the sheetmetal. Since I don't want to remove any glass, I devised a method of removing the vinyl remnants with a small flat-bladed screwdriver (and once or twice, a utility knife). It wasn't too terrible since the material was so degraded. There was a trickier part, though, and that was removing the vinyl that was stapled--you read that right--to the window channels. I either forgot, or never knew the factory used staples when installing vinyl tops. Yep, they blasted HD staples right into the sheetmetal to hold the material in place. I lost a couple of 'em, but I'll seal those holes with silicone or something when the time comes. The rest I just left in place and was able to pry the old material from beneath and around them.

The only vinyl left on the exterior is in small remnants sitting on the hood and decklid. The roof is totally bereft.

I was looking at the car, analyzing how I'm going to go about painting the roof, and I'm up in the air on that. There's a hard paint line where the vinyl-top mouldings were that I'll have to feather and respray, which puts me into the tops of the quarter panels. The problem is there's no way to blend new paint into the existing cracked, crazed and faded paint in that area. I don't think I really want to do a whole upper-body respray (hood, decklid, tops of quarters and fenders, and roof) but that's where I may find myself.

But, that's getting ahead of myself. I've plenty to do before I worry aboot paint, and next on the list is removing the old top glue. If my blasting tip is working after soaking in CLR since last weekend (or I can find a new one locally), I think 2,800PSI might be the hot ticket... I mean, that pressure washer stripped my parts Imperial down to factory primer with no chemical assistance. I also need to remove the old seam sealer from at least the RH drip rail, if not both, and that's not an easy spot to work. I'm guessing heat and patience, but I'm open to suggestion.

I didn't have the camera, so I didn't get photos. I'll take some tomorrow or Saturday.
 
funny one, but its worked well for me.... find a nice fitting flat head screwdriver something that fits nice and snug between the rail and the top, run it under a torch and slip n slice it out go till it starts to slow down and then re-heat the driver...it doesn need to be red hot just hot enough to make things easy....bonus points if it semi sharpened

have you considered doing a a flat black painted top?..or hell a vynle wrap for a top? just kinda thinking outloud..guess id have to see the where of the holes...but ive seen alot of sloppy factory a tops that went beyond the trim line all the way to the drip rails
 
funny one, but its worked well for me.... find a nice fitting flat head screwdriver something that fits nice and snug between the rail and the top, run it under a torch and slip n slice it out go till it starts to slow down and then re-heat the driver...it doesn need to be red hot just hot enough to make things easy....bonus points if it semi sharpened
I'm betting it would be even more effective if the drip rail itself was warmed with a heat gun. Thanks for the idea; I'm going to give that a try.

have you considered doing a a flat black painted top?..or hell a vynle wrap for a top? just kinda thinking outloud..guess id have to see the where of the holes...
I considered that, bedliner, and gloss black. The only thing I haven't considered is more vinyl. I guess I could just paint the new white and replace the top mouldings, but that seems a bit silly.

That being said, the whole car is a bit silly, isn't it?

ive seen alot of sloppy factory a tops that went beyond the trim line all the way to the drip rails
That's how this one was. The vinyl was all the way under the drip-rail chrome. I'd thought about simply trimming the vinyl with a utility knife at the various chrome bits and calling it good, but that seemed just too hokey for me, even on this car.
 
the ONLY reason i didne mention heating the rail is i know your trying to preserve paint..."if" your going to heat it heat it from the BOTTOM..IE where the door glass seal side of things as htis helps break the glue free its how i do it on trucks and fish...even some non mopars...you can put ALOT of heat in that drip rail from the underside before doing any damage and it really helps..but..youve a higher probability of hurting the paint

imo the whole A line unless ordered to the gills got the "fuckit good enough" treatment and the tops didnt get trimmed, and...i think it aided in the rusting of the roof to seam or trim...some rot at the seam sealer edge some at the trim line and theres no ryme or reason as to why one rots one way or the other..ive seen neerly identical cars rusted oposite....but white cars ALWAYS had it worse off only seconded by SILVER!!!!...ive seen more silver A cars with rot going from rear window all the way to the trim or blowing out the lead...and were talking west coast we dont rust cars...white cars often fair better in the back but worse up top where silver is bad down low in the roof but better off up high

imo if you dont want to re-paint id probably look at black painted and then semi gloss cleared then 220 wet sanded so its "dull" or even look into some patina coatings..tho i loathe the idea
i could see certain bedliners working but...ive also seen bedliners peal and ive seen rust worms get under them...so imo its as bad or worse than vynle....imo aside from paint a "wrap" top might be the second best possible thing since the tech and materials have come a LONG ways..and you could even get a simulated textured look..hell you could get carbon fiber LOL..point is if you got it smooth you could basicly apply a perminant sticker and be done with it....think about the satin black used on new cars at the window lines..i think that would be slick as hell while being totaly "under the radar"
 
I'm not actually trying to save the paint, since it's worn away to the primer and even bare metal in some spots. It's gotta get painted but I'm not sure how I'll go about it just yet.

Almost every moulding I removed (the backlight lowers are on the trunk lid):

100_6019.JPG


Here's some of the crap that was in the vertical part of the rear window channel, trapped by the reveal moulding. It's a something of a miracle that the window frame isn't even surface rusted, much less rotted right through:

100_6014.JPG


The front window channel is as right as rain too despite similar trash being dug from beneath the reveal, although admittedly considerably less.

100_6012.JPG


The next round will involve addressing the vinyl-top glue. I've got some adhesive cleaner that seemed to work pretty well on a test spot, but it'll be slow, steenky going. Pete stopped by and suggested I try a stripe erasor wheel, which I may since I've got one lying around.
 
i was under the impression you were trying desperatly to not paint it and keep the patina ...i fucking hate that word tho.....honestly id just re-shoot the whole thing and call it a day...whites not flashy or special
i dig the pinstripes especialy the matching ones down the hood..no seriously id re-apply em after a fresh coat of white
 

SiteLock

SiteLock
Back
Top