Rusty's not very quiet cuda progress

I'm maxed out on ground cover, when I lost the last one it had about a foot of snow on it, it buckled pretty goodIMG_0191 (1).JPG
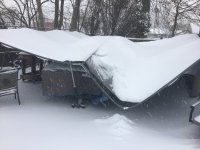
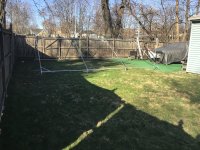
New one went up pretty easy, I built the roof on the ground, tarped it & then when I had all the kids over,(with the wives too) we walked it over the car & put the legs in, tarp off yesterday was easy, getting it back up is a bit harder I throw some ropes over the main bar & pull a little on each till I get it up over the top, that takes a while. IMG_0320.JPG
 
After pricing the new emblems I decided I should dig mine out & see what's good, welllllllll after going through half my boxes AGAIN, not one to be found, now I should have 1 set off this car & a few leftovers from the other car where I did buy new, they are eluding me, year one's have a 30% sale & that's the best # yet, have to find mine by monday night when the sale ends
 
Heater thawed out on that rainy day, so I went out yesterday & started it up, was 39* outside, gave it an hour & 1/2 to warm up & then ventured out.
Not too bad it got it up to 56, while I was searching for the emblems that still elude me I dug out a bunch of plastic & rubber pieces to clean up & see what I could reuse.
So 3 buckets of hot soapy water into a plastic bin & the washing began on these gems..............20221219_134433.jpg
front & rear fender shields will do, skinny rubber one for the cowl had a hole, so I'll need new there, the long fat ones are both front of hood to radiator seals, I think the 73's had the metal clips, it seems more flexible the the 74's, that is a bit more stout & has plastic clips, see how they clean up I should get one good to go?
cleaned one end of each, the 74 is in the rear & looks like that will probably the one. 20221219_140038.jpg
Starter shield was all cracked around one bolt hole, super glued the **** out of it & clamped it up, might hold? 20221219_132950.jpg20221219_133046.jpg
that's the part that bolts up so it won't be seen!
 
Last edited:
Starter shield was all cracked around one bolt hole, super glued the **** out of it & clamped it up, might hold?
Cut some sheetmetal to back the cracked areas then slather it with JB Weld (or even bondo), sort of like finishing drywall where you cover the tape. Hit it with the appropriate shade of black and Bob's your uncle.
 
Yea, welding on thin metal is nearly impossible & I mess up even when the metal is good, I spend more time grinding my blobs then welding!

Yea! I finally got outside for a while today, not a lot accomplished but I scrubbed on those plastic & rubber pieces a while & at least put one piece on!
Not bad for an almost 50 year old hunk a rubber.20221228_141746.jpg
Got the garage nice & toasty today, so I finished cleaning some parts & shot some paint on. The glove box door is finally done, now lets see how bad I screw it up putting the new lock on?
???
?
20221230_153657.jpg
I think some of the plastic looked better before I painted it.
Went through the tail lights I accumulated over the years , none are perfect, tried to make 4 decent ones out of the parts? Now I have to shine up the trim rings & paint one white inner circle.20221230_153615.jpg
 
I really have to check my inventory, I was just about to go in & order some parts, the tail light gaskets for one, when I saw a box that said body gasket kit, sure enough they were in there!
More 5 footer stuff, but they will do, some cracking in the lenses but again, original 50 year old stuff, with nice new gaskets!
Even did ok on my white ring, sometimes I surprise myself!
20221231_145025.jpg
 
It took a while but I finally figured out why that inside door handle wouldn't open the door.
After changing the direction of the rod AGAIN & pulling the mechanism out & back in a few times, I finally noticed the wrong part was moving, back & fourth to the other door (which I didn't mess with) a few times & it showed me the rods go to the opposite connections, well when I first put it in the different length of the rods did not look like they could go anywhere else, had to hold the inner handle wide open to get it to line up with the clip on the mechanism!
Still waiting on the other new outside handle!
 
After going through the first box yesterday & not really moving a lot of stuff around I decided it was time to go through all the boxes & separate areas of the car & consolidate the mess & get a little clue to what my next parts order will be.
I have stuff everywhere, got one more engine bay box done & a trunk box. Now working on separating interior, exterior & front end parts to consolidate them! 20230103_151126.jpg
found a painted trunk catch & replaced the black one................20230103_133637.jpg
& finally put together a few pieces of the hood latch & mounts..............20230103_135618.jpg
 
Another disappointment, my mechanic called, I was all happy my control arm bushings were finally done & then the but came, one upper had a different ever so slightly larger bushing, the new one just fell in the hole with a little play.
So I just ordered a new one, kicker is it has the bushings & ball joint already on, guess I'll have a few spare parts another 134 bucks thrown at it!
 
They should be, today I picked up the rest, lca's & one upper ready to go, now taking a close look at the bad one, it does not look beat up at all, but the old bushing had a second sleeve over it, so did they hone it out at some point?
Well I just hope the new one I ordered is correct!
Dropped off the axles for new bearings, see how that goes ???
 
Beautiful day today, just ran the heater for a little while to take out the overnight chill, rest of the day in shirtsleeves!
So I continued the box cleanup, actually threw out some ratty old parts that I had the replacement stuff for, found a little more hardware that needed painting, only had to do I headlight frame, a new one came with the new fender.20230104_150401.jpg
These boxes are all kinda sorted out........................20230104_150421.jpg
Still some to go, but I think most are already in good places (I hope) 20230104_150442.jpg
 
They should be, today I picked up the rest, lca's & one upper ready to go, now taking a close look at the bad one, it does not look beat up at all, but the old bushing had a second sleeve over it, so did they hone it out at some point?
Well I just hope the new one I ordered is correct!
Dropped off the axles for new bearings, see how that goes ???
I kinda sorta remember seeing an inner support ring on them that IIRC you press the bushing in then you press the support ring on the bushing. Maybe they put the ring on the bushing first, but I'm pretty sure there would be more than a little difference in the hole size, if you could do it at all. I imagine it would take a hole saw to open it up far enough - but might be wrong :D
 
I was going to take a pic of it , defiantly look different than the other 3 but I already chucked the old bushings, I just hope the new one comes with quality bushings & ball joint?

Still finding stuff that needs strip & paint, after 2 rounds of stripper burning my hands right through my rubber gloves I went to the wire wheel, still need a lot more work! 20230105_144739.jpg20230105_151718.jpg
2 sets of filler corners, the back are the orig. off the 73, front from 74, I stripped off 9 different color over sprays, guess I'll paint them all & see what comes out better? 20230105_144716.jpg
On a semi positive note the trunk & roof rail seals came quickly, but the other half of the order is on BO, seems to end up the case on a lot of what I'm trying to buy.20230105_152559.jpg
 
Went to put the garbage out& they were still in the bag, so here's some pics. but upon looking closer they do all look the same, the one with the bad hole seems to have mushroomed past the end???
20230105_182438.jpg20230105_182456.jpg20230105_182614.jpg20230105_182629.jpgWhy I was left with an oversized hole is beyond me!
 
It not only has the rubber pushed out the end of it, the metal shell is shorter by about the same amount. It looks like "installing" it included cutting part of the shell off.

Somebody must have been real proud of how they worked around whatever was wrong to start with.
 

SiteLock

SiteLock
Back
Top