My 71 Duster work in progress

You know how I fixed the vacuum leak I was hunting when the infamous intake full of coolant event occurred? I cut paper gaskets out of the thinnest gasket paper I could buy and used them. Truth.

You'd have to be pretty determined to use the ones that come in the box because IIRC they throw off the bolt alignment by raising the intake and you have a helluva time getting the bolts started.

I'll give her a shot of ether at the gaskets and see if that tells me anything about the intake leak.

$20 for springs is cheaper than $150 for a distributor so I'm leaning toward trying to tune it before replacing it.

FWIW I had a copper out to the house today to do the VIN verification. I opened the hood, pointed at the rad yoke stamping, then at the fender tag and that was good enough. Then I pointed at the dash tag and noted that it has the right kind of rivets there too. He then said we should've started there, it's easier to read. It seems his training didn't cover *why* they do a VIN verification and barely covered "how". But on the + side it only cost $5, if you can ignore all those damned taxes I pay ...

But now I should be able to change the title so that's a good thing.
 
Reading a little bit about the tach drive distributor confuses me. It seems those are supposed to go from nothing to everything like a locked out distributor. But man those springs are so hefty I'm skeptical of that. Plus after decades, who knows what someone thought was a good idea at the time.

I went ahead and contacted Mancini while I was at it to ask if the MP distributors they're selling now have the adjustable advance limit built into them like the Mallory MP distributors did. If it does I may just go ahead and buy one, and this time for a B motor and save myself some space over the RB with a spacer setup that I've got now.
 
Here's something here I found:

"Here's some info. EDIT The mr gasket light spring kit is 925B iirc. The MP kit is P2932675. the crane kit (which is no longer available new) had a plain spring a yellow spring & an orange spring & they recommended to always keep the OE light spring & sub in something instead for the heavy spring with the long loop on one end."

So ... the spring with a loop in it is the light spring? Let's look at that one more time.

20210710_190041-jpg.22904

Sure you can't tell just by looking, but that "light" spring looks heavier than the "heavy" spring other than the loop that lets that one jump out ahead of the other one.

This is a photo I found there also of another guy's distributor with just one spring so it goes directly to full advance once it starts.

7896729-bilden.JPG
 
I don't believe the newer Mopar distributors have adjustable advance, other than the rate via springs. FBO Performance makes an "adjustable" limiter plate for Chrysler distributors to limit the amount of advance created. That, in conjunction with the lighter springs, should be all the adjustment a guy needs, but FBO also sells the plate with a set of six advance springs (part #J685S) for $54+shipping. There's a lot of sales pitch on the FBO site (I love the "fact" that electrons somehow move faster through a computer processor making calculations than they do a transistor) but the limiter plate is a pretty good idea.

The Mr. Gasket 925B instructions say to remove the heavier spring and replace it with one of their springs for 4-speed applications, but replace both springs with an automatic. I suppose with the "cushion" of the torque converter the load on the engine is different, allowing a slightly-faster advance curve.

The heavier spring with the loop is "light" because that loop allows some advance prior to actually engaging and stretching the coil. The distributor with one spring removed will not go full advance upon startup, but it will be "all in" pretty quickly--probably below 1,500. Both weights have to be fully out for full advance, and the design of the system means the spring is technically holding both weights (play with one without the springs in place).

According to what I recall, the MP tach drive had a "performance curve" but it wasn't going full-tilt at 1,700RPM or anything. Since you didn't buy yours new, there's no saying for sure what was done to it over the years. I've never opened mine up other than to see it's got the OE-style pickup and reluctor so I have no basis for comparison. Lacking a vacuum advance means I've no intention of ever using it. I don't have a dragstrip-only car, nor do I plan to build one.

I wouldn't suggest buying a new distributor, but I would highly suggest swapping to something with a vacuum advance. Used B distributors are inexpensive and much better quality than the overseas junk currently hawked by virtually everyone. There were a few vendors at the last swap meet with multiple OE distributors under $50. Fun fact: Other than the shaft itself and the vacuum advance, all Chrysler distributors are essentially the same. Even the plate to which the vacuum canister connects is the same, if memory serves--it just gets pulled from the other direction. Put your shaft assembly into an LA distributor with vacuum advance, use a B/RB advance canister, and you're done. Hell, if you felt like making the cuts in the body you could modify your existing distributor to accept a canister and install the advance plate.

I know I keep harping on it, but vacuum advance makes significant improvements in driveability and fuel economy. Very significant--like multiple miles per gallon--especially at light-load cruise, where the engine wants to see way more advance than the mechanical arrangement can provide (often 50+°).

Never, ever re-use a B/RB turkey pan, facings or not. Once it's torqued it's junk, and you're just begging for trouble by trying to re-use one. Everyone who's way smarter than me and has it all figured out ends up fixing their cars after I convince them to replace their "good" turkey pan with a new one. Daily-driving big-blocks for several years was an excellent teacher: New pan, spray High-Tack, no facings. Perfect every time.
 
inre to what he 👆 said about advance weights, go back and re-read. A very inexpensive solution that I did with my convert w/440 and the waGOON 440 was to replace the heavier spring with another OEM lighter spring. This allows full advance around 2k. This makes for a nice, non-tire smoking launch in the waGOON, unless I pre-load the converter, bringing it closer to the full advance point. Then it SMOKES.
 
Yeah if I stay with this distr I will need one of those FBO plates. And yeah, that guy's full of it but that's a good product. IIRC he got his start selling electronics to people that didn't know better. Maybe they do work better, but c'mon man.

I didn't expect those new MP distributors to be adjustable but you never know if you don't ask. (Since writing that, Mancini confirmed that they do not.)

I haven't run vac advance for years, and have marvelled at how little gas mileage I get. IIRC that old blue gTx was always less than 10 per, usually way less. I thought it was because I drove like a maniac.

I've still got to put it on stands again and pull the driveshaft. If that's causing the noise, it sounded a lot like something was going to break so that's got to be fixed with some urgency. It kind of freaked me out actually, and it seemed to start and stop above and below a certain speed but I didn't look at the speedo. Maybe 20-25 MPH. My first thought was the exhaust rubbing on it from the sound. It seemed to be between me and the rear end, as in next to and slightly behind me where the tailshaft is.

I hope it's that simple anyway. While it's out I can also try to fit that driveshaft loop up in there, because with my luck and the way it shifts, if I don't it's going to break something. It's also time to break out the how to rebuild a 727 book and see if there's anything I can do to soften that up without pulling the trans.

I also revisited this thread during the driveshaft measuring, and I thought it was only 1/4" too long and was thinking about checking the driveshaft angles. I guess that could come into play and make a helluva noise too. There's no guarantee the angle with the 8-3/4 is the same as it was with the 9". I need to remember to look at that while it's up in the air.
 
Last edited:
tach drive dizzy is most likely a boat dizzy..id almost bet money on it

as far as the shaft goes, exhasut rub could be possible, atleast youll have signs of it, a 1/4 inch too long of shaft shouldnt be any issue assuming its not bottoming out because the engines too far back......the only way to check it correctly is to get it up in the air with the weight on the k member and the rear axle so you can check it for bottom out, does it get worse the faster you go or not?
It got loud really quick and I had to go uphill before I got home so I kind of got right out of it and hoped I was going to make it home.

I'm afraid it's the driveshaft angle caused by the engine being on elephant ears. It seems to sit way high in the bay.

I'm going to get all four tires up on ramps and see what it degrees out at before I let the rear tires hang and pull the shaft out to see if I can see anything indicating it's too long.

FWIW the engine is positioned where it needs to be - the transmission xmember ensures that. But it doesn't seem like it would take much for the length on the ears to cause the the angle to be all wrong. The spring pads were relocated on the axle too, so there's a chance that is contributing.

I'll find out. I'm pretty sure that so long as it has weight on the wheels I don't have to get all spun up trying to get the car level before measuring because that will all come out in the wash. Meaning that the measured shaft angle will include any angle on the car itself.
 
actualy...if memory serves theres a full inch of adjustment in the trans mount, so in theory..the whole thing "could" be too far back still, i seem to recall some mounts having even more adjustment, but its been decades since i had to pull a trans i just remember slots on both the trans side and the crossmember side and that they shouldnt be maxed out in either direction

your right about the ears possibly f-ing the angle tho, and the trans mount has PLENTY of flex to have everything off enough to have the engine hit the hood....

toss the relocation kit in out back and yeah you could be in a world of F-ed angles
No relocation kit in this one thank Dog, but the rear end housing started life as a C-body unit so the perches could be installed at any angle. Tolerances stack up, angry noises are made, and here I am trying to figure it out. I think but am not sure that the front to rear of the ears is also limited by the shock tower.

I don't need perfect (it's a good thing) just good enough, with no angry noises.
 
well once you angle it all out, if nothings wildly out, id wonder about the tail shaft bushing/bearing, and id be looking to verify engine position with something on OE mounts, even a simple measurement from exhaust stud #1 to fender line on each side and forward to the core support...certainly someone with a bigblock rig can get you those
 
well once you angle it all out, if nothings wildly out, id wonder about the tail shaft bushing/bearing, and id be looking to verify engine position with something on OE mounts, even a simple measurement from exhaust stud #1 to fender line on each side and forward to the core support...certainly someone with a bigblock rig can get you those
I forgot to mention it before but you could be onto something with the slots in the trans mount. If it is back 1/2" + 1/4" too long to begin with = 3/4" too long. I'm going to look at that the next time I'm underneath the car.
 
According to the Gospel of St. Mopar, Chapter 16 Verse 02 passage 1, the factory driveshaft for a Duster with an A727 & 8¾" axle is 44.99" long, measured center-to-center of the cap openings. Strangely enough, the same number is listed for the Dart despite the latter having a 3" longer wheelbase.

Challenger, with a 110" wheelbase--2" longer than the Duster and 1" shorter than the Dart--uses a 45.79" propshaft.

Kooky.

It all makes sense now. /s
 
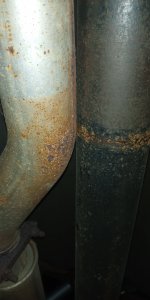
Why hello there mr. witness mark

20211002_165836.jpg

I forgot about the initial 9" rear end. The exhaust was built with that in place, and a 9" has an offset pinion. Replacing that with the 8-3/4" shifted the driveshaft over and now it rubs the exhaust. Of course the exhaust is fully welded because why wouldn't it be? What a pain in the neck. That looks like a 3" length of pipe that needs dented, and I don't have an OA setup. Mapp is as good as it gets here.
 
see if you can just tweak the exhaust mounts to pull it over, your only looking for 1/4 inch tops, hell pull the drive shaft and put a dent in the pipe
 
I don't think I'd heat it anyhow. It shouldn't be too bad to deform that with a hand sledge by holding the back side of the pipe against a 2x4. Denting with the pipe heated might create thin spots, but even if not you're more likely to cave in the pipe rather than merely massage it out of the way.

LOL but isnt there also a couple different tail shafts as well? and i seem to remember 2 yokes?
Nope. All passenger-car A727s are the same length and share the same 30-spline output. There are short-tail units in trucks, vans and motorhomes, but the only two slip yokes are the ones for 7260 and 7290 U-joints. The same yokes are used on all sliding-spline long-tail A833s (B/C/E-body/truck), which are the same length as an A727 once bolted to the bellhousing.
The A9xx-series automatics are shorter OAL and use a 26-tooth output spline, shared with A-body 4-speeds in 1966 and calendar-year 1967 (early '68s are 26-spline) as well as nearly all of the aluminum A/F-body OD A833s from '75-'80. Both of my cast-iron A-body ODs are 30-spline.

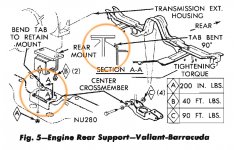
FYI: As far as the slots on the transmission mount are concerned, there's not enough travel in them to make the driveshaft too short. The correct driveshaft will locate the yoke about 1/2" away from the seal boot, itself is over 1" tall. The slots were provided to give the drunken UAW goons some leeway in welding on the K-member brackets (or frame rails, for that matter). If the trans mount bolts up to the factory trans crossmember, the catalogued driveshaft will fit, period.
Side note: I realize you're past this point with the 400, but for future consideration: The 1973-'76 A-body transmission crossmember is a significant upgrade over the '68-'72 part. The mount is easier to install, because (and more importanty) it uses a spool mount. The spool mount can't rip itself in half like the early one can (and often does). Installing the early mount the right way--which nobody does--increases its lifespan considerably.

TransMount.jpg
 
Looking at photos (haven't worked on the exhaust, haven't gone outside since yesterday) I don't think it has an H pipe so I might be able to loosen things up and twist it enough to get it off the drive shaft. If it's got an H pipe then it's time to figure out the best way to put a dent in it.

Whoever built the exhaust apparently didn't have a pipe bender because all those small bends coming off the headers are short pieces welded together.
 

SiteLock

SiteLock
Back
Top