My 71 Duster work in progress

Make sure the bottom of the can is above the level of the fuel pump. Pumps like to push; pull not so much.
I put it on a "kick-step" stool when I did this for the van. The idea being to get it to naturally flow downhill to the pump.

However... what's going on with your fan?
I didn't pay any attention to that other than giving it a spin to make sure it's not hitting anything. It might be an illusion but will definitely look at it.

BTW the solid mount is about 0.15 thicker than the biscuit mounts.
 
Last edited:
OK I got absolutely nothing done yesterday but come back with questions

I didn't get a carburetor base as mentioned below. I might have one laying around - I save those gaskets and such. I don't think it's really necessary, right?

1721135587466.png

Also, I watched a roadkill video on installing the manifold and they didn't use the red plastic hold-it-in-place gadgets with the print-o-seal gaskets. I looked at Summit and the print-o-seal kit doesn't come with them. I got a rebuild kit with at least 3 different kinds of intake gaskets and a pack of the 4 red things. It really doesn't matter but led me to wonder if I could use the red plastic gadgets with the print-o-seal gaskets.
 
Last edited:
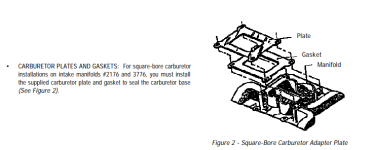
Are you using a standard (non-RPM/Air Gap) Performer intake with a square-bore carb (Holley 4150/4160, AFB or copy)? If so, you need the plate. The edges of the secondary bores will be exposed with a square-bore carb, and the carburetor gasket will just act as a whistle.

If you're using one of the RPM variants it's native square bore and no such plate is needed. The plate comes with the 2176/3776 intakes, which are the only ones that require it to my knowledge.

I'm not crazy about those gasket placeholders. In my paranoid world, a piece of them could get dislodged and sit between the head and manifold, potentially creating a leak. In practice, it's never happened to me. These days I do all my intake-gasket holdin' (and sealing) with red Permatex Spray High-Tack. Follow the directions, and leave the cork gaskets off the front and rear block bulkheads. Even if they're rubber or nice squishy foam, omit 'em. Use a thick bead of silicone on those areas, corner to corner. If you do the silicone first, by the time the sprayed gaskets are ready to be placed the silicone will have skinned enough to prevent it from sticking to both the block and intake.
It's an Air Gap manifold with a Holley 4150. For some reason I had 2176 stuck in my head for the part number but just checked and no I've got a 7176.

I have the print-o-seal gaskets so I'm going to put then on dry with some RTV around the water ports for good measure but probably don't even need that. I will use thread sealer on the bolts.

The roadkill doofuses discussed using cork or RTV and ended up using the gaskets because they weren't too thick. It seemed to me like they had to mess around to get the bolts in though. And, they put the cork down dry, trusting they'd get enough gasket squeeze when bolted down. Then they don't show how that worked out. They never do.

They had also plugged the bypass hose on the intake. I've got to plug the heater hose connections, but I've got what I need to put the bypass on it so I will. I don't see that they gain anything by leaving it off.

FWIW I don't really like the idea of wasting a tube of RTV when I've got perfectly good gaskets but such is life. I used the cork gaskets on the last small block I had. I needed to drill holes into the intake for the roll pin to slot into but I had no leaks and IIRC no problems bolting it on.
 
On the other car I did use the cork & had a leak in the rear section, but I also didn't really blob the silicone in the corners, one or the other caused the leak. This time I started the same way, never found a leak but with the vacuum problems I redid it with the good Dr's silicone, BTW I used the red brush on sealer on the side gaskets & when it set a little I removed the red place holders being paranoid of a leak.
After all that still wimpy vacuum, I kinda think it was sealed both times & will never really know unless the car starts acting up?
 
My repop fan shround is poop. The piece of junk has curved and across the top/bottom only the outside edges touch the radiator. The only thing it's got going for it is it was half the price they are nowadays.

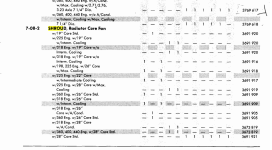
I gotta do something about this. It seems like an original shroud would be about unobtainium at this point. I found a 22" shroud for a 74 a-body w/ 225, It seems like that would work, but I checked the 74 parts book and there is no listing for a a v8 with a 22" radiator.

1721156528818.png
I also went to the most expensive place I could think of to find one and Tony D doesn't have any listed either.
 
Last edited:
I use the High-Tack and omit the end seals for one simple reason: I'm more paranoid about intake leaks than you are about wiped cams. On an LA, it's a virtually undiagnosable vacuum leak. You'll only know for sure when you pull the intake and find oil tracks into the intake ports. In the meantime, you can't tune the carb and can't determine why, because it passes all the standard vacuum-leak test. Funk dat.

Then they don't show how that worked out. They never do.
They're certainly not going to show failures unless it provides hilarity. I don't trust that show as far as I can throw Freiburger. I like both he and Dulcich just fine as personalities, and I'd trust the latter with advice. However, on their shows advertising dollars overwhelmingly trump integrity and they regularly push useless shit on their viewers.

They had also plugged the bypass hose on the intake. I've got to plug the heater hose connections, but I've got what I need to put the bypass on it so I will. I don't see that they gain anything by leaving it off.
I have no earthly idea why they would do that unless they were installing an electric pump that doesn't have provisions for it... which is the kind of thing they do to artificially inflate horsepower.

I needed to drill holes into the intake for the roll pin to slot into but I had no leaks and IIRC no problems bolting it on.
Those roll pins perform no real-world function. In the odd event that I do find them in a block, I remove and discard them.
 
Those roll pins perform no real-world function. In the odd event that I do find them in a block, I remove and discard them.
Pretty sure the gaskets I was using many years ago didn't have adhesive on them so the roll pin holds them in place until you can get it snugged down and the RTV sets up.
 
Looked again and don't have print o seal gaskets, just plain old composite and 3 steel ones. Haven't used the spray tack for over a year should probably buy a fresh can.

Took the poop shroud off and it's cracked. FWIW I've mentioned this somewhere in this thread but it came pre-cracked and plastic welded back together. Figuring that it's chinese parts and I would just get another one that was plastic welded in the factory if I sent it back, I jb welded a stiffener to the underside of that spot and went with it. It didn't crack there this time so I got that going for me but I get to do that again in another place.

I need a better shroud though. It's pure junk.
 
The parts situation for these old cars is pretty sad, I've had more than a few parts either not fit, not work from the get go or fail way too soon.
When you consider that most of the 50 year old parts on the cars STILL WORK!
 
Pretty sure the gaskets I was using many years ago didn't have adhesive on them so the roll pin holds them in place until you can get it snugged down and the RTV sets up.
It doesn't seem like it'd be a very effective solution. It's only going to hold the center of the gasket. The ends of it are out near the bolts and free to push out wherever they please. My W2 gaskets came with attempted mitigation in that area--small fingers that are supposed to hold it--but again, those fingers no place good to go as the bolts are tightened so I snipped 'em off. Black silicone works a treat and allows the intake to come off easily if used correctly.

Looked again and don't have print o seal gaskets, just plain old composite and 3 steel ones. Haven't used the spray tack for over a year should probably buy a fresh can.
It's probably fine unless the nozzle's clogged. Air can't get into the can, so if the ball still rattles, shake 'er up and spray a little on a test piece of cardboard to check. I haven't checked it recently, but one can I have is over a decade old and I'm pretty sure it's still good to go. I bought it long before I left the Iron Mountain store in 2011 and successfully used it on Agnes' engine in June of '19. Without exposure to moisture or air, i.e. inside the can, there's little that can really go wrong. Hell, in several of those intervening years I had no garage heat, so if it even can freeze it certainly did.

I need a better shroud though. It's pure junk.
Originals are actually quite good if you can find one. I'm not certain as to the interchangeability of fan shrouds between the various years, though. The parts book doesn't show a 26" shroud for A-bodies until 1973, and in that year the 22" shroud numbers changed from the '70-'71 part numbers. Does your car have an original radiator with a number on it, or a Chinesium wannabe like Agnes?

The problem is that A-bodies with maximum cooling were not the majority; you need one from a 340/360 or a V8/AC application. A-body buyers were inherently looking to save money so while lots of HP Darts and Dusters were built, they pale in the overall numbers. AC wasn't terribly popular either, especially up this way. Shrouds can be tough to find.
The only shroud that was in our "local" yard was on a loaded '75 Valiant Brougham (heavy on the Bro, yo) that got shredded. That was a 26", but they don't show that size shroud prior to '73. Both of my Valiants are (now) 22" radiators, neither with a shroud, but both left the factory with the wee 19" radiator owing to their non-AC Slant Six configurations. Truth be known, you're ahead of the game even with the crappy one, but I had no overheating issues with Agnes with the 22" aluminum Asian unit and a clutched 5-blade "cop" fan even with ambient temps near 100°... and you've got the advantage of aluminum heads, so I don't expect you'll have any trouble.
 
The parts situation for these old cars is pretty sad, I've had more than a few parts either not fit, not work from the get go or fail way too soon.
When you consider that most of the 50 year old parts on the cars STILL WORK!
As I'm demonstrating (slowly) in my '71 Challenger build thread, I'd rather create Frankenfenders from rusty junk than buy reproductions. It's got nothing to do with price, either. The originals just plain fit.
 
Yep I had to rebend the back drop off on a quarter skin, it was off by 3/4" at the bottom.
The contours on the new fender don't match the factory door,
the nice new sender that didn't work, just a few off the top of my head.
Oh yea on the first car the side marker holes were stamped wrong, went back & the whole stack they had were all the same, the guy took a file to elongate the wholes, I could have done that a home instead of driving all the way up to Connecticut for basically nothing!
 
Does your car have an original radiator with a number on it, or a Chinesium wannabe like Agnes?
It's chinesium

I had gone through the experience of having two bumpers with identical cuts in them before the shroud, so I expected there would be a run of those, patched up with a cheap melt gun and shipped out. The box was factory sealed.

I'm hoping to be able to lay something heavy on it to hold it flat and jb weld a strip of thin steel to it across the crack. It's in the round part (the flat part is already reinforced) on the passenger side top.
 
I'm just tired of fighting with ill-fitting, low-quality parts.

Repro bumpers in particular have been a sore spot I've seen mentioned time and again, both here and many other places. I lucked out with the ones I bought for my '74--they're straightened, rechromed original 1970 bumpers. I bought them when Goodmark/Keystone still did them (North Star Bumper). I got them very reasonably--under $360 to my door for the pair. They were actually less expensive than reproductions in 2014; good luck finding them now.

I have my limits (NOS '71 Challanger quarters? No thanks), but in most cases I've encountered it's well worth using factory-issue, be it NOS or good used.
 
It looks like if I can save enough of the exhaust at the collector end I will be able to use it, at least to move CO to the end of the line and out the door at start up. So I cut one collector off before I called it done for the day.

I never understood why people weld exhaust systems together. Sure they're hard to get apart with old U-clamps, but how is grinding welds/cutting tubes any better?
 
I never understood why people weld exhaust systems together.
Durability (to an extent) and sealing, I suppose. Every ounce on a race car matters too.

Sure they're hard to get apart with old U-clamps, but how is grinding welds/cutting tubes any better?
U-bolt clamps are easily disassembled if you don't gorilla them. It doesn't take much torque on the nuts to generate a significant squeeze on the pipes. Tightening clamps to visible crush is complete overkill.

The one thing that does confuse me about welding: If you weld the entire system and it doesn't have some kind of flex coupling in it, you're asking for trouble. The whole length of the pipe is now a solid object with no flexibility. That's asking for stress cracks due to vibration over time, and why no manufacturer has built a fully-welded, front-to-rear system of which I'm aware without a flex coupling in it. Before the braided flex couplings became common, there was always a clamp on an overlap (slip fit) somewhere in a factory system. It was there as a flex point to mitigate vibration along the length of the exhaust. That's how I did mine on the Valiant: Some of the joints are welded while others are slip-fit with a clamp, be it U-bolt or band. Whichever clamp I used at a joint, it can be disassembled unless it managed to rust itself solid by now.
 
The worst are welded in H- or X-pipes. At least mine are separate so they can be swung out of the way and don't necessarily need to be removed to work around them.

I've got a brand new complete b-body setup with Flowmasters that I had to cut off an abandoned project road runner I bought to strip for parts. I cut them in the straightest place past the tail pipe so they could be used with a coupler spliced in.
 

SiteLock

SiteLock
Back
Top