You are using an out of date browser. It may not display this or other websites correctly.
You should upgrade or use an alternative browser.
You should upgrade or use an alternative browser.
1981 LeBaron coupe - from the ground up.
- Thread starter Dr.Jass
- Start date
Dr.Jass
Pastor of Muppets
From what truck? Ain't never seen one like that in a Dodge pickup, being that one's 4" or so across...
No, Cow, it won't work. I could make it fit but the gauge face is totally wrong. I need it to be a spun-aluminum face. Damned shame, too--those late B-body tachs were some of the most-accurate Mopar tachs ever made (produced by Faria). If you look back through this thread, you'll see pics of the speedo. It has to match, period.
No, Cow, it won't work. I could make it fit but the gauge face is totally wrong. I need it to be a spun-aluminum face. Damned shame, too--those late B-body tachs were some of the most-accurate Mopar tachs ever made (produced by Faria). If you look back through this thread, you'll see pics of the speedo. It has to match, period.
thrashingcows
Drowning deep in my sea of loathing...so I'm
Yeah I remember the spun aluminum face on the guages. Just thought if it would fit and work you could either have it refaced or a decal made up to look right.:huh:
Dr.Jass
Pastor of Muppets
Well, that's where the trouble started--making a pattern for a decal for the tach face.  Don't think I don't appreciate the suggestion; I do.
I'm recycling the old spun-aluminum fuel gauge face so I know it will fit and look right, and the mechanics of installing the Auto Meter parts aren't the issue... I just had the scale all wrong. It was quite frustrating. I still haven't fixed it completely... not that I've worked on it nearly as intensely as I was.
What will be cool is having a factory-looking tachometer with a "warning zone" that starts at 6,700 and a redline of 7,200. :dance: Perhaps I should have started with a tach that reads higher than 8 grand.
Dr.Jass
Pastor of Muppets
Well, I've actually worked on the car of late... damn, these F-based cars rust in some hideous spots. Did some patching on the firewall/toe plate/door-frame junction area tonight. Not pretty, but effective. I'm glad this is an '81 LeBaron and not a '71 Hemi Super Bee with a sunroof. I'm nobody's welder, and three-panel junctions just plain aren't a pretty place to work. I got it done, but thank God for undercoating because it's going to need it to hide the butchery required.
Dr.Jass
Pastor of Muppets
Actually, this is the car on which I'm learning to weld sheetmetal, so yes... there are some unpretty things happening. Not as ugly as what was there, though--the pinchweld between the firewall and toe board was rusted through as was the firewall, and where that seam meets the door frame the frame was rusted through as well. The only way to do it correctly would have been to cut that whole section out of another car... ain't got one of those lying around. I just patched over the holes since they're in a non-visible area, rather than trying to cut patches to fit inside them. Three patches later and it's weathertight, if not gorgeous. Thank God for 36-grit flap wheels and my angle grinder.
Restoman, your place in this world is secure.
Restoman, your place in this world is secure.
thrashingcows
Drowning deep in my sea of loathing...so I'm
Yeah in the minds eye the patches sure look good don't they. Until you start to weld them in and then reality hits....:doh:
Glad to hear some work getting done on the ol' Lebaron. Pics?[smilie=f:
Glad to hear some work getting done on the ol' Lebaron. Pics?[smilie=f:
Dr.Jass
Pastor of Muppets
I haven't been able to work on it for the last few days. My neck and back are messed up, and it's too painful to go out there. :doh:
Pictures? None... my camera is officially dead. With brand-new batteries, it will take one picture before it says the batteries are smoked even though they'll work in other devices. I can't complain, really... I got about 9 years' use out of the old girl. It's time to replace, but the funds aren't there at the moment.
Pictures? None... my camera is officially dead. With brand-new batteries, it will take one picture before it says the batteries are smoked even though they'll work in other devices. I can't complain, really... I got about 9 years' use out of the old girl. It's time to replace, but the funds aren't there at the moment.
restoman
The paint fumes have cleared so I'm
Restoman, your place in this world is secure.
Just finished the same area on the 56 Merc I've been working on. Where the floor, toe board, kick panel, door post and inner rocker all tie together.
The Merc is totally gutted, so it's far easier to get to then your LeBaron, but it's still a pain in the ass.
My back aches for days whenever I do those kinds of repairs.
A 46 year old man is not supposed to bend and twist like that.:shifty:
Dr.Jass
Pastor of Muppets
The area is so bad on mine I just decided that weathertight was good enough. It'll never be a show car while in my possession, just a fun driver and a car on which I can learn some of the ins and outs of welding, paint & body, etc. This project is more about learning than anything and the car is still solid enough that small patches are all that's required rather than full panel replacements or major frame repairs.
Of course, the Imperial will be a cakewalk compared to this one. It came out of Texas and is ka-leeen!
Neck feels good enough to go out there tonight once I've got the dog squared away. I've got to put down some Chassis Saver over my recent work, and will have to start on another area in the meantime. I may work on the front spring-hanger area, or else the interior (probably the floorpans). Not sure yet... we'll see what mood strikes when I'm out there. I'm really ticked about the inability to take pictures, though.
restoman
The paint fumes have cleared so I'm
Now how the Hell are we supposed to critique your work if we can't see it?I'm really ticked about the inability to take pictures, though.
Dr.Jass
Pastor of Muppets
I've actually been making some progress on the car. Of course, I didn't have a digital camera to document anything (and no, I don't have a camera phone) so I didn't see a lot of point in updating.
I finished up all the welding on the RHF inner fender. It was a disaster area and the repairs are not pretty, but they're effective. I weld like a gorilla. After finishing that up, I had to take a hiatus... the next day Valentine got spayed (05/14), and we had a horrible week thereafter. In fact, three days after the surgery I was convinced she wouldn't make it through the night. So, the car sat unattended (and unprimed in the repair area) for a week. Valentine lost about 5lbs during that week... significant on a 34lb pup. She's fine now, but enormously clingy of late... so that's hampered my progress too. I feel guilty being gone all day, then coming home and leaving her alone again for several hours.
I did get out and shoot some of Magnet Paints' excellent Chassis Saver on the inner, roundabout May 22nd. It was a rush job, and there were a lot of runs and sags. I did not attempt to sand them out; the stuff is enormously tough and it's an inner fender so I just left it. Of course I regret that a little now, but it's too late to change it. Here's where I learned a valuable lesson regarding Chassis Saver that I'm sure applies to POR-15 as well: if you think your spray gun is clean, it's not. The stuff is pervasive, so clean it again. Seriously. Yesterday I threw out a spray gun after soaking it in Kleen-Strip's amazing Naked Gun Spray-Gun Kleener for several days, to no avail. If that stuff can't clear the gun, nothing can. Luckily, it was a cheap-ass siphon-feed touch-up gun, so I'm only down about $40.
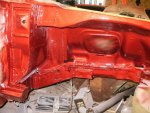
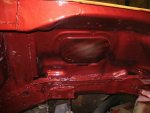
On the subject of yesterday: I got out there again for a couple of hours, and shot the very-first actual color on the car, again in the inner fender. Though it will be covered in undercoating, I wanted to get the practice with the paint so I know how to shoot it when the exterior gets color. It's U-Tech Polybase (Chrysler Inferno Red, code WEL), and it laid down great. Very user-friendly stuff with great coverage (I did not use Polybase Plus, which covers even better). I realize it's a small area but I got no tiger stripes or mottling, nor did I get runs or sags. That's why I now regret not sanding out the Chassis Saver, because it looks like I did!
For the record, I love the color (click for a picture of it) and am very happy I decided to abandon the GM WA382E Pewter I originally planned to use. I'm still doing a two-tone with metallic black on the hood, fender tops, and forward half of the roof.
I haven't chosen the final clear yet (and I didn't have time to load the gun again anyhow) so I used U-Pol Clear #1 after 3 layers of basecoat. Good stuff that's well worth the price, but it is a little tricky... it will leave white "whiskers" in overspray areas.
Oh, and I got a new digital camera, so pics are forthcoming. I'm still learning the camera and will go out and get some shots of the "final" product, meaning this is as good as it's gonna get before undercoating. :shifty:
As expected, seeing the color actually on the car is inspirational and will hopefully motivate me to work on it more... if Valentine will let me!
Dr.Jass
Pastor of Muppets
Oh, and for the record: Chrysler Inferno Red looks a lot like human blood when soaked into clothing or particularly on the skin. I went to two stores last night still in my painting clothes and with my hands still sporting some WEL. One cashier was scared because it looked like I'd bludgeoned someone to death (relax, Steph--it's paint), and the other one was worried that I was injured (no, Rox, the beer is not to numb the pain of the stab wound). 
A Facebook friend suggested I should have gone and bought a chainsaw looking like that... my response was I should have at least asked Steph if they sold ax handles. :bwuhaha:
A Facebook friend suggested I should have gone and bought a chainsaw looking like that... my response was I should have at least asked Steph if they sold ax handles. :bwuhaha:
Dr.Jass
Pastor of Muppets
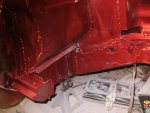
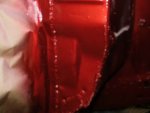
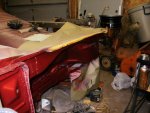
As promised... some new pics.
You can plainly see some of the butchery I perpetrated, but suffice to say the seam sealer hides a lot. Also evident are the "whiskers" left in the overspray areas from the U-Pol clear. I could buff them off, but they'll never be seen anyhow.
You can plainly see some of the butchery I perpetrated, but suffice to say the seam sealer hides a lot. Also evident are the "whiskers" left in the overspray areas from the U-Pol clear. I could buff them off, but they'll never be seen anyhow.
Attachments
Dr.Jass
Pastor of Muppets
It's funny... I really don't like red cars (overdone, you know?), but the car has a red interior so I was limited to black, white, red, or some shade of sliver/grey. I originally chose the WA382E GM Pewter, but after seeing a Silverado that color with a red gut, I really didn't like the combo. Someone who worked across the street from me has a Caravan painted Inferno Red, and while having a smoke one day I noticed the color rather than the van. That was it--the color for my car.
If you don't have polarized sunglasses, I highly advise you get some. You'll get a new appreciation for a lot of colors you see on cars. Inferno Red absolutely pops when viewed through polarized glasses... my co-worker thought I was nuts until I handed him my sunglasses and told him to go and look at that minivan. He was amazed.
If you don't have polarized sunglasses, I highly advise you get some. You'll get a new appreciation for a lot of colors you see on cars. Inferno Red absolutely pops when viewed through polarized glasses... my co-worker thought I was nuts until I handed him my sunglasses and told him to go and look at that minivan. He was amazed.
Diplomat_Wagon
Hiding In The Bushes While
I can vouch for the polarized sunglasses, HUGE difference!

