You are using an out of date browser. It may not display this or other websites correctly.
You should upgrade or use an alternative browser.
You should upgrade or use an alternative browser.
1981 LeBaron coupe - from the ground up.
- Thread starter Dr.Jass
- Start date
Dr.Jass
Pastor of Muppets
Dr.Jass
Pastor of Muppets
Thanks!
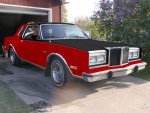
You may remember several years ago I posted a poll and put up several variations of that same pic representing different paint schemes. Not one of them had red as a main body color, because I really didn't want a red car. The winning pic was the same paint scheme, only with silver where the red is in that pic.
After seeing that Inferno Red, though, I really fell in love with it and decided that was the way to go with the red interior. Sorry that I defied the poll results, but I think it's going to look better than it would have with the original scheme.
thrashingcows
Drowning deep in my sea of loathing...so I'm
I like that color too. One of the few reds that I truly like, I think it will look great with the two tone color scheme you propose.
restoman
The paint fumes have cleared so I'm
No ripping forthcoming from here. I've been around licensed bodymen who couldn't weld - Hell, one of them travelled a long way to come work for me - and what you did looks effective to me. Once it's undercoated and covered with a plastic liner, it'll never see the light of day anyway. 
Restoman... you were supposed to rip on my hack job!
Dr.Jass
Pastor of Muppets
I probably should have used larger patches. I was trying to keep them as small as possible, but I'm sure that didn't make things any easier. Unfortunately, where the patching was done was almost all along edges so the only way I really could have made it nice would have been patching in the entire area from another car.
I got some more work done on the car yesterday... well, one fender anyhow. Pics later.
I got some more work done on the car yesterday... well, one fender anyhow.
69.5CUDA
Blah Blah Blah
something i found doc is that a patch smaller than 3x3 tends to be hell unless its a really long 1inch strip or something like that...but seriously sometimes the area is just hell so wouldnt even think twice about it..especialy in an unseen area...ive done my fair share of ugly patches
Dr.Jass
Pastor of Muppets
69.5, the patches themselves weren't really the problem... it was more what I was trying to patch that caused the problem. I took your and restoman's advice from quite a while back and actually cut up the original hood to make the patches. The problem was primarily that towards the outside edges, I was trying to weld to very-thin metal and had a lot of problem with blowing through, even with the amperage and wire speed in the basement. There was just very-little with which to work.
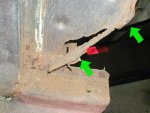
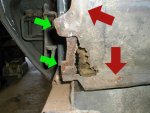
Check out the pics of the area... the red arrows show where there was serious blow-through and additional patching required because of extensive rust from the back side of those area about which I did not know. The green arrows reference the same two points between the pictures. In the picture of the hole in the door frame (the one without any red areas) you can plainly see the pinchweld between the floorpan's toeboard and the firewall showing through the hole. As I'd said in a previous post, short of cutting the whole area out of another car, I don't know that I could have done it much better than I did. I was welding patches to other patches... it was certainly a nightmare area for me to tackle first.
I wish I'd have had a camera to take pics of how bad that area really was. If you think it looks bad in the pics, you should have seen it after I got done with the 36-grit flap wheel. The area pointed out by the upper red arrow had a hole probably 3" long by ¾" wide, and the hole in the pinchweld was nearly as long (lower red arrow), starting almost at the pinchweld's outer edge at the door frame, and leaving less than a quarter inch to which I could weld along the lower edge... and there's no way to make a bigger patch for that piece so I was stuck doing what I did.
It's solid, it's weathertight, it's covered in seam sealer and the undercoat will hide the rest. The other side of the car's a little better, but it's been crashed over there (replacement rocker, installed by a hack, and wrinkled sheetmetal with holes in the area similar to this) so that will be interesting as well... :doh:
Attachments
Dr.Jass
Pastor of Muppets
It doesn't look great, Stretch, but it looks a hell of a lot better than it did. I really wish I'd have gotten pics of the damage after grinding it away; it was far worse than my pics show (those are simply of what I'd found after pulling the fender).
You know you're welcome to come and wade through the Disaster Area Garage any time you'd care to do so.
You know you're welcome to come and wade through the Disaster Area Garage any time you'd care to do so.
restoman
The paint fumes have cleared so I'm
New guys. Oi vai.69.5, the patches themselves weren't really the problem... it was more what I was trying to patch that caused the problem. I took your and restoman's advice from quite a while back and actually cut up the original hood to make the patches. The problem was primarily that towards the outside edges, I was trying to weld to very-thin metal and had a lot of problem with blowing through, even with the amperage and wire speed in the basement. There was just very-little with which to work.
Check out the pics of the area... the red arrows show where there was serious blow-through and additional patching required because of extensive rust from the back side of those area about which I did not know. The green arrows reference the same two points between the pictures. In the picture of the hole in the door frame (the one without any red areas) you can plainly see the pinchweld between the floorpan's toeboard and the firewall showing through the hole. As I'd said in a previous post, short of cutting the whole area out of another car, I don't know that I could have done it much better than I did. I was welding patches to other patches... it was certainly a nightmare area for me to tackle first.
I wish I'd have had a camera to take pics of how bad that area really was. If you think it looks bad in the pics, you should have seen it after I got done with the 36-grit flap wheel. The area pointed out by the upper red arrow had a hole probably 3" long by ¾" wide, and the hole in the pinchweld was nearly as long (lower red arrow), starting almost at the pinchweld's outer edge at the door frame, and leaving less than a quarter inch to which I could weld along the lower edge... and there's no way to make a bigger patch for that piece so I was stuck doing what I did.
It's solid, it's weathertight, it's covered in seam sealer and the undercoat will hide the rest. The other side of the car's a little better, but it's been crashed over there (replacement rocker, installed by a hack, and wrinkled sheetmetal with holes in the area similar to this) so that will be interesting as well... :doh:
Doc, sometimes, ... ok, most times, it's easier to just cut away ALL the damage and start from fresh. Even it it means fab'ing large patch panels, far away from the original damage. Pinch weld joints are not too difficult to make. Welding to thin, rusted sheet metal is a great way to increase the grey count on your hair folicles. Also a great way to pepper your arms with weld splatter. Makes a great conversation starter when the burned sin doesn't tan - the MJ jokes are endless.
But it is looking good.
Dr.Jass
Pastor of Muppets
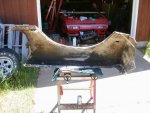
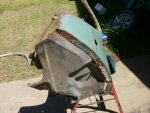
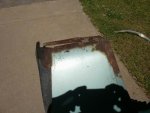
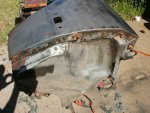
Yesterday's progress...
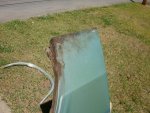
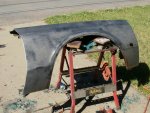
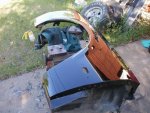
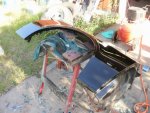
Whilst walking around the compound , I saw the RH fender I'd picked up for the LeBaron a few years back still sitting where I'd placed it when it came home. Being it's been sitting outside for a few years, I thought it high time I did something about protecting it from further rust damage. I removed it from its resting place and proceeded to attack it with chemicals and tools.
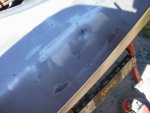
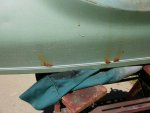
First up was the chemical stripper to remove the OEM paint, which (surprise) hid a medium-sized spot of plastic filler. It's not really uncommon on older cars, nor is it the first time I've seen it. There's a pretty-decent dent it was covering; I did nothing about it now since I don't want to start bodywork on the car until it's bolted together; if I fixed it now, it could well come apart once the fender's bolted in place and it's under tension.
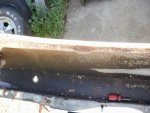
After the stripping agent had done its thing, I attacked it with my 4½" angle grinder and a knotted cup brush, to remove rust and prep the rest of the surface for the Chassis Saver (it won't cling to smooth metal). Once it's scuffed (no easy feat, by the way) I can do bodywork over the Chassis Saver, so I decided to coat the entire fender rather than just the problem areas of the lower edges and wheel arch.
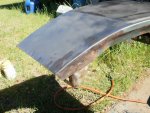
I loaded up my crappy touch-up gun with the Chassis Saver and shot the panel. I waited the prescribed flash time and shot it again, then cleaned my gun really, really well. The paint laid out nice (it always does if you don't run or sag it), and I was very happy with the results. Unfortunately, I ran out of paint stripper and wasn't able to take care of the inside or front; I've got more stripper but no energy to tackle it tonight since my 3-day weekend was much like a marathon--car, Tina's house, graduation party, etc. As nice as it looked last night, I went out there this morning only to find a bird had shat upon it. :doh: We'll see shortly how well that paint holds up to avian droppings.
The heavily-pitted areas will get a skim coat of plastic filler; I'd like to attempt actual metalwork on the dent to try and straighten it as much as possible before the I break out the filler. Again, I won't attempt that until it's bolted to the car.
Anyhow, enjoy some more pictures:
Whilst walking around the compound
First up was the chemical stripper to remove the OEM paint, which (surprise) hid a medium-sized spot of plastic filler. It's not really uncommon on older cars, nor is it the first time I've seen it. There's a pretty-decent dent it was covering; I did nothing about it now since I don't want to start bodywork on the car until it's bolted together; if I fixed it now, it could well come apart once the fender's bolted in place and it's under tension.
After the stripping agent had done its thing, I attacked it with my 4½" angle grinder and a knotted cup brush, to remove rust and prep the rest of the surface for the Chassis Saver (it won't cling to smooth metal). Once it's scuffed (no easy feat, by the way) I can do bodywork over the Chassis Saver, so I decided to coat the entire fender rather than just the problem areas of the lower edges and wheel arch.
I loaded up my crappy touch-up gun with the Chassis Saver and shot the panel. I waited the prescribed flash time and shot it again, then cleaned my gun really, really well.
The heavily-pitted areas will get a skim coat of plastic filler; I'd like to attempt actual metalwork on the dent to try and straighten it as much as possible before the I break out the filler. Again, I won't attempt that until it's bolted to the car.
Anyhow, enjoy some more pictures:
Attachments
-
 Web_10_0531_05.JPG172.9 KB · Views: 16
 -
 Web_10_0531_02.JPG116.3 KB · Views: 17
 -
 Web_10_0531_13.JPG171.4 KB · Views: 17
 -
 Web_10_0531_09.JPG149 KB · Views: 17
 -
 Web_10_0531_10.JPG87.9 KB · Views: 39
 -
 Web_10_0531_07.JPG125.2 KB · Views: 17
 -
 Web_10_0531_12.JPG180.5 KB · Views: 17
 -
 Web_10_0531_17.JPG160.9 KB · Views: 19
 -
 Web_10_0531_16.JPG153.1 KB · Views: 18
 -
 Web_10_0531_06.JPG120.3 KB · Views: 16
Dr.Jass
Pastor of Muppets
I'm sure you're right, but my metalworking tools are comprised entirely of a claw hammer and a 4" vise. I was able to make the lower firewall patch extend on to the pinchweld, but I would not have been able to duplicate the edge of the pinchweld itself--the firewall half of it is not only welded to the toeboard, but at the outer seam, it makes a 90-degree downturn that actually covers the seam and extends maybe 1/16" past it. That last bend is maybe 1/8" total from the edge of the pinchweld. If I'd had a metal brake or bender, I might have attempted it. I wasnt' going to go there with a small vise and (I'm not kidding) my grandfather's claw hammer.New guys. Oi vai.

I am a new guy. This is why I pester Jedi Restoman with PMs and questions. As I said, I took your and 69.5's advice about using original metal; one side of the original hood is now nearly clearanced for zoomie headers.
69.5CUDA
Blah Blah Blah
actualy doc..if you stair at that vice long enuf..youll see that pinch weld joints can be maid with it...ive made more goofy patches with my vise than anything else..in fact 90% of my 90bends on the lloyd were formed on my vice..and you know that spot that rotts out on a-bodys under the batter with all the goofy angles and such...a normal hammer and the front yard made a patch that the factory would have been proud of..you just have to think outside of the box when making some of the stuff...for what you had you did a hell of a job..as for burning thru..try stitch welding..turn the wire speed up just a bit more and just tap the trigger..keep the area hot and just tap at it all and you can actualy weld amazingly thing stuff solidly and even fill in holes you burned out in even the thinest stuff..its an art really but once you start playing with the concept youll et good at it in a hurry...and im sure youll find more thins spots where its going to be well used info....im CONSTANTLY running into factory thin spots on the lloyd and its not stuff that needs cut its just how the mettal was stretched
as for patches ive give you a few good ideas..get some random small peices of solid stock you can make a 1/4inch 90 bend in your vice then slip a peice of 1/4inch plate into the vice with it provded the solid stock is narrow enuf and then make another 90deg bend...another great tool is actualy a couple peices of solid stock and some heavy duty c-clamps pinch some sheet between them and hammer bend it slowly from end to end and back and it will look like it was done in a brakeand you can then bend it over the edge of that should you need a C shape..also soft old blocks of wood make great beating bags..preferable old 8x8 blocks they tend to be nice and soft in the center..round stock is good for bending sheet over for forming corners too...its all about creativity around you and you can create pretty much any patch
as for patches ive give you a few good ideas..get some random small peices of solid stock you can make a 1/4inch 90 bend in your vice then slip a peice of 1/4inch plate into the vice with it provded the solid stock is narrow enuf and then make another 90deg bend...another great tool is actualy a couple peices of solid stock and some heavy duty c-clamps pinch some sheet between them and hammer bend it slowly from end to end and back and it will look like it was done in a brakeand you can then bend it over the edge of that should you need a C shape..also soft old blocks of wood make great beating bags..preferable old 8x8 blocks they tend to be nice and soft in the center..round stock is good for bending sheet over for forming corners too...its all about creativity around you and you can create pretty much any patch
Dr.Jass
Pastor of Muppets
Thanks, Kirk... I'll refer back to this post when I hit the other side. :dance: I know I may seem like I'm a know-it-all sometimes, but I'm always listening when it comes to that which I don't know, and I appreciate the advice.
However, that little fold-over at the edge of the pinchweld? I'm not sure that could have been duplicated with what I've got. It's so small as to not even be noticeable, but I wanted to retain it and it wasn't rusted so I did it the way I did. If I had pictures it might be easier to explain; I'll document the driver's side much better than I was able to on the passenger's. The driver's side should be easier, but there I'm dealing with crushed metal from a long-ago crash as well as rust holes and blatant butchery on the rocker. However, the rust is much-less serious over there... or should I say, I think it is. It hasn't met the flapwheel yet! :doh:
However, that little fold-over at the edge of the pinchweld? I'm not sure that could have been duplicated with what I've got. It's so small as to not even be noticeable, but I wanted to retain it and it wasn't rusted so I did it the way I did. If I had pictures it might be easier to explain; I'll document the driver's side much better than I was able to on the passenger's. The driver's side should be easier, but there I'm dealing with crushed metal from a long-ago crash as well as rust holes and blatant butchery on the rocker. However, the rust is much-less serious over there... or should I say, I think it is. It hasn't met the flapwheel yet! :doh:

