tiny...aka 1958 lloyd

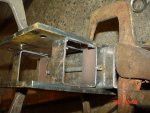
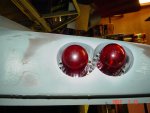
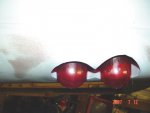
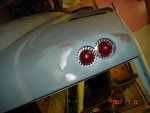
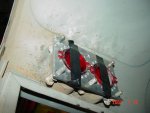
ohh look even more with them mounted...love the way this is going to look judgeing by the second to last shot....turned out MUCH MUCH better than expected.....still need to polish the lenses obviously and make the xmas tree of led's that will go inside of them(fixing to order more LED's as the design i have in mind calls for 80 red led's per lens and then the 20 white per turn ring...meaning 400 led's on my tail lighting alone
 

Attachments

  • 1-Picture 094.jpg
    1-Picture 094.jpg
    71.4 KB · Views: 11
  • 1-Picture 095.jpg
    1-Picture 095.jpg
    62.4 KB · Views: 16
  • 1-Picture 096.jpg
    1-Picture 096.jpg
    65.8 KB · Views: 12
  • 1-Picture 097.jpg
    1-Picture 097.jpg
    40.9 KB · Views: 13
  • 1-Picture 098.jpg
    1-Picture 098.jpg
    47 KB · Views: 13
  • 1-Picture 099.jpg
    1-Picture 099.jpg
    66.6 KB · Views: 20
  • 1-Picture 100.jpg
    1-Picture 100.jpg
    66.2 KB · Views: 14
Everything is looking cool per the updates. When I welded for a living I wanted to make a "timer" for skip welding, had it in my head. it would be a circle like a record with lines of copper radiating from center out. by moving the "stylus" in or out you could adjust timing. Then I got to thinking about how to adjust "on" time and dropped it and just started thinking of naked chicks again while being bored out of my gourd.

not applicable to what you are currently doing but I thought of this while reading. Chiropractor had one to show me the "arc" of my spine on the x-rays, I was fascinated by the toy more than my health!
 
Last edited:
well i need something to take my mind off life and somewhere to pour some creativity soooooo

the last week ive spent makeing a HUGE mess in the shop trying to increase my floor space by moveing stuff out or into the rafters...ive ALMOST got enuf room to get the lloyd AND the alfa milano into the shop...once the milano is in the shop it wont move till its welded stable.....i did up the math and measurements today and i have to take 20 inches out of the wheelbase of the milano to make it match the lloyd....once ime done cutting it will be little more than a front suspension rear suspension and a drive shaft tunnel...wich will get mated to the lloyd body

one of my PERSONAL requirements for this cut was to get my "finished" tires on the milano BEFOR cutting...today i went down to the tire place and should have my tires in the mornin...a set of 140+mph rated 195/50/15 a 22.5 inch tall tire....id have loved to get some 195 45 15's but was not going to pay 400+ PER tire!!!!!..when i can get a FULL set of 4 for 230 mounted balanced ect........sooooo tires will be in tomaro mornin.......ill admit i was hoping for a 20 inch tire but simply put no one makes such a tire any more....even tho i have a set of OLD never mounted 20 inch goodyear blue streak slicks....whats this mean?...well 10-1 odds ill have to cut the wheelwells and raise them front and rear by atleast 2 inches

eitherway im pulling the lloyd off the trailer tomaro(yeah still tarped and trailered from the micro show) and getting it back into the shop..putting the tires on the milano and hopefully getting the milly into the shop

for the sake of perfection and keeping the milly PERFECTLY square..ive studdyed how they stretch lincolns and caddys for limo and hurse stretching.....down and dirty..ya need 2 LEVEL stationary rails ..weld the front half of the car 3 inches forward of where your going to cut....weld a slider to the cat 3 inches after the rear cut and slide together...the rails keep everything perfect...or atleast thats the theory...the more perfect the rails the more perfect the squareness of the car...most stretch companys use railroad track....thats not an option here.....sooo ill hit the steelyard in the next week and see what i can find that wont go over 50$...should be able to find some nice 2x4 steel square tube for cheep...makeing it level is going to be tricky as my floor is anything but....so once the car is setup there will be NO moveing the car or rails till its welded back together solid enuf that it wont shift or flex funny


imo ive thought out every variable that i can in advance prior to cutting...if ANYONE has any input on the cut or rail jig speak up NOW....ive even picked 2 matching points on the car 20 inches apart that are exactly the same so that the rocker area can be welded and braced temporarily
 
your doing a fine job Kirk.. keep it up. i like the way you salvage things that others thro out. i do the same... you would definatley be a big asset to any shop. just put you in a corner and come back later to give ya a coffee and see you again a 4. you have alot of creativity and for that you should get paid well. someday . in the meen time your doing fantastic. when i star on my stuff i,ll begin to post. i have a 74 1 ton 4x4 int. pickup . and i got a plan for it. and i am useing a hood fron a hiway tuck . it,s off an old WHITE FREIGHTLINER CONVENTIONAL. and i might put a sleeper on it to. i may even use my detroit engine in it. airbags under the front. right now it,s just a dream. and opposition. but that is what makes it all work. say it cant be done or it wont look right and you win a trophy for excellence when your done --- remember YOU CAN,T ARGUE WITH SUCCESS:bwuhaha::bwuhaha::doh::bwuhaha::helpme::)
 
haveing a craptatstic night..been in the b-room for an hour already..and feeling like ive been kicked by a horse while rideing spinning rides to long at the fair

ill see what i can get for pics tomaro depending on how mobile i am
 
ok well picked up my new skins today..i "was" worried about the tires being too "low profile" and looking rubber bandish....

anyway i was limited for options..tires cant be any any wider than a 205 and must fit a 15 inch wheel and be UNDER 24 inches tall severly limiting my options.....they do make a smaller tire a 195/45/15 but at 450$ per tire aka 1800$ for a set i simply couldnt justify paying 1800$ for 1 less inch of hight at 22.1 inches...when i can get a set of 195/50/15s for about 55% a tire and be speed rated up to about 145mph at 22.8 inches tall..soo yeah i opted for the 50 series tires and paid 238$ mounted balanced and some tires disposed of

soon as i was loading em into the back of the minivan i was quite happy with the look of the tire ..not sooooooo low to look fun and not an "ugly" looking tread....even more impressed by how well the tire looks on the wheels....anyway i tossed a set under(well a front one anyway as the cars sitting on the trailer goofy and wouldnt allow me to see what the rear would look like under the car) and well....i "was" EXPECTING to have to run a set of these
39c7_1.JPG

but now im not so sure that its a requirement......mine you "if" i do decide to run some discs they WILL be ALUMINUM and NOT the new stainless varity as there too godamn heavy..and due to the wheels being aluminum iwill be required to run the bolt on varity


has ANYONE delt with aftermarket pedal and MC setups?..im eyeballing this setup and would LOVE some input
http://cgi.ebay.com/ebaymotors/ws/e...STRK:MEWA:IT&viewitem=&item=220159965544&rd=1


PS let me be the first to say this...it feels VERY weird buying a set of tires and putting them onto a car thats going to be cut up..admitedly the suspension and tires will end up on the lloyd but you get the idea....actualy its only the second set of 4 tires ive ever bought new and only the 3rd time ive bought "new" tires
 

Attachments

  • 1-Picture 032.jpg
    1-Picture 032.jpg
    59.6 KB · Views: 10
  • 1-Picture 033.jpg
    1-Picture 033.jpg
    117.8 KB · Views: 13
  • 1-Picture 034.jpg
    1-Picture 034.jpg
    88 KB · Views: 22
  • 1-Picture 035.jpg
    1-Picture 035.jpg
    81.4 KB · Views: 20
  • 1-Picture 036.jpg
    1-Picture 036.jpg
    106 KB · Views: 28
lazy edit

tires WILL be outside of the stock wheelwells some(about 3 inches each side)...soooo im going to have to flair the body at the wheelwells and likely raise the fronts...as well as the rears(already expected to be doing the rears)
 
well shes off the trailer and back into the shop...the mating ritual has begun as theve had a good look at eachother :bwuhaha:
 

Attachments

  • 1-Picture1 038.jpg
    1-Picture1 038.jpg
    127.1 KB · Views: 13
  • 1-Picture1 041.jpg
    1-Picture1 041.jpg
    105.1 KB · Views: 12
  • 1-Picture 1037.jpg
    1-Picture 1037.jpg
    81.7 KB · Views: 12
  • 1-Picture 1039.jpg
    1-Picture 1039.jpg
    128.2 KB · Views: 14
  • 1-Picture 1040.jpg
    1-Picture 1040.jpg
    131.4 KB · Views: 12
  • 1-Picture 1042.jpg
    1-Picture 1042.jpg
    114 KB · Views: 12
  • 1-Picture 1044.jpg
    1-Picture 1044.jpg
    94.9 KB · Views: 9
lloyds all nestled into the corner makeing room for the milano to slide into the room.....soon the milano will start striping for the lloyd :bwuhaha:......maybe i should give the milly a 5th of nitromethane to get the fluids moveing:bwuhaha:


gotta shuffle a few more things around to get the milly in but should be in tomaro...going to presherwash the milly down today to get anything off now that may fall off in the shop(damnit i just swept and blew out the shoop floor)
 

Attachments

  • 1-Picture 1045.jpg
    1-Picture 1045.jpg
    95.6 KB · Views: 9
  • 1-Picture 1046.jpg
    1-Picture 1046.jpg
    106.3 KB · Views: 11
  • 1-Picture 1047.jpg
    1-Picture 1047.jpg
    72.5 KB · Views: 10
  • 1-Picture 1048.jpg
    1-Picture 1048.jpg
    69.5 KB · Views: 12
Boom chicka bow wow. Some red lights might speed it up some. Eh, prolly be like dogs, have 'ta throw water on 'em to break 'em apart. :bahh:
 
69, I haven't checked your progress for some time, but I like what you've done.
When I first saw the initial project I thought "what the Hell is this guy gonna try here?", but you've got some pretty good vision. Not too many people can take a beat up, almost laughable car, and create another one from it. Resto's are easy, creating something unique takes talent.

THANKYOU!!!

i must admit i see a finished project out of the worst things...not always in 100% clear details and nothing that cant be edited along the way ..imo resto's are somewhat simple and boring to an extent.(the average guy with some know how and skill can pull off a resto just throw money at it on the stuff ya cant do)...if there was any 1 person/company i would have loved to learn under it would have been baris customs.....some of the strangest coolest stuff rolled out of those doors and theres alot of lost art out there that i love to death...wish i had an english wheel.......did i ever post my scetch i did on the lloyd?

custom..has been watered down over the years..so many "customs" are nothing more than parts off the parts house shelf and some bling and paint...days of the chop channel section and unique engine/trans/suspension combos are long gone..everything seems to have fallen into the "kit" 350/350 narrowed 9 on a nova or mII front end everything from 32's to 60s and 70s trucks/cars..............i dig old school but love to toss in a little bit of modernization when posible without going ugly..
 
i dig old school but love to toss in a little bit of modernization when posible without going ugly..

Yes, I agree!!!

I think Eastwood sells an English Wheel, here's a Link on Ebay for a book on how to build your own. With your fab skills it should be a piece of cake.
 
belive me ive considered makeing a hammer mill and an english wheel MANY MANY times...for the wheel its the wheels that kill ya in costs...............the day i have a shop thats big enuf ill have me a wheel and mill....probably pick me up a used break befor long...needed one too damn many times
 
well the milly is in the shop and with a tiny bit of spare time and a good WHACK to the head i removed the hood and tuned the engine..purrs like a kitten and barks like a ferrari ....at this point should i nip a wire or screw up a vac line ect i WILL KNOW ABOUT IT!!!!!...still funky as hell to pput "new" tires and a full tune on a car thats being cut and dissasembled LOL


well mother has been on my nerves for the last few days and with the week full of DR appts and such i had had enuf took the day and went down to the surplus steel yard and got me a 20 foot stick of 2x2x.065 to start getting the jig built..also found a matching set of 2 caster wheels (ones on a swivle ones fixed but i want the wheels only) as well as a few misc bits of usefull steel for the jig

let me start by saying this...its a ROYAL PAIN IN THE ASS to get a "raked" car level..compound that to the fact that 99% of all concreet floors are far from level..and toss in some HUGE cracks in the floor from the previous owners big rig and you just start to see the iceberg of PITA...after 2 hours and borrowing the neighbors 6 foot aluminum level...i got both 10 foot sticks of 2x2 under the car 1 per side...once under the wheel area(with the car OFF of them) i had to level the stick by placeing pieces of steel under it to shim it up till level..i started doing it with my 2 foot level and that simply didnt fly...with the 6 footer it was fairly simple...once the passenger side was done i slowwwwwwly set the car down onto it and adjusted it to be PERFECTLY centered with the front tires and rear(theres a nice 1inch wide flat stripe down the center of my tires buy did that ever help)..then moved to the drivers side jacking up the car placeing the steel and finding that this side had to go up 2inches off the floor just to make it level with the other side...shimmed it every 12-18 inches with random chunks of scrap...set the car down and checked it all ...ahhhhh nice and level..checked to see what i needed for width braces and found the front to be 1 inch wider than the rear...ahhh shit...sooo i raised the rear up on the drivers side and shifted the stick 1/2 inch let it down and repeated on the other side...perfectly square now......next was to adress the rake of the body..plased a 1 1/2 inch 1 foot ong stick under both front tires on top of the 10 foot sticks lowwered it down and DONE all square and perfect......

now i need to weld the jig together and weld the leveling shims to it as well as the front end risers....also i need to dissasemble the casters that i got and remove the wheels...the idea here is to make a somewhat crude version of what they use to stretch limo's and herse's just used in reverse...the plan is to take the wheels out of the casters and mount them to 2 plates the are snug on the 2x2 sticks then weld the new caster assembly to the rear half of the car 6 inches from the cut line and make a set of "skid" c-channel for the very rear of the car.....the front half will be welded down to the jig and not allowed to move.....as an extra percation i plan to remove any non structeral material from the car prior to welding th casters to the car and the front of the car to the jig so that i can compensate for any ride height changes......

yes i may be over complicating it but i want to be 110% sure that the suspension stays 100% square with ZERO variation....remember this milly is a unibody car and to take 20 inches out of it is not a task for the faint hearted....

ill try and snap up some pic's tomaro of what we are looking at
 
ok well heres a few shots of the jig work thats begun

first 4 are of the primeary rails of the jig under the car FULLY leveled out

the next set of pics is the first to sliders for the rear half of the car to keep it straight true and on the jig right where i want it

last 2 pic's i used some VERY thin sheet to shim out the plates to keep the sliders close but give some room to move...most the car can shift side to side is 1/16
 

Attachments

  • 1-Picture 1062.jpg
    1-Picture 1062.jpg
    102.7 KB · Views: 13
  • 1-Picture 1063.jpg
    1-Picture 1063.jpg
    101.5 KB · Views: 13
  • 1-Picture 1064.jpg
    1-Picture 1064.jpg
    97.2 KB · Views: 10
  • 1-Picture 1065.jpg
    1-Picture 1065.jpg
    83.4 KB · Views: 11
  • 1-Picture 1066.jpg
    1-Picture 1066.jpg
    95.1 KB · Views: 12
  • 1-Picture 1067.jpg
    1-Picture 1067.jpg
    91.6 KB · Views: 11
  • 1-Picture 1068.jpg
    1-Picture 1068.jpg
    99.3 KB · Views: 13
the assembly of one of the sliders.....the plan is to put 2 skate board wheels into each slider....originaly i was going to use a single caster on each but that ment that it could pivot..2 skate wheels should hold the weight just fine and keep it from pivioting
 

Attachments

  • 1-Picture 1069.jpg
    1-Picture 1069.jpg
    116.7 KB · Views: 7
  • 1-Picture 1070.jpg
    1-Picture 1070.jpg
    110.1 KB · Views: 8
  • 1-Picture 1071.jpg
    1-Picture 1071.jpg
    91.2 KB · Views: 7
  • 1-Picture 1072.jpg
    1-Picture 1072.jpg
    94.9 KB · Views: 8
  • 1-Picture 1073.jpg
    1-Picture 1073.jpg
    109.8 KB · Views: 7
  • 1-Picture 1074.jpg
    1-Picture 1074.jpg
    98.2 KB · Views: 8
  • 1-Picture 1075.jpg
    1-Picture 1075.jpg
    91 KB · Views: 9
2 sliders basicaly complete...more pics posted later tonight
 

Attachments

  • 1-Picture 1076.jpg
    1-Picture 1076.jpg
    101.9 KB · Views: 8
  • 1-Picture 1077.jpg
    1-Picture 1077.jpg
    117.8 KB · Views: 9

SiteLock

SiteLock
Back
Top