tiny...aka 1958 lloyd

Hmmm...

Any British stuff floating around out there? Maybe a Mini, or Spitfire? Those rims are a deeper version of what you've got there and you could extend them even farther with some rolled sheetmetal.
Perhaps a VW Bettle? 67 and newer Bug would give you a bit of a hooded headlight look. Might be kinda nifty.

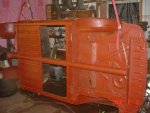
I think you might be in for some metal surgery in order to get everything to flow together. Your fender is pretty snub nosed.

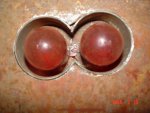
What holds the headlamp assembly in place? Are you gonna stick with the stock size? If not, you'll have to mock up the new lamp and bucket and then try the ring.
A trick I use sometimes is forming with aluminum tape - duct tape and cardboard. Rough it out to shape and then step back and second guess yourself. Tape is pretty cheap, fast to use and faster to discard if you're not happy with it. A quick spray paint will take your eyes off the shininess of the tape.

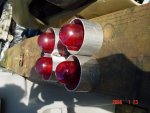
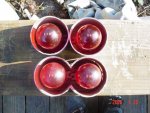
Side view-able taillights would look cool.
 
actualy the stock holding hardware is wierd as hell and certainly up to the job of ANY frenching but its going byebye since its soooo rusty its almost un useable...was thinking if i went down a size i could snag a bucket from a toyota celica(ive got a few laying around actualy)..bug rings eh..theres a bug yard fairly neer by will have to check it out...probelm is with the current size its a VERY tight fit in the fender..not shure how well it would extend..love the idea of the aluminum duct tape great tip...now for the holes on curves?
 
Are you thinking of using two lamps from a four lamp system? That might work, as long as the thing didn't have to be safetied before being plated.

Don't forget, the headlight will have to be accessible from behind once you French them in.
There was a fella around here (one of those "I know everything and you can't tell me squat" kinda guys) that set back the lights on his 54 Chev. Did a nice job except for the fact that he welded the headlight bucket in place. When he finished the car and painted it, he discovered the left light was burned out. There was no way to change it!
He painted the car in my booth and reassembled it in my shop, so I knew all about it. I laughed me ass off!

He ended up damaging the fender trying to remove the bucket, and then tried to get me to repair it for free. He was upset that I hadn't said anything, being that I had done this kind of work before, I should have noticed it. !!!

Still brings a good chuckle thinking about it.
 
dont have to safety stuff out this way so no worrys there..as for getting to it from behind...thats the way this was setup to begin with so theres lots of room back there but how do you make it come apart? sleeved bucket?..course if i go with a smaller bulb i could have it come out like a normal unit
 
The last ones I did (it was three or so years ago so I'm a little foggy on details) I used Beetle style buckets. Had them kicking around, and they were easy to modify, so...

They were designed with a flange to mount to fender tabs. Screws go in from the front after the ring comes off.
I put the fender tabs on the inside of the fender - from the wheel side - and mounted the bucket with the screws. Only the screws went in from the backside of the bucket.

I did the same for the adjusters. Kinda.
I got the longest adjusting screws I could find, filed a groove on the end to fit a slotted screwdriver and mounted them thru the adjuster bases as normal. They went right thru (one of the advantages of the Bug bucket) and aiming was done from the backside. 'Course, now its a two man job to aim the lights, but it seemed like the thing to do at the time.

The Beetle units are made by Hella and Audi.
Check out some VW parts sites to get some pics.
 
well here is my new delema for the tail lights
 

Attachments

  • 1-Picture 086.jpg
    1-Picture 086.jpg
    87.6 KB · Views: 24
  • 1-Picture 087.jpg
    1-Picture 087.jpg
    65.9 KB · Views: 19
  • 1-Picture 088.jpg
    1-Picture 088.jpg
    68.9 KB · Views: 15
  • 1-Picture 089.jpg
    1-Picture 089.jpg
    84.6 KB · Views: 18
  • 1-Picture 090.jpg
    1-Picture 090.jpg
    90.3 KB · Views: 19
nice to be working again and with some new eye protection ...feal a lil better haveing em now ..a lil progress today along with the taillight mockup

all of the heavymetal welding is done as well as about 70% of the sheetmetal..its stiffer now than it was but with no extra weaight LOL not been cutting corners just changeing of the deasign a bit..if ive added any weight its less than 10lbs

rolled it the rest of the way over to make work a lil easyer

total cost to date
15$ in grinding wheels/wires/sanders
12$ is surplus steel
15$ in gas (running around to pick up steel and such)
..everything else has been free or leftovers from other projects
 

Attachments

  • 1-Picture 093.jpg
    1-Picture 093.jpg
    61.8 KB · Views: 32
  • 1-Picture 091.jpg
    1-Picture 091.jpg
    92 KB · Views: 30
  • 1-Picture 092.jpg
    1-Picture 092.jpg
    95.6 KB · Views: 32
69.5CUDA said:
well here is my new delema for the tail lights

If you space them close together - go with the figure eight housing.
The two separate housings stuck close together doesn't look right.
 
to put a 440 in it would require stretching the car a minimum of 18 inches ..as well as a full tube chassis ...as well as much much more i dotn care to list as i thought about a small block for a month or more and deemed it to much trouble and WAY WAY to much $$$ ..as entertaining an idea it is unless someone wants to send me 5k$$ or more ...well you get the idea not to mention the end result would be a drag only car as there wouldnt be room for steering components
 
The underside looks good, coming right along, eh?

Wish I could roll a car over to weld up the frame and floors. Would make life much easier.

Think XL would mind seeing his Charger in that position?
 
been worried for a few days now since i added all that new steel as well as striped all of the salvageable bottom stuff its been sitting in my dry shop gathering moisture from the are and gaining a lil surface rust slowly :( 
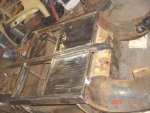
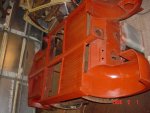
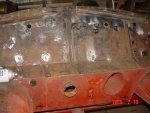
..but today finaly was just warm enuf to shoot it with some rust proofer after cleaning it all up again :giggedy:....so now i can finaly roll it back over tomaro and work some more patch panel magic
 

Attachments

  • 1-Picture 094.jpg
    1-Picture 094.jpg
    73.4 KB · Views: 44
  • 1-Picture 095.jpg
    1-Picture 095.jpg
    77 KB · Views: 39
With that first coat on, the metal you added in looks like it was part of the all along. Excellent work! :clap:
 
yeah useing 67-69 cuda fastback truck panels as floors was PERFECT....atm im stuck needing to run to the steel yard....must get minivan tranny back in

this lloyd should be alot stiffer in the flex department being it was all sheetmetal ...now its got some nice box sections
 
well ive come to some ideas...so dont shoot me to hard for this one...

redoing the rear rolled pan is going to be next to imposible as its to far mangled to be of much use ..also i want to extend it down some to clean up some line issues the car had befor dissasembly...ive sighted some useable skins for this[smilie=f:a set of 67-69 barracuda fenders eg the front lower wrap around area(said fenders rearended a truck sooo the bucket areas are toast as well as a good portion of the tops..altho rustfree there imo only useable as patch panels)

did a little mockup of what the tailights will look like installed (pics below)

welded up a TON of firewall holes as everythings geting re-routed or changed welded up all skin-work holes light stock tailight provisions ect(no im not loosing the trim as i like it)...started sanding down skins to see how bad they are and theres nothing bigger than a 50c piece and very very few spots...this thing never saw much action obviously as its rather straight...body work is going to be soooooo easy :banana: aside from my "changes" and aditions:toot:

also removed the glass from the windshield skin and rear door...LOL the glass weighs more than the panels there in:shifty: ...wired down the iterior floor space after rolling the car over useing tie down from the rafters

a vision has hit me and ive run thru all of the posible problems and solved them...its getting a POWER windshiled ...yes i said that right..should be fun ...befor you think im crazy..how diferent is it than a jeep windshield going down or a streetrod?
 

Attachments

  • 1-Picture 101.jpg
    1-Picture 101.jpg
    72.8 KB · Views: 27
  • 1-Picture 102.jpg
    1-Picture 102.jpg
    70.1 KB · Views: 24
  • 1-Picture 103.jpg
    1-Picture 103.jpg
    81.5 KB · Views: 27
  • 1-Picture 106.jpg
    1-Picture 106.jpg
    86.9 KB · Views: 26
  • 1-Picture 107.jpg
    1-Picture 107.jpg
    36.9 KB · Views: 25
doh forgot the tail light shots...mind you this is a ruff draft of the tail lights to get a feel for how its sorta going to look and to see what kind of dificulty i may run into....since the real panel is partaily curved
 

Attachments

  • 1-Picture 104.jpg
    1-Picture 104.jpg
    54.1 KB · Views: 22
  • 1-Picture 105.jpg
    1-Picture 105.jpg
    55.5 KB · Views: 26

SiteLock

SiteLock
Back
Top