Rusty's not very quiet cuda progress

73-No word on texas cuda yet [smilie=e: hopin it don't come now till next weekend, got a full plate this week!
beeps-My wife's threatining to hang me out there! [smilie=2:
 
Finally got a little time for the 73, started up the music machine to let her charge up & listened to that nice lopy cam tap me a beat to set up the work stuff for weldin!
the easy one first, pass side not too bad, ground it out, not deep so I oxysolved it !
ground out, then cleaned up
 

Attachments

  • 450_pass_after_clean_up_rail_repair_0393.jpg
    450_pass_after_clean_up_rail_repair_0393.jpg
    37.4 KB · Views: 169
  • 450_after_grinding_1rear_rail_repair_0394.jpg
    450_after_grinding_1rear_rail_repair_0394.jpg
    33.3 KB · Views: 169
dabbed a little por15 on that baby & she's done!
 

Attachments

  • 450_pass_side_por_rear_rail_repair_0388.jpg
    450_pass_side_por_rear_rail_repair_0388.jpg
    38.2 KB · Views: 165
Now of course this is RUSTY C so ... well ... you know it won't be that easy, drivers side I was hopin only the outer piece was gone, but noooooo she popped thru!
 

Attachments

  • 450_dr_side_after_grinding_rear_rail_repair_0395.jpg
    450_dr_side_after_grinding_rear_rail_repair_0395.jpg
    41.5 KB · Views: 166
So I bridge welded the hole workin in from the edges , then I patched the whole thing, after two rounds of weldin & grindin, here she is!
 

Attachments

  • 450_dr_side_1st_round_a_weldin_rear_rail_repair_0392.jpg
    450_dr_side_1st_round_a_weldin_rear_rail_repair_0392.jpg
    33.7 KB · Views: 164
Put away the noisy stuff for tonight , went back for (I hope) the final pass to fill in the voids, may try & weld in the wire covers on the floor pans tonight, not a bad after noon, 74 all charged up, still need that bushing sleeve to call the undercarrige complete, but I think thats IT! [smilie=e:
 

Attachments

  • 450_dr_side_fillin_in_rear_rail_repair_0389.jpg
    450_dr_side_fillin_in_rear_rail_repair_0389.jpg
    41.3 KB · Views: 164
Thanks guys, did eek out enough time to weld in the wire covers, gettin close to body work on the shell, one more rust repair in framing under the roof buy the windshield & that sleeve & it's back to the quarter pannels!
 

Attachments

  • 450_wire_covers_welded_in__0401.jpg
    450_wire_covers_welded_in__0401.jpg
    34.5 KB · Views: 153
Welded in the mystery sleeve & got a coat a por 15 all around & in it!
 

Attachments

  • crop_bushing_sleeve_por15_0421.jpg
    crop_bushing_sleeve_por15_0421.jpg
    36.1 KB · Views: 136
  • crop_bushing_sleeve_welded_in_0432.jpg
    crop_bushing_sleeve_welded_in_0432.jpg
    81 KB · Views: 136
Had a little give in the Q pannel buy the tail panel, didn't wanna weld there cause I couldn't use spots, but had to do it the ADD on way! [smilie=e:
had to seal up the bottom too!
 

Attachments

  • crop_weld_quarter_to_tail_panel_0431.jpg
    crop_weld_quarter_to_tail_panel_0431.jpg
    44.6 KB · Views: 132
  • crop_weld_quarter_to_tail_panel_0429.jpg
    crop_weld_quarter_to_tail_panel_0429.jpg
    64.3 KB · Views: 131
& now the finally , the last patch needed on the shell!
the carnage!
& the carnage removed!
 

Attachments

  • crop_roof_frame_rust_cut_away_0424.jpg
    crop_roof_frame_rust_cut_away_0424.jpg
    47.5 KB · Views: 130
  • crop_roof_frame_last_of_the_carnage_0426.jpg
    crop_roof_frame_last_of_the_carnage_0426.jpg
    60.4 KB · Views: 130
Patch is formed, but I had to slop por 15 into the guts there, so not sure if I will attempt the weld (I said attempt cause the metal is thin on one side) tonight but she's ready!
 

Attachments

  • crop_the_las_patch_0416.jpg
    crop_the_las_patch_0416.jpg
    16.3 KB · Views: 127
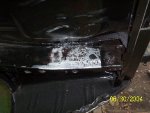
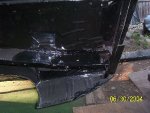
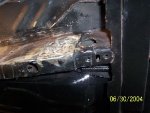
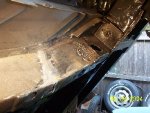
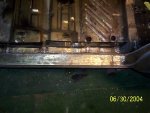
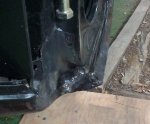
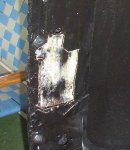
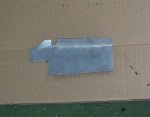
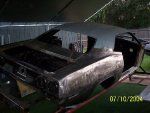
It's in, not too bad,not a lot a blow thru, so either i'm gettin a little better at weldin [smilie=e: or the metal wasn't as thin as I thought [smilie=e:
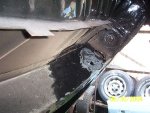
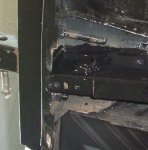
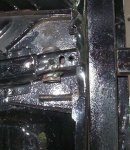
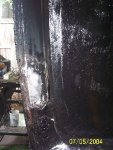
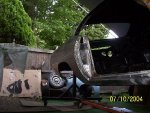
but it's done, started strippin the quarter & door sil area on the pass side, body work is approaching swiftly, I know when it gets here it'll slow down to a crawl, but after 2 years, it will seem fast! [smilie=e:
 

Attachments

  • 450_roof_frame_last_of_the_welding_0433.jpg
    450_roof_frame_last_of_the_welding_0433.jpg
    46 KB · Views: 118
Gettin close, little more cleanin & a dent in my new quarter to deal with, A coat a por15 & body work can begin on the pass side!
Naked lady! [smilie=b:
 

Attachments

  • 450strippin_q_area_pass_side_0440.jpg
    450strippin_q_area_pass_side_0440.jpg
    33.9 KB · Views: 100
drivers side should be easy, just the one coat a primer on the quarter to remove, still got the doors to do but that will hold awhile!
 

Attachments

  • 450_strippin_pass_door_sil___quarter_area_0441.jpg
    450_strippin_pass_door_sil___quarter_area_0441.jpg
    45.1 KB · Views: 99

SiteLock

SiteLock
Back
Top