You are using an out of date browser. It may not display this or other websites correctly.
You should upgrade or use an alternative browser.
You should upgrade or use an alternative browser.
Rusty's not very quiet cuda progress
- Thread starter mopar_man
- Start date
restoman
The paint fumes have cleared so I'm
Ed Zachary!From the pics it looks nice. Drive the wheels off it and have a blast. It has come an extremely long way and you did it all. Impressive....Really!
Rob
To me, the car looks pretty good Rusty. :bravo:
Things are starting to tighten up around these parts too. Not gonna be good.

RUSTY Cuda
In over my head!
Yes she looks great from a few feet away, I guess I was hoping for better results on the touch ups, well, what turned out to be the screw ups. anyway I guess I have to be happy with what i ended up with, She's pretty straight & it actually runs & moves under it's own power. Hopefully the road test(s) will come this year.If the interior come out decent & she doesn't fall apart as i drive it, maybe i'll earl schibe it in a few years! [smilie=2:
As for the inner fender, it was thinner than orig, so I just did the back half, front half was fine, the short weld point wasn't much more work that the rest of the spots would have been, so for equal work I kept the better metal up front.
On the other side I actually only used part of the patch panel, kinda the same theory:huh: Rich.

RUSTY Cuda
In over my head!
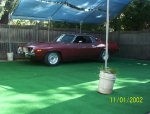
Haven't done much with the cars latley, but finally got around to raising the grade behind the garage so i can install my carpets(well when i finally buy em) without worring about it getting wet when I get flooded back there!
Moved the pavers in last winter but the top soil was frozen so that waited till now, moved 3 yards in last weekend & with the help of Greg 340(thanks man!) moved in another 3 yards yesterday.
Today I raked till I dropped then raked some more, got it decent & moved the old carpet back in & parked the cars.
The intention is to artificial turf the whole area between the pavers I lined the edges with & extend it out to the edge of the garage, gives me a 20 x22 work area.
Now I gotta clean up the spots where I had the cars for over a year & get some real grass growing!
Attachments

RUSTY Cuda
In over my head!
Better late than never! I guess a roof over my head would be a tad better! 
Did a little spring cleaning today, let her run fo a while & t6hen mothballed her back up, gotta get some moola to finish her off, i'm so close it hurts! :wtf: Rich.
Did a little spring cleaning today, let her run fo a while & t6hen mothballed her back up, gotta get some moola to finish her off, i'm so close it hurts! :wtf: Rich.
Attachments
")
RUSTY Cuda
In over my head!
That car may have more weight in my blood, panels, patches & welding wire & rods, and 48 coats a various primers & paint than original metal! But she's all mine! Rich.
But she's all mine! Rich.RUSTY Cuda
In over my head!
Haven't been over here in a while!
Had trouble starting her up last weekend, actually both cars since the bottoms got wet in that last storm, banging starters & such.
Funny thing is the 74 started from the key for the first time in months, 73 starter won't even try.
Had to pull the stearing linkage to get it out(headers) so I'll put the new parts in once the starters done!
Worst part is they are both pretty much brand new mini starters, never even hit the road! I'm sure I'll be doing the same on the 74 soon! Rich.
Almost forgot an excuse to post a pic! New carpet for the work area!
Had trouble starting her up last weekend, actually both cars since the bottoms got wet in that last storm, banging starters & such.
Funny thing is the 74 started from the key for the first time in months, 73 starter won't even try.
Had to pull the stearing linkage to get it out(headers) so I'll put the new parts in once the starters done!
Worst part is they are both pretty much brand new mini starters, never even hit the road! I'm sure I'll be doing the same on the 74 soon!
Rich.Almost forgot an excuse to post a pic! New carpet for the work area!
Attachments
RUSTY Cuda
In over my head!
K, starters in & she fired right up, also put in the new steering links & ends so wheel alignment is now possible!
If charger man ever gets his new wheels I can put those cragers on & have good rubber, that might be the torch that lights the fire to finally insure & register this thing! :huh: Rich.
If charger man ever gets his new wheels I can put those cragers on & have good rubber, that might be the torch that lights the fire to finally insure & register this thing! :huh: Rich.
RUSTY Cuda
In over my head!
A big thanks to Greg340 for comming over & helping me out , we found why the tranny would not shift to low gear, trans line in the way, a little tweaking on the lines & thats done. We also got the cowl leaks on the pass side figgered out & sealed, had to pull the heater box & the rear fender splash shield & reseal a few seams where the old sealer had broken down (or been messed with when I was patching some rust) but now I can put down the noise barrier & get ready for carpet!
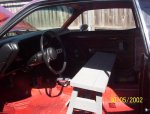
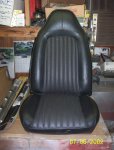
Also picked up the seats today, recovered at a local upholstry shop, they did a nice job & got a fairly good match on the material, not a numbers car anyway.
Removed my bench seat
 & be ready to put the buckets back in , soon i hope!
 Rich.
Rich.

Also picked up the seats today, recovered at a local upholstry shop, they did a nice job & got a fairly good match on the material, not a numbers car anyway.
Removed my bench seat
Attachments
RUSTY Cuda
In over my head!
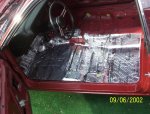
Yesterday I seam sealed my welds inside, those two major corners in the trunk &put on the new trunk seal, wasted my money,lid was still pushed up, got one side pretty good other side is still up a bit, may be my bodywork, done with adjustments & removing rear rubber bumpers, so unless it settles on it's own it is what it is!:dgt:
Today I put in the insulation (eastwoods version of dynomat) a little tricky to work the shapes in & their roller pops off the handle with a little too much pressure(actually not enough for my taste) but a little tweeking on the arms & I made it work. Put the heater box ,insulation pad & splash shield back in & let her run for 20 mins. laid in the new trunk mat , shot some black paint on the seat belt retainers & cleaned up my mess, not a bad day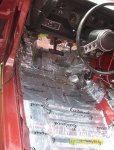
RUSTY Cuda
In over my head!
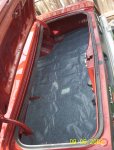
last few pieces of the puzzle came today, carpet & headliner insulation came today, get the rest of the floor insulated & lay in the carpet then I can call the headliner guy & set that up, I'm gettin close! 
Now do I glue the insulation to the roof or does it just lay above the liner? Rich.
Now do I glue the insulation to the roof or does it just lay above the liner? Rich.