You are using an out of date browser. It may not display this or other websites correctly.
You should upgrade or use an alternative browser.
You should upgrade or use an alternative browser.
Rusty's not very quiet cuda progress
- Thread starter mopar_man
- Start date
")
RUSTY Cuda
In over my head!
It would be HARD to INSERT your TOOL with the tap in there!
Gonna try & wiggle my arm in tomorrow & grab the nut with needle nose vise grips don't know if my old body can contort into a position to do that & turn the tap at the same time, I feel the need for pain killers already!
If that don't work 68's idea will be next!
Gonna try & wiggle my arm in tomorrow & grab the nut with needle nose vise grips don't know if my old body can contort into a position to do that & turn the tap at the same time, I feel the need for pain killers already!
If that don't work 68's idea will be next!
RUSTY Cuda
In over my head!
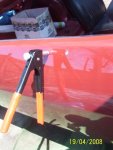
K more room in there than I thought got the vise grips on & finished cleaning out the threads, other one went without a hitch & still snug.
could not get the nut & washer on the back to snug it up so Don put the nutsert tool on your loan Rusty list(will need it for putting in the nuts on the pass side too) those are just holes in the sheet metal(after market mirror)
Kinda cold out there so I didn't drill em out yet.Rich.
could not get the nut & washer on the back to snug it up so Don put the nutsert tool on your loan Rusty list(will need it for putting in the nuts on the pass side too) those are just holes in the sheet metal(after market mirror)
Kinda cold out there so I didn't drill em out yet.Rich.
RUSTY Cuda
In over my head!
I have new inserts just need the tool, pretty sure they are 1/4 - 20 ? Rich.
") Looks friggin sweet and I don't really care much for the E body 'Cudas but yours might just change that opinion!
Looks friggin sweet and I don't really care much for the E body 'Cudas but yours might just change that opinion! RUSTY Cuda
In over my head!
Well not a lot of car time latley, lifes little monkey wrenches have ben flyingh my way, but since the grand poo bah wants me to post anyway,I'll post some crap!
Fishy, for some reason I'm really not in any hurry to drive the car, maybe it's the fear of leaving a trail of parts as I take off?
Went out for a while today & got more electrical stuff workin. 340 bros, I used one of those fuses,thanks for the overkill on the fuse supply! that got most workin, scrapped up some grounds & got the top dash lights on, heater control & rear plate light still not on, but really didn't dig too deep on those.
but now (after the plate light) I'll be night leagle!
Got a front bumper filler, clean,paint that & I can drille out the grille for mounting(must be a 72 grille, no holes for the filler screws.)
So thats about it for car stuff for now, see yas around! :toot:Rich.
Fishy, for some reason I'm really not in any hurry to drive the car, maybe it's the fear of leaving a trail of parts as I take off?
Went out for a while today & got more electrical stuff workin. 340 bros, I used one of those fuses,thanks for the overkill on the fuse supply!
that got most workin, scrapped up some grounds & got the top dash lights on, heater control & rear plate light still not on, but really didn't dig too deep on those. but now (after the plate light) I'll be night leagle!
Got a front bumper filler, clean,paint that & I can drille out the grille for mounting(must be a 72 grille, no holes for the filler screws.)
So thats about it for car stuff for now, see yas around! :toot:Rich.
RUSTY Cuda
In over my head!
The way I test circuits maybe sooner than you think!:shifty:
thanks again, you gotta get over here, been a while. Rich.
thanks again, you gotta get over here, been a while. Rich.
RUSTY Cuda
In over my head!
Gotta rebuild the deck first, not high on the priority list right now! :dgt:
got the rear plate light on by adding another ground, so only the heater light still out!
Got some other crap done, too tired to type, look at the pics! :shifty: Rich.
got the rear plate light on by adding another ground, so only the heater light still out!
Got some other crap done, too tired to type, look at the pics! :shifty: Rich.
Attachments
RUSTY Cuda
In over my head!
gomopar440
Livin' my life...one gas station at a time.
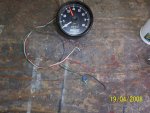
Most all tachs follow this pattern
Blk = ground
Red = ignition switched +12v
White = dash light (coming from dimmer switch)
Green = negative (-) post on the coil
Hope this helps.
Blk = ground
Red = ignition switched +12v
White = dash light (coming from dimmer switch)
Green = negative (-) post on the coil
Hope this helps.
RUSTY Cuda
In over my head!
That should do it, thanks Go!
greg340 "GREGGLES"
sleeping in a vat of jello
Hey Rich ya get anything done on the car lately??? How about the windows??
RUSTY Cuda
In over my head!
Not a damn thing in months, got my fader switch wires off ebay, still sittin in my desk drawer. work got busy & the weekends have been filled with some family problems, my mother got a new knee, my father is in need of help with his tax returns & My bro in law is recovering from another cancer operation. I think I started it up for 20 mins last "holiday" weekend, of which I worked & visited someone every day. Maybe in the fall when everything settles down a bit! :huh: Rich.