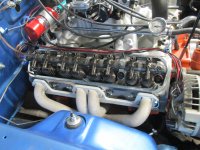
My 71 Duster work in progress

I finally got the hood close to where it needs to be but it still stops about an inch above where it should. It really seems like it should move toward the passenger side, but if you know A-body hoods you know there is really no side to side, only front-back and up-down. Any side-to-side would be because one side is farther forward than the other so it's not sitting in the hole straight.

The slotted holes are oriented so you don't get any real front-back motion out of those. The rear-most bolt is for up-down angle of the hood. So there you snug the front bolt and loosen the rear bolt, hold the hood at the angle needed in relationship to the hood, and tighten the bolts.

To move the hood front-back you have to loosen things up to where you can slide the hood on the inserts. So that means both bolts have to be loose to make the adjustment, very loose. Once it's loose enough to slide, the weight pulls the front of the hood down and the rear edge of the hood up. This is madness LOL.

I have tried raising it up the bare minimum, when I loosen the bolts the front of the hood still goes down and the back up, and when I try to pivot it down from that position I either close the hinge, or push it open. So the bare minimum gives me nothing.

Another hassle is that I'm pretty sure with the angle the rear-most slotted hole is cut, the hood doesn't move straight up and down but also in and out in relation to the cowl. So I've had no joy setting one adjustment, then the other.

Also I read that the bumpers along the inside of the fender are to align the hood. They are all in place along the driver's side fender so they should be pushing the hood to the passenger side, but they aren't. It is actually way too close toward the driver side. Right now I suspect that is the reason the hood won't close completely - it is closing on the bumpers instead of sliding over them. Maybe I should lube them? Yes they do fit in the recesses stamped into the hood.

I feel like I did with those damned clutch linkage clips - there is a method that makes this easy, I just haven't found or figured it out yet.

More finagling and cursing is in my future but I won't be defeated.
 
I had similar problems with my hood, after a LOT of tweaks it somehow found a spot I could call it close enough & put the tools away.
Frustrating to no end, I think a visit from Resto would help us both !
 
I think a visit from Resto would help us both !

Yeah no kidding this is crazy.

I took another shot at it during lunch, moved the driver's side forward and down and it seems like I might have it adjusted close enough to shut on that side. The passenger side still just kind of stops too soon but I'm convinced the reason it does that is the hinge is down but the hood is not if that makes sense. So I'm going to approach it that way and maybe I'll get lucky and it will close and latch before too much longer.
 
I'm not sure on A-bodies, but on B and E-bodies if the rear of the hood is too high, you need to adjust the front of the hood down. It's totally counterintuitive.

Since I didn't give a rat's keister about panel gaps on Agnes, that hood went on easily. No fight whatsoever. The gap isn't perfect, but if you saw what I did to hang the fenders that shouldn't come as any surprise. I never made any attempt to adjust the fenders, either. This, of course, means I'll fight like the dickens when I assemble something about which I give a damn.
__________________________

Black Yellow and Black where the radio plug is Red* White and Orange. there might be a tracer on one of those black wires but I wasn't interested enough to fight for a closer look.

View attachment 28222

The connector you were using (B/B/Y*) was for the headlamp-on buzzer. It's not tied to the dash illumination, it's tied to the courtesy lamps (dome, map, trunk).

Nothing AutoMeter in my buggy, only the cheapest stuff available is good enough for my car. The tach is vintage but it's basic junk too, probably came from Sears or Pennys.
The only AutoMeter parts in my car are the bulb covers. VDO auxiliary gauges and a homebrewed Stewart Warner tach built from parts of lesser tachs--I put a panel-mount Stage III into the cup from a different, unknown-model pedestal tach. The remains of the original pedestal tach are still sitting on the front seat. I don't think I've got $100 tied up in both tachs.

The bulb covers aren't AutoMeter-specific, they fit stantard interior bulb numbers like 1895, 194, 168, 1861 etc.

FWIW the A12 came with the world's dumbest AutoMeter tach. The numbers are teeny tiny and scrunched together until it gets to 4k. Perfect for a 440, right? I think it goes to 12k or something goofy like that. I guess it was on clearance sale.

I found a photo:
View attachment 28225

I've seen that style of face previously. I can see where it would be useful on a bike, maybe even an engine like my 340 where I'm shifting mid-7s, but there's too little resolution in the useful range of most engines for it to be of use.
 
if you saw what I did to hang the fenders that shouldn't come as any surprise
Same here. The AMD fender curves didn't match up to the cowl and door anyway so I got it to good enough and quit. I just want the hood to close and latch so I can drive the car.

FWIW I haven't restarted it since the initial fire up, but have changed to fresh break-in oil and a new filter so it's ready. I still need to set the idle speed and timing but I've also got a new fuel line setup connecting the hardline to the pump and to the carb. I would just feel better with one person under the hood watching for leaks while someone else is in the car to shut the circus down if things go south. Remember I set that 400 on fire before and know what a mess a fire extinguisher makes. Things escalate quickly with a fuel leak.
 
Same here. The AMD fender curves didn't match up to the cowl and door anyway so I got it to good enough and quit.
Even though my right front's been crashed, straightened, and sculpted anew from filler, I'm sure it still fits better than the AMD part. That being said, we didn't even have a starting point. We had to make one. 😂

No joke--those fenders haven't been moved since that post. They simply didn't warrant further adjustment. Everything clears and the gaps are beater-acceptable (and, sadly, better than I've seen on many "done" cars).
 
I'm not sure on A-bodies, but on B and E-bodies if the rear of the hood is too high, you need to adjust the front of the hood down. It's totally counterintuitive.
A-bodies are the same. That's what I was describing with "the weight pulls the front of the hood down and the rear edge of the hood up". The front hole in the hinge isn't a slot, it's just a too-big hole. The one in the back is a slot. So the whole thing kind of teeter-totters around the front bolt.

No we don't have it shutting yet but it wasn't for a lack of trying. I still think it's a matter of not having the hood on the hinge right. The hinge is all the way down but the hood isn't. I also noticed that the amount of "free play" involved in holding the hood all the way up to tighten the hinge is about how far I lack to get it to shut. Again, if that makes sense.
 
Noted from the web: "my parts 72 has a build date of 5-72, and adjust in the hinge, while my driver has a date of 10-71 and adjust in the hood itself. "

"adjust in the hood itself" is what I'm dealing with. Alice should be the same way.

I found people saying, just get someone to hold it up in the front and push the back down. Yeah that doesn't work for me, we've tried it about 20 times by now.

Also it's too late for me but this is a great tip: "I learned that before removing a hood, I drill 2 small holes on both sides so I can stick an alignment nail thru. I tried marking the bolt locations with a Sharpie, but not precise enough to get it back."

Finally: "I usually start out adjusting a hood by lowering the latch plate and taking the hook off the front of the hood! Then I lower the two front bumpers to allow the hood to open and close freely while you're working with it! Lower the hood down until the first corner in the front is flush with the fender and adjust the bumper to let the hood rest flush and set to work on the high corner, and check the fit of all the gaps. If the hood is tight in a front corner, the opposite corner needs to be loosened on the two hood bolts and slid back or forward to open or close the gap. If the hood is high is a front corner, the opposite side hinge needs to be raised, or "turned" by loosening just one bolt and tipping the hinge! Check after every adjustment, and go in small increments! If the desired adjustment doesn't benefit the job, reverse your last adjustment. Once you get the front corners adjusted and the gaps correct, set the other bumper and reset the latch! If the rear of the hood is high, you can lower the hinge equally on each bolt to drop the corner straight down, again in small increments!"

I'm unsure how any of that will work in practice though.

I put the pins back on and can use those to hold the hood down enough to where I can try driving it a little. The road right outside my garage was repaved Monday. It will be tempting to leave my mark on that.
 
Last edited:
I noticed the straight lower forward edge on the hinge and the bottom of the hood weren't parallel, so I adjusted that and it made a lot of difference. I actually had it latching but it was still sitting too high so I kept messing with moving that front edge it until it wouldn't latch LOL

I've got a wisdom tooth coming out today so the car has to wait until Friday for more fun and frustration
 
My DDS looked at it long and hard but was afraid it might break off at the root so he punted it to an oral surgeon who is equipped to deal with the unexpected. It's above the gum so I'm hoping they numb me up and just reach in and snatch it out. It never works like that.

This will leave me with just one wisdom tooth that is under the gum. In the x-rays it looks to be perfectly formed, but turned sideways.
 
I noticed the straight lower forward edge on the hinge and the bottom of the hood weren't parallel, so I adjusted that and it made a lot of difference. I actually had it latching but it was still sitting too high so I kept messing with moving that front edge it until it wouldn't latch LOL
Are the hood bumpers interfering?

Good luck with the tooth, hope it goes better than mine did, I now know what torture feels like!
I've been fortunate to avoid any wisdom-tooth nonsense, but believe me--I'm no stranger to dental pain. Novacaine and other locals don't work on me, and no dentist has ever gassed me. It's always live, in the raw. I've had bad teeth since I was a kid, so there's been a lot of dental work over the years. Even so, my current dentist couldn't understand my refusal to do implants and go with a denture instead. I'm thinking, "Dood, were you even in the room?" My prior dentist, a family member who retired, never considered implants: "There's no way I could put you through that."

My DDS looked at it long and hard but was afraid it might break off at the root so he punted it to an oral surgeon who is equipped to deal with the unexpected. It's above the gum so I'm hoping they numb me up and just reach in and snatch it out. It never works like that.

This will leave me with just one wisdom tooth that is under the gum. In the x-rays it looks to be perfectly formed, but turned sideways.
I've had a couple of surgical extractions, but my dentist did 'em. They're just like regular extractions with greater pain and expense. 😖 Recovering from them was no different, though, nor did they take longer to heal.
 
Are the hood bumpers interfering?
No, they're screwed all the way down, and the latch was adjusted all the way down until I got it close enough to latch. IIRC it seemed like it was hitting the latch instead of sliding into the slot when I stopped last night.

Novacaine and other locals don't work on me, and no dentist has ever gassed me
The last time I had wisdom tooth work done I was going to a guy I called the painless dentist. I remember him cracking one and taking it out in pieces, but I was so gassed up I didn't care one bit.

My prior dentist, a family member who retired, never considered implants
My dentist tried to talk me into that when I had a tooth yanked out a while back. No, I can live without that one tooth. I remember one who tried to convince me that if you pull a lower tooth the one above it will fall out.
 
Thats great!
Mine was under the gum, but managed to poke through in one tiny spot, well that was enough to get it infected, That in turn made the nova cane not work, He worked on it & knew it was killing me & offered to stop a few times, I was just saying do it & get it over with, after a while more he just quit saying I'm killing you.
When I left there my whole body was shaking, took about a half hour to settle down.
Took the meds & the infection was cured so I headed to the surgeon , there my lip was not getting numb either, after a while she just said she's starting, see how it goes, well I finally got lucky & she cut it out without any further anguish!
 
This one jumped right out. It all happened so quick I didn't even take time to look at the thing. Just let me out of this torture chamber.

(But seriously, no torture, easy peasy I said, and the doc agreed)
 
Yeah the latch has been adjusted up and down, it's just that right now it's in the position where it's way too close to the drivers fender so it's not hitting the slot right and bangs into the moving part instead of sliding over it to latch.

I haven't messed with the side to side on the latch because the hood is already closer to the driver side and that's the way it is already adjusted. Because nothing really changed other than the adjustment.

So far I have adjusted it all the way down, to get it out of the way, and raised it all the way up, to get it to latch. I couldn't tell you where it is right now. When it was latching, there was a bow in the hood so I kept adjusting until I made it worse because that's what I do. I've got the hood pins off too.

I really wish I had known of the drill-locating-holes idea before I took it off.

I'll be back at it tonight.
 
I'm standing in the driveway, goosed it a little rolling down the hill.

1724520804235.png

The mark at the top must have been me coming back in. I'm pretty sure I heard the sure-grip ratcheting too, so there's that.

There's also still one heck of a rattley kind of noise at the front of the engine. Gina couldn't wait for me to keep investigating before taking it out and around the hood so that will come later. It kind of sounds like it's around the header/fuel pump/alternator area.

The temp gauge didn't work at all this time so I've got no idea how hot it got but it was over 190 using a HF temp gun at the intake bung to gauge it. It's cooling down now so I can fix that. It's good to have spares.

The transmission isn't happy. It's not noisy AFAICT but it didn't like my weak attempt to bang 2nd or when I tried to downshift into 1st while rolling. All I got was 1st and 2nd. I'll give it some time, wait on the clutch to break in some more.

It seems pretty danged strong but I've almost forgotten what it's like to have a a muscle car kicking me in the ass. The clutch is something. I've gotta avoid stopping on hills until I get used to it or it's going to be wait on the car in front to pull away then 3 grand and dump the clutch.
 
I filmed the noise. It sounds like exhaust. Maybe?


Actually it sounds like a Cummins.

The top of the valve train is fine we checked it again, cranked the engine and watched the valves, all moving about the same.
IMG_2988.JPG
 

SiteLock

SiteLock
Back
Top