My 71 Duster work in progress

10w-30 for oil, right? I broke it in with straight 30w Lucas, so I tend to stick with what worked for me ....

Lucas Oil 10679-1 Lucas Hot Rod and Classic Car Motor Oil | Summit Racing

I miss the good old days when you just grabbed whatever oil and all was well.

Once I raise it up for the oil change I will take care of looking around underneath for leaks and checking the clutch adjustment. Then hi-ho, it's around the block we go.

Another note, the timing was at 30 BTDC while "idling" yesterday. I gassed it and noticed it jump way up, then come back after a point. I was surprised at first because I had the limiter plate installed at 18* and initial @ ~ 15*, but forgot the vac advance was plugged in (ported).

I didn't bother with advancing it more because it was running so cool. I don't know if it's going to act different at idle (after I adjust the throttle cable), but it seemed strong yesterday so I will likely just leave it where it is and see how it goes.

Looked under the car this morning and saw no new drips on the floor. We moved it forward from where it was yesterday with the exhaust outside the doors so the floor under the engine was dry to start with. I will still look but those drips might have even been from grease melting and dripping down. I had my grimy hands on everything under the car at one point or another and I never did clean up the torsion bars as good as I should have.

One gripe, I screwed up and bought a new gas can at the Kroger gas and go, and the stupid thing has some sort of goofy safety nozzle on it. Basically, it's useless because you have to press a button, slide the nozzle back, and hold it somehow while you pour the gas. There's not even a vent on the can, the nozzle vents itself. It had some sort of a splash guard inside the can too that blocked me from putting the hose too far in. That thing's in the bottom of the can now, and I swiped the nozzle out of a normal can that fit good enough for me to fill a pop bottle for use priming the carb.
 
I pre-filled the bowls and thought at first it wasn't firing because it just spun over slick as anything. First thing I thought was to make sure the rotor was in the distributor. It was. Then I changed from the remote starter switch to the seat, partly because I thought we were done for the night, and boom it fired up almost immediately.
Did you forget to switch the ignition to run? That's the kind of error I'd make.

There's something clicking around the front of the motor. I don't think it's under the valve covers but who knows. The PS pump wasn't full and that might have been involved in it. Well, it started full but you know how that goes when the gearbox is dry. I was partly afraid to try to fill it more with the engine running, but mostly too busy doing other things.
The first thing I'd check is the header bolts. The next thing I'd check is lifter preload. I can't say I've ever heard a PS component click or tick, including driving a parts car 60+ miles with cut hoses.

Oh PS according to my mech temp gauge it didn't get above 160. I would say it's lying but the mech gauge didn't run high either.
It's kind of weird that it never got hot.

I couldn't find my IR thermometer so I couldn't really double check it. Everything was hot and pressurized so it was doing its thing.

That 400 engine would've been boiling after 1/2 hour.
If you had some timing in it, which you obviously did, and a 160° thermostat I don't find that surprising a'tall with the solid-mounted fan. Those things move a ton of air, whether they need to or not. They never stop pushing.

I hope I didn't burn up the PS pump.
If there was some fluid in it and it wasn't groaning, you're probably fine. The gear wasn't loaded at any point, so the pump was essentially freewheeling. As long as there was some fluid in it, I think you're fine.


Going back to the solid-mounted fan, check the blades on it closely. I had one on my '73 Charger which also had a tick or click up front. With ~130,000 I chalked it up to lifter noise. Nay, 'twas not a tappet. I revved it up a bit one night, heard a bang, and the car started shaking horribly. I was about a mile from home and by the time I got there several interior screws had backed out--that's how violent it was. I thought it tossed a converter weight or something. I couldn't see anything evident by flashlight but didn't know what I was looking for either, other than holes in things like the block or valve covers. The next day, in full sunlight, I found a taco-curled piece of metal sitting on the intake, next to the throttle cable. It turned out to be a fan blade.

Like I said, those fans never stop pushing. They don't clutch out ~35MPH, they just keep yanking air through the radiator. Eventually that workout cracked one of the blades on mine and in time it finally broke free. Yes, it was a factory Chrysler steel fan, not some rinky-dink aftermarket trash. I replaced it with some rinky-dink aftermarket trash for the time being, then switched to a clutch fan and have never looked back. The only failure I've ever had with a clutch was it locking solid. I had no idea it happened and had been driving it awhile like that.

However, if you're interested in sticking with a solid fan, Stretch always recommended a lightweight plastic blade like he used on his circle-burner for years with no failures in constant high-RPM use. I believe Diplomat_wagon took that advice and was impressed with the results. Flex-a-Lite makes them up to 18" in diameter that weigh less than a pound. It's still unnecessary drag on the engine above 30-35MPH, but not as much as the brutal stocker.

10w-30 for oil, right? I broke it in with straight 30w Lucas, so I tend to stick with what worked for me ....

I miss the good old days when you just grabbed whatever oil and all was well.
10W-30 is what was originally specified, so it's hard to go wrong with that. Anything heavier is just more pumping losses with no gain in wear protection. Heavier oil does not have greater film strength.

Based on the fact that GM continued selling flat-tappet truck engines without cam problems for several years after the zinc/phosphate levels in oil were reduced, I'm not inclined to put a lot of stock into the need for high-zoot oil. Then again, for the few miles put on these cars comparatively speaking, it's not a lot of expense for the peace of mind. If I get around to actually daily-driving the '68 Valiant, I'll use the cheapest oil I sell. It recently got one such oil change, simply because the stuff in the pan was at least 15 years old.

One gripe, I screwed up and bought a new gas can at the Kroger gas and go, and the stupid thing has some sort of goofy safety nozzle on it. Basically, it's useless because you have to press a button, slide the nozzle back, and hold it somehow while you pour the gas. There's not even a vent on the can, the nozzle vents itself. It had some sort of a splash guard inside the can too that blocked me from putting the hose too far in. That thing's in the bottom of the can now, and I swiped the nozzle out of a normal can that fit good enough for me to fill a pop bottle for use priming the carb.
You can thank the American legal system for that problem.

Long story short: 30 years ago, Blitz was the #1 fuel-can manufacturer, by a margin of more than 2:1 over the rest of their competition combined. Someone got burned quite badly in an incident involving one of their cans, sued, and won. Once that news got out, everyone who was too stupid to operate a gas can, i.e. filling a running lawnmower, smoking whilst pouring it into their car, etc. and burned themselves started filing lawsuits. The "problem" was Blitz's unsafe design, which was just a differently-shaped plastic version of a good ol' metal gas can with a vent. Within two years, Blitz's legal fees were higher than their annual sales. It was easier to just file bankruptcy and walk away.

Once that happened, every other manufacturer immediately designed impossible-to-use-one-handed, "flame-proof" nozzles. It's easier, and more profitable, to be a pain in the arse than it is to get sued out of existence. Companies like EZ-Pour make kits that fit many of these crappy cans to convert them to a normal nozzle and retrofit a snap-closure vent on the opposite end. I have EZ-Pour kits on every can I own.

VP Racing sells normal fuel jugs, but be aware: They don't come with a nozzle/hose assembly!
 
I bought one of those 2 gallon cans when I lost the little yellow disc for my 5 gallon, glad I didn't chuck it,
they couldn't even fill it ay the gas station.
So I cut out that strainer thingie & now I duct tape the top of my old can & use a big old funnel to pour the 2 into the 5 without that friggen nozzle on it!
I miss my jerry cans, I had a bunch when I used to do oil service!

Not sure what stat I have in mine but it sat idling in pretty hot weather for about a half hour & never went over 190.
 
Did you forget to switch the ignition to run? That's the kind of error I'd make.
I don't think so. I had notes taped all over the place to remind me, and that was one. But that could have been it. I about crapped myself when it fired, I don't think the engine even spun and with the throttle cable too tight, it took off like a house on fire.

The first thing I'd check is the header bolts. The next thing I'd check is lifter preload. I can't say I've ever heard a PS component click or tick, including driving a parts car 60+ miles with cut hoses.
Yeah I've got a bunch of bolts to snug down again anyway. I don't think it's lifter preload because I was so nutty about that. I remember going one by one with a flashlight looking to be sure the plunger was depressed just a little bit under the retainer.
If there was some fluid in it and it wasn't groaning, you're probably fine
It would only groan if I turned the steering wheel, right? I didn't do that. I had to keep telling myself to keep my hands off the shifter you moron.

The pump was full when I started but was dry as far as I could see when I shut the engine off. Seems like it would shove as much as possible out of the pump toward the gear once the pump was spinning.

Going back to the solid-mounted fan, check the blades on it closely.
That could be something there. It seemed to randomly just CLICK and seemed to be coming from the alternator. I have a clutch fan here I was planning to use but it's too big to fit the radiator so I'm not stuck on that solid fan.

Then again, for the few miles put on these cars comparatively speaking, it's not a lot of expense for the peace of mind.
I was telling Gina last night, I'm following the process because if something goes wrong I'll always wonder if not doing this or that per advice was the reason.

I did read more today and see people putting a few hundred miles on the break in oil before dumping it so I'm considering that. None of the parts stores here have "hot rod" oil on the shelf so I need to order it from Summit anyway.

You can thank the American legal system for that problem.
Yes I'm aware of the history and the numerous complaints. This was just the first one of those things I've encountered personally. I thought that was all over and done with by now.

I will order a proper spout kit for it once I figure out which of the seemingly identical kits on Amazon with differing prices is the best deal.

Not sure what stat I have in mine
I ended up taking the high flow high zoot one out of the 400 when I robbed the housing from it. I don't know for sure but it's obviously a 160. I also bought a 180 in a pile of parts for this engine and might switch to that if the engine isn't coming up to temps.

Gina told me the thermostat went up 10* from on to off, then I told her it only goes up to 100 so ...

they couldn't even fill it ay the gas station
It took a minute for it to register that you're in Jersey, the capitol of stupid rules for gas stations. :D
 
It would only groan if I turned the steering wheel, right? I didn't do that. I had to keep telling myself to keep my hands off the shifter you moron.
If the pump is empty, it'll usually make noise. There was probably enough in the bottom of the reservoir to at least lubricate it.

Gentle reminder to yourself and others reading along: Mopar power steering systems use Dex/Merc or ATF+4 transmission fluid, not power steering fluid.

I did read more today and see people putting a few hundred miles on the break in oil before dumping it so I'm considering that. None of the parts stores here have "hot rod" oil on the shelf so I need to order it from Summit anyway.
My process has always been to dump the oil used in cam break-in immediately, then run the next batch for 500 or so miles. After that change, I go with a standard 3,000-mile interval (2,500 on turbocharged engines).

I will order a proper spout kit for it once I figure out which of the seemingly identical kits on Amazon with differing prices is the best deal.
The link I posted was to EZ-Pour's application guide by container manufacturer.

Gina told me the thermostat went up 10* from on to off, then I told her it only goes up to 100 so ...
Engine temperatures always rise after shutdown due to heat soak. 10-20° is normal. Agnes usually went up to around 195° after shutdown with a 180° 'stat, which was the factory-installed/OE "summer" thermostat for these cars. Back in those days, folks "winterized" their cars, which usually included installing a 195° thermostat for improved heater performance. In the mid-1970s all the factory thermostats went to 195° because a hotter-running engine is both cleaner and more efficient.
If your car can safely run a 195° 'stat, there's no solid reason not to do so. I ran my Six Pack Charger in triple-digit Atlanta temps for a few years and never once overheated with the factory-style (Robertshaw) 195 'stat.
 
Engine temperatures always rise after shutdown due to heat soak. 10-20° is normal
I meant room temperature :D
My process has always been to dump the oil used in cam break-in immediately
Noted. That makes sense. There's bound to be bad stuff in that oil after the run-in.

Mopar power steering systems use Dex/Merc or ATF+4 transmission fluid, not power steering fluid.
I found a couple of jugs and was using that. I remember when you couldn't find PS fluid because it was ATF.
The link I posted was to EZ-Pour's application guide by container manufacturer.
Right, it's just a straight-forward gas can, nothing special about it other than the parts I'm eliminating. Amazon lists what appears to be identical parts that have various prices. That's what I was trying to figure out - is the kit that's 25% more worth the upcharge or are they all the same?

It is ridiculous to be here talking about buying replacement parts for a gas can, isn't it?
 
Yesterday I re-tightened all the header and intake bolts, checked the plugs, and pulled the valve covers. All the pushrods felt right to me and there was no sign of trouble, ie no unexpected shiny parts or shavings. The plugs were fine. I fixed the throttle cable so that's ready to go, and fixed a tiny leak at the sending unit that turned out to have given me a lucky break.

1723635554752.png


Imagine the fun if that would've popped apart under pressure.

Also since this came up the other day, the white tape was put on this weekend, the other has been there for awhile.
1723635847090.png

"The switch" is both the key and the hidden toggle switch wired into the starter safety circuit.

But I still might not have had the key fully on until I actually sat down in the car.

Tonight I'm going under to look for leaks and check the clutch adjustment. I haven't seen any oil spots since we shoved it forward, so I'm hoping for luck.

ETA: Everything about the fan seems tight. Next start up if the noise is still there at idle I will take the fan belts off.
 
Last edited:
There's supposed to be a dead spot at the top to some extent (the manual says 1" at the pedal), otherwise the release bearing is constantly touching the plate fingers. On that note, make sure the fork return spring is in place.
Back to the clutch now, I see you posted 5/32 clearance at the end of the fork. I'm making the command decision to round that down to 1/8" because that's the way I'll be measuring it in practice.

I checked that in the FSM and shonuff it doesn't say which end of the fork to measure.

Do I shoot for 1/8" clearance between the TO bearing and the clutch fingers, or 1/8" travel at the rod end of the fork? I'm going to go see what I can see maybe it will become evident when I'm looking at it.

FWIW There's easily an inch of travel before I feel the fork return spring come into play, and then another inch between there and when I can feel the pressure plate. The first inch has gotta be the oval holes coming into play. I do not like that at all. It should be one inch to the pressure plate period or the pedal seems too low IMO. Every b-body I've had felt that way but this is my first a-body 4-speed. I even looked at adding a spring to hold the pedal up but couldn't find a place to put one.

BTW, no runs, no drips, no problems AFAICT underneath. Also no obvious exhaust leak but it was blowing like a hurricane the other day. Probably has something to do with my welding.

Hoping to be chirping some tires on the 1-2 and the 2-3 this weekend.
 
Back to the clutch now, I see you posted 5/32 clearance at the end of the fork. I'm making the command decision to round that down to 1/8" because that's the way I'll be measuring it in practice.

I checked that in the FSM and shonuff it doesn't say which end of the fork to measure.

Do I shoot for 1/8" clearance between the TO bearing and the clutch fingers, or 1/8" travel at the rod end of the fork? I'm going to go see what I can see maybe it will become evident when I'm looking at it.
The 5/32" dimension is at the pushrod end of the fork. There's no way to measure play at the other end of the fork. You'd have to measure at the throwout bearing which, had that been the case they would've said "measured at the release bearing".

FWIW There's easily an inch of travel before I feel the fork return spring come into play, and then another inch between there and when I can feel the pressure plate.
We're back to "linkage not designed for clutch installed" again. I'll bet one dollar American that the finger height is lower on the diaphragm that it would be on a B&B. Also, diaphragm clutches have almost no "feel" to them until the fingers have moved a relatively-significant distance.
When I bought my '78 Trans Am it had a factory diaphragm clutch. When that failed, I put a B&B in it. Hey, I can feel the clutch!

The first inch has gotta be the oval holes coming into play. I do not like that at all. It should be one inch to the pressure plate period or the pedal seems too low IMO. Every b-body I've had felt that way but this is my first a-body 4-speed.
Every single Mopar clutch linkage, including your B-bodies, had oversized oblong holes in the rods when the parts were new. The fit is sloppy by design. That's why they used those clips you love so much; it would fall apart with anything else. It's one of the reasons why there's a fork return spring--to take up the slack in the linkage.
You also need to remember that the over-center spring provides resistance in the first inch or two of pedal travel before it goes over center. You don't have that now, hence the sloppy feel or lack of) feel.

I even looked at adding a spring to hold the pedal up but couldn't find a place to put one.
Find a long spring at the hardware store, with larger wire than a throttle-return spring (wire diameter of say 1/16"-3/32") with a free end you can bend yourself. Dorman actually makes something similar to what I'm describing--we have one in stock at work, but it may not be long enough. Anyhow, put it right where the over-center spring was. It may work, it may not; I've never tried it. However, it wouldn't have enough force to hang the clutch at the floor but it might have enough force to provide the resistance you crave in the initial pedal travel.
 
I think I figured it out. The z-bar is hitting the starter so it doesn't pull all the way back. It used to not hit because I ground a weld to make it not hit. Now it whacks right into it. I think I bent something when I messed up the z-bar bushings putting in the motor mount. It looks like it's the bellhousing bracket/ball but hard to tell with it all assembled.

The good news is I don't think I have to fix it right now because it comes back far enough to get the TO bearing off the fingers. I will find out soon if it releases or not, hopefully it will or else the exhaust and the header have to come back off. I would rather wait until winter to take that all back apart again.

I can get the z-bar in and out with the header installed but can't hook up the lower linkage. I barely can get to it to disconnect it.

McLeod has a spec for clearance between the TO bearing and the fingers, and it's easy to measure from under the car with the splash guard off. "Adjust clutch pedal “free play” to correct specifications. Throw-out bearing should not be tight against clutch fingers. 1/8” – ¼” is recommended, except cable linkage. " Also, the four largest feeler gauges I've got stacked together make an 1/8" (.035+.032+.030+.028). It's almost like they planned it that way.
 
Before - perfectly straight

1723813799087.png
1723813215915.png
Note the ball centered up in the z-bar.

After, note the angle between the bracket and the end of the z-bar:
1723813375404.png

It looks worse in person. (Yes I fixed that plastic steering column thing with a little fine tuning of the relationship between the inner and outer parts of the column.)

In my mind I was blaming it on the taller motor mount, then I noticed it hitting the starter. I didn't think I was rough with it but something happened there. I don't know if I'll be able to straighten that thing out if it's bent; might need a new one. The inner fender is not bent so it's on the engine side, whatever it is that's wrong.

If that has to come apart the exhaust and header have to be dropped because the adjuster and related clip hide between the header and frame rail. Past experience confirms I can snake the z-bar out of there with the column in place.

Hitting the starter limits how far back the pedal will retract, so I don' t know if I'm still getting enough travel to disengage the clutch or not. Of course I opened my big yap and told Gina I should be able to take her for a spin this weekend, so a test with the rear wheels off the ground is in order before it comes apart. If that works out I may go ahead and take it around "the block" before disassembly. I won't be power-shifting it anyway.

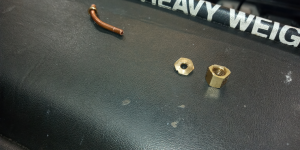
I did get the fuel line routed from the tank to the carb so I got that going for me. They cut the hardline off too short so a compression fitting was involved on the suction side to get that past the headers in metal.
 
Troubleshooting the reason why the tach doesn't work, found that I took power off what seems to be a radio/backup light feed, and it's not hot now. So the backup lights don't work but they did the other day. The fuse is OK. I dunno what the heck is wrong. If it was just the backup lights then I would look at the transmission end, but it's a total loss of power on that circuit so its under the dash somewhere.
 
OK, I figured out that the bracket might be bent, but the problem is that I had the spring clip for the white plastic bushing in the wrong place. I pried the ends of that out of the holes and moved the z-bar away from the starter then popped the clip back in and I'm your uncle. Now the clutch feels normal.

I figured out that it's not really a big deal to adjust per the FSM to 5/32 at the end of the fork. You just move the arm against the return spring back until it hits the fingers and stops, then adjust until you've got 5/32 (1/8) or so motion (gap) between full forward and full back.

Now to figure out the stupid backup lights. I hope I don't end up having to pull the fuse box out.
 
Troubleshooting the reason why the tach doesn't work, found that I took power off what seems to be a radio/backup light feed, and it's not hot now. So the backup lights don't work but they did the other day. The fuse is OK. I dunno what the heck is wrong. If it was just the backup lights then I would look at the transmission end, but it's a total loss of power on that circuit so its under the dash somewhere.
First we'll deal with the backup lamps. I had a bit of difficulty with those, but I don't remember the issue at the moment, only that the fix was simple. The turn signals also work off the same power feed, but on a different wire. Have you got working turn signals? I did, but didn't have backup lights.

First things first: Remove the tach wire. Get the reverse lamps working first.

Brain-fart reminders:
Make sure the transmission is fully engaged in reverse. Because of the straight-cut gears, it won't always do so with the engine stopped.
Reverse lamps are on switched 12V; they won't work with the key off.

On the instrument-panel side of the bulkhead:

The turn signals (18BK) and backup lamp feed are (18W) are connected at the same point at the bulkhead (Cavity W) at the bulkhead disconnect. The radio (18R*) and backup-lamp feed meet at the radio connector, crimped into the same connector. The other wire in the radio connector is orange (18O), which is illumination (and unrelated). The 18R* is fed by Fuse C (RADIO, B/UP). The backup lamps themselves are fed by Cavity Z on an 18W* that goes back to the rear-lamp harness via the connector near the LH kick panel. If you have a dash-mounted "REVERSE" lamp, it's on an 18BK* fed by Cavity C on the bulkhead (this lamp was mandatory on 4-speed cars, NA on 3-speeds). It's the only wire on that cavity on either side. If you haven't got one, the cavity is unused on both sides.

On the engine side:

The only wire coming off the engine side of Cavity W is an 18BK that goes straight to the backup-lamp switch connector. The only wire at Cavity Z is 18BK* coming from the same connector, which feeds the bulbs. On the transmission side of the backup switch connector, there should be two 18BK* wires, one which goes to Cavity C for the dash-mounted "REVERSE" lamp, and one that goes to the switch on the transmission. If you haven't got a dash "REVERSE" lamp, that wire may not be present. If it is, plug it into Cavity C and fuhgeddabootit--it won't serve any purpose, but it can't short.

Simply put, the power to the backup lamps goes out to the engine bay through Cavity W, passes through the switch, then returns to the interior via Cavity Z, which feeds directly to the rear lamp harness. It also goes through C if you have a dash "REVERSE" light. If you've got working turn signals (unsure of your radio status), you've got a break somewhere in 18W and 18W* on the dash side of the bulkhead.

Test for voltage at Cavity W, engine side, with the key on. If you don't have power, look at your radio connector. The 18W and 18R* must be connected. It's all hardwired from there, so if it's not that connection or the fuse there's a broken wire.

I wish I could remember what the problem was on mine, but the fix was apparently so simple that it escapes me now. I had working turn signals and the radio wiring hadn't been cut, but no dash light and no backup lamps. I never touched the lamp grounds (which isn't to say you shouldn't check yours). I know that initially my car wasn't going fully into reverse and hence not engaging the switch. That was due to a detent ball that had fallen out, an assembly failure on my part that can't happen in an assembled transmission.

It's something simple. I have never once had to mess with a fuse box.
 
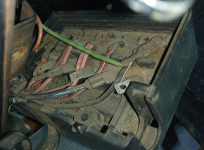
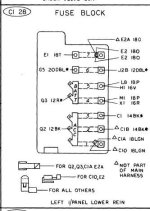
I flipped it over and everything is plugged in as expected.
1723935956152.png
fuse box reverse.jpg


It confirmed that I am not checking the radio plug though. The one side of the plug I found actually does connect to the dash light circuit but it's not orange and there is no red* or white wire connected like there should be for the radio. But the wire is red* coming out of the fuse box so that isn't it. Hard to say what it's for but the connector I need is somewhere up in that rat's nest of unplugged connectors. I quit for last night but will probe the actual backup wires to see where the voltage ends.

There's always a weird coincidence. After sitting there for a month or more with the transmission full, it seems the backup light switch has decided to start leaking just enough to notice. Weird and probably unrelated. Maybe.
 
It confirmed that I am not checking the radio plug though. The one side of the plug I found actually does connect to the dash light circuit but it's not orange and there is no red* or white wire connected like there should be for the radio.
This confuses me. I can't find any dash/cluster illumination wires in the diagram that aren't orange. Maybe I didn't look long enough, but part of that is based on experience. All the dash lighting wires are hot whenever the headlamp switch is pulled, regardless of key position; if yours was only hot in RUN then it's something else. Courtesy light wires are generally yellow or pink, fed from the same point as the dash illumination circuit but complately separate from it.

Regardless, if the connector you used isn't R*/W and O/O that means you need to check a different fuse.

I did make a mistake; the harness side should have two orange wires on the same terminal of the two-pin radio connector, for a total of four. There are only two wires on the radio side. The reason I keep harping on the radio connector is because it's often severed by hack would-be stereo installers. If that's what happened in your car at some point, what became of the white wire that feeds the backup lamps?

What color is the wire you did use, along with the other wires in that connector?
Yeah I know they should be orange, this one isn't and I've got no idea what it's for but it's disco again. I found the proper radio plug and tapped into that for my 12v switched (tach) and gauge lighting.

I checked all the wires to the backup switch, found no continuity between the poles on the switch, climbed back out, sat in the floor, floored the clutch and it went further into reverse. Now they work.

The backup light switch is leaking out the plastic center part, I should've replaced that while the trans was on the floor.

We are now in hood adjustment hell. The a-body could've been a perfect car if it wasn't for those stupid floppy hood hinges.
 
The one side of the plug I found actually does connect to the dash light circuit but it's not orange and there is no red* or white wire connected like there should be for the radio.
What color is the wire you did use, along with the other wires in that connector?
Yeah I know they should be orange, this one isn't and I've got no idea what it's for but it's disco again.
Damn it, Bob, what color is it?! You're tearing me apart here.

I found the proper radio plug and tapped into that for my 12v switched (tach) and gauge lighting.
Fun fact: AutoMeter bulb filters are nearly an identical match for the OE cluster lighting. I was tickled to see how well all my gauges, dash lighting, and aftermarket gauges matched after installed 'em.

I checked all the wires to the backup switch, found no continuity between the poles on the switch, climbed back out, sat in the floor, floored the clutch and it went further into reverse. Now they work.
I had a feeling that might be it, or part of it. There's really no wiggle room on how the switch is actuated; if it's not all the way in reverse, the switch won't actuate.

The backup light switch is leaking out the plastic center part, I should've replaced that while the trans was on the floor.
OE part number is 3488270. Standard Motor Products part #LS201 or suitable cross-reference. It's getting harder to find, mostly due to really shoddy cataloguing on older applications.

We are now in hood adjustment hell. The a-body could've been a perfect car if it wasn't for those stupid floppy hood hinges.
It sounds like they're worn. Mine weren't what I'd call floppy, but I haven't dealt with the '68s hinges yet either. Hood installation is definitely easier with help on A-bodies. I can do it on a '71-up B or any E-body by myself.
 
Damn it, Bob, what color is it?! You're tearing me apart here.
Black Yellow and Black where the radio plug is Red* White and Orange. there might be a tracer on one of those black wires but I wasn't interested enough to fight for a closer look.

20240817_175123.jpg
AutoMeter bulb filters are nearly an identical match for the OE cluster lighting
Nothing AutoMeter in my buggy, only the cheapest stuff available is good enough for my car. The tach is vintage but it's basic junk too, probably came from Sears or Pennys.

FWIW the A12 came with the world's dumbest AutoMeter tach. The numbers are teeny tiny and scrunched together until it gets to 4k. Perfect for a 440, right? I think it goes to 12k or something goofy like that. I guess it was on clearance sale.

I found a photo:
1724091231704.png


OE part number is 3488270. Standard Motor Products part #LS201 or suitable cross-reference
Got it, thanks.

It sounds like they're worn. Mine weren't what I'd call floppy, but I haven't dealt with the '68s hinges yet either. Hood installation is definitely easier with help on A-bodies. I can do it on a '71-up B or any E-body by myself.
Mine seem to want to bind up like the spring is too tight. I tried lubing them ha ha. Yeah that helped. It seems like there's an inch of slop between the two sides until they're bolted to the hood.

I don't remember ever having help with a hood and I've certainly had a bunch of them off but only one a-body. I know the b-bodies just went slap right back in place.

The FSM says mark first them put them back in the same place. On a A-body you can only mark the hinge/hood at one place (the leading edge of the hinge) and I've got that. There are witness marks where it was bolted in place for years if not decades and I put the bolts back on those but still no joy.

It seemed like the threaded inserts in this hood were sliding forward and back inside the hood making things even more challenging.
 
Last edited:

SiteLock

SiteLock
Back
Top