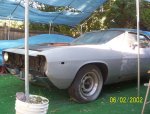
Texas Cuda!

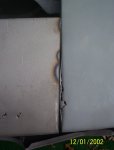
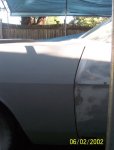
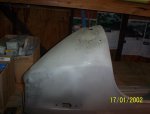
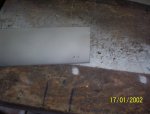
This mourning I put the fender on, my God all went well, not even a finger print, tonight a friggen tree branch will probably fall on it![smilie=f:
I really killing all the fun on this car!:rolleyes: Rich.
 

Attachments

  • fender on-wiper clip 001.jpg
    fender on-wiper clip 001.jpg
    170.2 KB · Views: 9
  • fender on-wiper clip 002.jpg
    fender on-wiper clip 002.jpg
    152.5 KB · Views: 10
Last edited:
This baby's gonna keep me busy awhile !
 

Attachments

  • more parts blasted 001.jpg
    more parts blasted 001.jpg
    161.5 KB · Views: 4
  • more parts blasted 002.jpg
    more parts blasted 002.jpg
    160.8 KB · Views: 4
  • more parts blasted 004.jpg
    more parts blasted 004.jpg
    158.7 KB · Views: 4
  • more parts blasted 003.jpg
    more parts blasted 003.jpg
    153.4 KB · Views: 4
  • more parts blasted 006.jpg
    more parts blasted 006.jpg
    164.1 KB · Views: 4
  • more parts blasted 014.jpg
    more parts blasted 014.jpg
    156 KB · Views: 4
More work to do!
 

Attachments

  • more parts blasted 007.jpg
    more parts blasted 007.jpg
    152.5 KB · Views: 3
  • more parts blasted 008.jpg
    more parts blasted 008.jpg
    157 KB · Views: 3
  • more parts blasted 009.jpg
    more parts blasted 009.jpg
    164.1 KB · Views: 3
  • more parts blasted 010.jpg
    more parts blasted 010.jpg
    175.6 KB · Views: 4
  • more parts blasted 011.jpg
    more parts blasted 011.jpg
    162.5 KB · Views: 4
  • more parts blasted 012.jpg
    more parts blasted 012.jpg
    157.9 KB · Views: 2
My new fender came today, I think they forgot a step or two!:wtf:
 

Attachments

  • more parts blasted 017.jpg
    more parts blasted 017.jpg
    165.5 KB · Views: 6
Cut out some of the bad spots & got one outer patch on the fender done, gotta do some work on that front drop off before I can por 15 the back & guts , then the lower brace will go on!
 

Attachments

  • more parts blasted 018.jpg
    more parts blasted 018.jpg
    154 KB · Views: 5
  • more parts blasted 019.jpg
    more parts blasted 019.jpg
    170.1 KB · Views: 5
Cut out a couple on the header panel too, screw holes were gone on the end piece & the spot where the grille clips go gone on the second piece.
Fun Fun Fun! :rolleyes: Rich.
 

Attachments

  • more parts blasted 016.jpg
    more parts blasted 016.jpg
    168.1 KB · Views: 5
Made a couple a patches for the header panel & drilled out one of the mounting bolts stuck in the fender.
Welded up where the front of the fender split open & hit a few holes & weak(split) spots.
 

Attachments

  • cutting & patching 001.jpg
    cutting & patching 001.jpg
    176.4 KB · Views: 4
  • cutting & patching 006.jpg
    cutting & patching 006.jpg
    164.4 KB · Views: 4
  • cutting & patching 007.jpg
    cutting & patching 007.jpg
    157.4 KB · Views: 4
  • cutting & patching 008.jpg
    cutting & patching 008.jpg
    159.6 KB · Views: 4
This baby's next, gonna try& roll a piece a metal over the edge of the bench & make the arc, will try & save all the edges, bottom 's gonna be hard to save, or fab for that matter! this will be interesting!:eek: Rich.
 

Attachments

  • cutting & patching 009.jpg
    cutting & patching 009.jpg
    155.5 KB · Views: 6
Just trying to out do my first resto thread, 8,459 posts on the fenders!
Da Ja vous all over again, got that patch formed & started the welding but my sons 2nd game was not cancelled, he had a good day , hit the ball well (had been in a slump) 5 rbi's , 3 or 4 put outs in the field & we still lost big, he's on the bad news bears this year, they are their own worst enemies!:rolleyes:
Anyway, I bore yas with some more pics of the fender tomorrow! Can't wait, can yas ! :shifty: Rich.
 
Ok, started out ok, thought it was going well, on the 3rd set of spots things started going downhill, kept either burning through or grinding thru, ended up welding way too much to try & build up the back so I could get the front nicer. got it too hot & warped it pretty good, hammered most of that out , ready to sledge-a-matic the sucker at this point.........................
 

Attachments

  • cutting & patching 010.jpg
    cutting & patching 010.jpg
    161.8 KB · Views: 5
  • cutting & patching 011.jpg
    cutting & patching 011.jpg
    164.7 KB · Views: 5
Cooler head prevailed & I got out the epoxy putty for the last couple of holes in the weld & 1 major grind thru, so 10 demerits for the rusty one, it was that or cut the whole bottom off & start from scratch, & I have no patience for that! :(
It's gonna take some putty to get that baby smooth anyway!:rolleyes: Rich.
 

Attachments

  • cutting & patching 012.jpg
    cutting & patching 012.jpg
    158.2 KB · Views: 4
Lower brace spotted in, test fitted on car, bottom's a little off but I can make it work, so finished welding & flooded the brace with por15, will get the rest of the back tomorrow!
part of the fold over edge split Had to weld that up too! :doh:Rich
 

Attachments

  • cutting & patching 015.jpg
    cutting & patching 015.jpg
    163.2 KB · Views: 4
  • cutting & patching 016.jpg
    cutting & patching 016.jpg
    165.3 KB · Views: 4
  • cutting & patching 017.jpg
    cutting & patching 017.jpg
    164.5 KB · Views: 4
  • cutting & patching 018.jpg
    cutting & patching 018.jpg
    164.4 KB · Views: 4
Rusty, have you ever used a copper backer for the thin spots, when the welder burns thru, no matter what?
You can buy them here and there, but they're pretty easy to make up your own, in any shape you desire.
Just take some some copper pipe fittings or pipe, flatten them out and you now have a backer that will keep the welds from falling thru the thin spots. Doesn't keep the steel from burning away if its too thin, but it does make it easier to build up the welds. For some cooler fingers, solder a length of pipe in the fitting before you flatten it.
I've got several made up, in different shapes and bends for getting at those hard to reach areas. They have saved my ass a few times, and it impresses the Hell out of someone whos never seen them in use. :)
 
Yes I am using backup(home made) It's all in the operator,[smilie=f: I grind too much, trying to make it look like one piece of metal, those dark lines around the welds annoy me,:mad: 
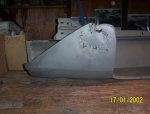
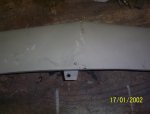
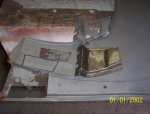
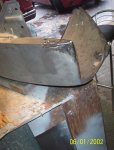
so I hit em again & grind away, I got the surounding metal too thin , then I tried to build up the back to support the front welds, got it too hot & warped the shit out of it, hammered most of that out, by now I've lost all patience & start running beads, the deeper I go the worse it gets, so the last grind off left 1 big hole, & a few of those dark voids in the weld, that's about when i had had it, got out the epoxy putty & locked the sledge hammer in the basement, far from reach! :helpme:
If I would have quit at the first sign of trouble & went at it again the next day the results Might, just might have been better! :shifty: Rich.
 
Even when it goes well it's pretty nasty, but when you finally hang a decent panel, well you know what I mean! :giggedy:
Luckily for me (and any would be customers) I don't do this for a living & can walk away antime(which I should do more often) so most of the time I do enjoy the work! ;) Rich.
 
Where do I start, well with the good stuff first, got those braces back in the header panel & the headlight bucket back on the fender. Now I'm trying to straighten these pieces as I go, bucket & it's flanges were bent pretty good, so I decide it's time to hang em on the car & see where we are at.
I pulled the a/c condenser & straightened rad & hood supports as best I could, there close but till the rad is out I can't tell for sure;
So there going on pretty good, actually found enough hardware between what was there & what was left from the 73(bought a lot of new for it) so plenty of "extra" hardware.
then I start to tighten everything, well the front of the fender ripped open..............
 

Attachments

  • position a-c & front end pcs 009.jpg
    position a-c & front end pcs 009.jpg
    155 KB · Views: 4

SiteLock

SiteLock
Back
Top