Texas Cuda!

RUSTY Cuda

In over my head!
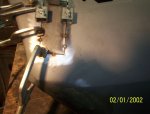
Here we go again, had a couple a pieces off the 74 blasted, I'm knee deep in rust repairs again, buy your eastwood & por 15 stock now,supply order going in soon!:eek:
So here's what I've got to work with.
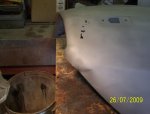
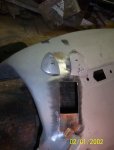
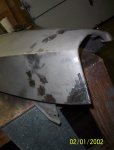
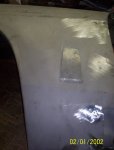
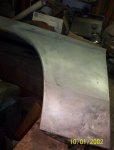
Fender..........
 

Attachments

  • 74 trunk lid 001.jpg
    74 trunk lid 001.jpg
    168.3 KB · Views: 20
  • 74 trunk lid 002.jpg
    74 trunk lid 002.jpg
    151 KB · Views: 19
  • 74 trunk lid 004.jpg
    74 trunk lid 004.jpg
    148.3 KB · Views: 18
  • 74 trunk lid 005.jpg
    74 trunk lid 005.jpg
    165.2 KB · Views: 17
  • 74 trunk lid 007.jpg
    74 trunk lid 007.jpg
    156.2 KB · Views: 17
  • 74 trunk lid 009.jpg
    74 trunk lid 009.jpg
    157.7 KB · Views: 16
  • 74 trunk lid 010.jpg
    74 trunk lid 010.jpg
    168.6 KB · Views: 15
On the trunk lid(s) one I got off ebay was crapola, but there may be enough skin area to make the repairs on the one that came with the 74. the inner frame is surprisingly good, but the rear lip & skin is fubar!
Started cuttin out some of the bad parts, I ALMOST forgot how mich fun this is!!!!!!!!!!!!:shifty: Rich.
I may end up pulling the whole skin off after seeing the inside there!
 

Attachments

  • 74 trunk lid 013.jpg
    74 trunk lid 013.jpg
    163.3 KB · Views: 15
  • 74 trunk lid 015.jpg
    74 trunk lid 015.jpg
    165.2 KB · Views: 15
  • 74 trunk lid 017.jpg
    74 trunk lid 017.jpg
    170.5 KB · Views: 14
  • 74 trunk lid 018.jpg
    74 trunk lid 018.jpg
    169.5 KB · Views: 14
  • 74 trunk lid 020.jpg
    74 trunk lid 020.jpg
    168.9 KB · Views: 21
After skinning the trunk lid(more on that later) I decided to start small to get back into the swing of things!:toot:
Made my patch for the head light bucket.
 

Attachments

  • rust repairs 001.jpg
    rust repairs 001.jpg
    165.6 KB · Views: 12
This will be another case of Rusty gone looney, after seeing the insides of the lid when I started to cut away the bad parts of the skin, I decided to take the skin off to at least treat the guts & maybe have it last a few years, so I figger I'll put in 150 hours & 400 bucks of materials to repair a 250 dollar(replacement cost) trunk lid:shifty:
Ahhh but what fun would it be bolting on a new piece? :huh:
Welp gotta go make up my eastwood & por 15 orders, there's rust a waitin on me!:toot: Rich.
 

Attachments

  • rust repairs 002.jpg
    rust repairs 002.jpg
    167.6 KB · Views: 14
Back in 74 or 75 I had a 70 chally that had a trunk lid rotted at least 5 times worse than yours. There was nothing left of the inner lip. i probably could have got a different lid for $50, but I decided to sell the car instead.
I hated that car every time I slammed the door. :doh:
 
Are you folks ready!...............................

for another million posts on a fender!:shifty:
Put in my por 15 order & started workin on the parts of the fender I could get behind.
You saw the carnage, heres the start of the repairs!
 

Attachments

  • rust repairs 003.jpg
    rust repairs 003.jpg
    170.7 KB · Views: 14
  • rust repairs 004.jpg
    rust repairs 004.jpg
    164.4 KB · Views: 13
  • rust repairs 005.jpg
    rust repairs 005.jpg
    168.6 KB · Views: 13
  • rust repairs 009.jpg
    rust repairs 009.jpg
    167.7 KB · Views: 15
Still gotta finish of the welding on that one, but I got the top done & a bunch a pinholes:dance:
 

Attachments

  • rust repairs 007.jpg
    rust repairs 007.jpg
    163.3 KB · Views: 13
  • rust repairs 010.jpg
    rust repairs 010.jpg
    160.6 KB · Views: 13
Last edited:
Lower patch is ready, I flanged the bottom to slide under because that metal is a bit thin down there, once the por15 comes I'll slop some into the frame work & get back to weldin & grindin again.
Plan on this car is por15 in the back, epoxy primer on all exterior pannels, hoping to avoid some of the mishaps that occurred on 2RUSTY (this car is) RUSTY2 aint that an understatement!
Actually have a few days work lined up so the adventures should start back up late in the week or the weekend! :toot: Rich.
 

Attachments

  • rust repairs 001.jpg
    rust repairs 001.jpg
    168.9 KB · Views: 12
  • rust repairs 008.jpg
    rust repairs 008.jpg
    161.8 KB · Views: 12
Wish I'd responded to this sooner... once you've tried Chassis Saver, you'll go back and throw rocks at POR-15.

I've used both. Chassis Saver rules; they don't offer as many variations or products as POR-15, but the product they market trounces POR badly.

Rusty, why do you do this to yourself?! :D
 
Maybe next car Doc, por 15 is in transit,usually only takes a day or two they are here in Jersey.
I love it when it works, thats why only the backside this time, but I really haven't tried any other, was actually thinkin eastwood stuff, but too late now.
You kiddin, I LOVE this shit, got a little down when I opened up that trunk lid, now I may skin the one with the bad frame & try putting it on my good frame, either way a new one is cheap enough if all else fails, but what fun is bolting on a new & inferior lid!:toot: Rich.
 
Last edited:
Slopin around in por15 again, taped up all the holes in the back framing on the fender & pored(ha ha )the por into the last hole, seeems to have seeped out of most of the joints hopefully I got most of the metal in there covered, now I can weld on that lower patch.
Hit the inside of the trunk frame(facing the skin) & the headlight bucket. Just gotta spay on the dust coat of primer later on the headlight bucket(that will get paint later) & I'm done for today.
Gettin my new grass carpet next week, so the back will look good again for a while! Rich.
 

Attachments

  • rust repairs 50.jpg
    rust repairs 50.jpg
    156.7 KB · Views: 12
  • rust repairs 51.jpg
    rust repairs 51.jpg
    165.6 KB · Views: 12
Last edited:
Got that lower patch welded on & por15'd the back of the fender, tried some of that reinforcing mesh I bougth for the other car & never used, cover up the holes in my welding & the thin metal back there, don't know if it will do any good, figured it cant hurt!:dgt:
 

Attachments

  • rust repairs 001.jpg
    rust repairs 001.jpg
    170.5 KB · Views: 10
  • rust repairs 002.jpg
    rust repairs 002.jpg
    155.6 KB · Views: 10
  • rust repairs 003.jpg
    rust repairs 003.jpg
    154.4 KB · Views: 10
DA'd part of the fender by the patch , gonna take a while to clean that up for the epoxy primer on the outside, once it's primed I can start sloppin the mud on:toot:
Wondering where to shoot the pieces, makes such a mess in the garage, but not really set up for it outside, figure that out next week I guess.:huh: Rich.
 
K,I skinned the other trunk lid today,looks like it's gonna be my attempt at getting a usable lid, has some pitting on top, & a few holes thru, far less then the other, on corner was cut in two places, maybe a weld or 2 there, trick will be how it goes back on, that should be interesting!
 

Attachments

  • rust repairs 008.jpg
    rust repairs 008.jpg
    163 KB · Views: 8
  • rust repairs 007.jpg
    rust repairs 007.jpg
    165.7 KB · Views: 8
  • rust repairs 009.jpg
    rust repairs 009.jpg
    153.9 KB · Views: 8
  • rust repairs 010.jpg
    rust repairs 010.jpg
    172.2 KB · Views: 8
Got my new "grass" today too, it will look clean out there for a week or two, turned in all my scrap copper early this year, no christmas bonous this year!
 

Attachments

  • rust repairs 001.jpg
    rust repairs 001.jpg
    162.3 KB · Views: 9
  • rust repairs 004.jpg
    rust repairs 004.jpg
    155.6 KB · Views: 10
  • rust repairs 006.jpg
    rust repairs 006.jpg
    175.2 KB · Views: 11
Tried welding from the back this time, looking for less grinding on the skin, seemed to be workin at first but seemed to leave a line around the whole patch as I cleaned it up, so I hit those spots from the front.
Cut up the other skin to make the patches so it's all original metal:D Rich.
 

Attachments

  • rust repairs 001.jpg
    rust repairs 001.jpg
    156.6 KB · Views: 7
  • rust repairs 002.jpg
    rust repairs 002.jpg
    159.6 KB · Views: 7
Last edited:
Got some stuff accomplished today, epoxy puttied the last few pin holes on the fender & put the headlight bucket back in, got most of the skin ready for a coat of epoxy primer, then I can start the body work.
The inside of the trunk skin was preped & coated with por 15, think I'm gonna try & put it back together before I clean & prime that skin, a lot of effort wasted if it won't go back on right, time will tell on that one!
 

Attachments

  • rust repairs 004.jpg
    rust repairs 004.jpg
    161.4 KB · Views: 5
  • rust repairs 008.jpg
    rust repairs 008.jpg
    171 KB · Views: 5
  • rust repairs 003.jpg
    rust repairs 003.jpg
    162.8 KB · Views: 5
Yes & No , didn't really wanna start on this one till the other was completed, but things have been slow at work for some time now so I dare not buy the interior stuff I need.
So I figgered I could keep the outlay low workin on a few parts for the 74, got metal, got a welder so I can do the labor intensive stuff while I wait for the money train to pull in!
Then again I'll almost bet by the time I finish a few pieces I've have blown the money that could have bought the materials for the 73's interior!:eek: Rich.
 

SiteLock

SiteLock
Back
Top