Polishing a turd...

restoman

The paint fumes have cleared so I'm
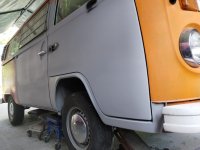
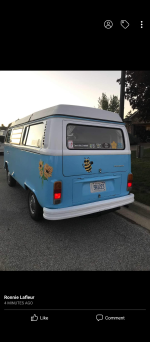
I did a LOT of metal work on the right rear quarter, rear corner, and rear panel on this Westy last summer. A cool old bus, but a ratty one, nonetheless.
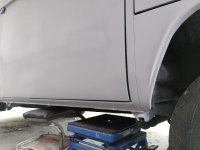
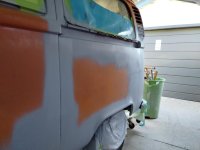
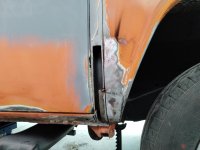
It's back this year for another go-round, this time for mostly dents, chips, blisters and some metal work to the right front dog leg.

Nothing fancy here. The owner has neither the money nor the inclination to subject himself and the bus to what it really needs: a total strip and re-do. I'm estimating around $25k to do it right.
That's ok, I don't have the inclination to get into that, either.

So...

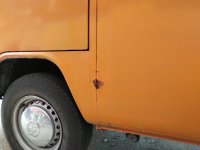
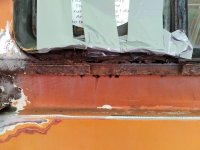
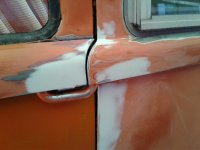
The old girl was in some type of collision in its past. The quarter was packed with filler when I got it last year. The sliding door is originally off a red bus, the front door is off of a blue one. The whole side has five (5) coats of orange paint on it, with various patches of red lacquer primer here and there. Two coats of red lay underneath the five layers of orange on the slider, three coats of blue linger underneath on the front door.
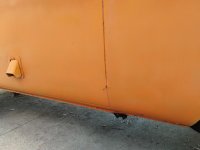
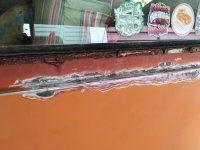
Yup... paint chips look like lunar craters.
Add in some filler, and rust blisters under the paint, and we get to what I'm trying to polish.
Like I said: nothing fancy. Nothing even really worth posting.

Like most VWs I've worked on over the years, this old girl has been endlessly cobbled by people who shouldn't be working on cars, let alone painting them. If I had a nickel...
 

Attachments

  • turd 1.jpg
    turd 1.jpg
    80.4 KB · Views: 5
  • turd 2.jpg
    turd 2.jpg
    71.9 KB · Views: 5
  • turd 3.jpg
    turd 3.jpg
    79.6 KB · Views: 5
On to the rust work...

Not the easiest of jobs when the intent is to disturb/remove as little as possible.
I hate it when folks don't replicate factory seams, so there was a little extra work here.
2 hrs to get to what you see in pic 1, 2.5 for pic 2, and 2,5 again for pic 3.

The rocker also needs some metal work. :(
 

Attachments

  • westy 1.jpg
    westy 1.jpg
    115 KB · Views: 4
  • westy 2.jpg
    westy 2.jpg
    83.1 KB · Views: 4
  • westy 3.jpg
    westy 3.jpg
    132.8 KB · Views: 4
its only "ok" to remove a factory seam "if" you remove the entire factory seam end to end..and your welding and leading it
 
its only "ok" to remove a factory seam "if" you remove the entire factory seam end to end..and your welding and leading it
Lead????
No frigging way. There are much better products on the market than lead.
And this bus isn't a candidate for most of them! :)
 
sure there are better products but if id have said anything else it wouldnt have been clear what i ment LOL
 
Too warm to be doing this kind of work!
Flash times in hot and humid weather... yeah, if you say so. ;)

But, it's almost done.

Somehow, I missed taking any after pics of the welded rocker, but it is welded.
 

Attachments

  • westy 4.jpg
    westy 4.jpg
    97.4 KB · Views: 1
  • westy 5.jpg
    westy 5.jpg
    80.1 KB · Views: 1
  • westy 6.jpg
    westy 6.jpg
    85.7 KB · Views: 1
  • westy 7.jpg
    westy 7.jpg
    70.1 KB · Views: 1
The Turd came back for a week in September, to try and tidy up what looked to be a decent driver's side.
The owner spent a good chunk of change a few years ago, getting someone to put in "...all new metal..." on the rocker, lower front quarter, rear forward lower quarter, and behind the wheel.
Yeah... right.
Here we go again!

The only metal put in was a patch panel for the lower side/rocker area. That someone didn't bother with factory seams, he didn't even bother himself to clean out the rusted spots: he just patched over them, along with the old rusted-out rocker. It's still underneath the patch panel.

The pics speak for themselves. I didn't remove the patch panel, but I trimmed it back, welded in both front and rear ends as they should have been done (that was a shit-ton of work!), blasted the rust, yadda yadda yadda....
If time had been on my side, I would have insisted on cutting out the shitty work in it's entirety, and starting from scratch. But, with only a week, and the nearest panel being three days away, I did it the hard way. :(
I was so ticked off, I didn't even bother taking pics of the reconstruction, but it's there.
More to follow...
 

Attachments

  • turd 4.jpg
    turd 4.jpg
    70.1 KB · Views: 2
  • turd 5.jpg
    turd 5.jpg
    77 KB · Views: 1
  • turd 6.jpg
    turd 6.jpg
    104.6 KB · Views: 1
  • turd 8.jpg
    turd 8.jpg
    81 KB · Views: 1
  • turd 9.jpg
    turd 9.jpg
    83 KB · Views: 1
  • turd 15.jpg
    turd 15.jpg
    74.5 KB · Views: 1
  • turd 16.jpg
    turd 16.jpg
    82.2 KB · Views: 1
Then, onto the rear section, and under the side glass...
The rear panel, I got lucky. The previous guy patched over the seam and I was expecting more work, but turns out, he was just too lazy to trim the panel.
I cut it back to expose the factory seam, blasted the rust, re-welded, yadda, yadda, yadda.
Under the side glass... what a mess! Here, I had no choice but to do a temporary repair until such time as the owner get a new window seal and vent wing assembly. Without any idea of what I'd find if I pulled the glass, it was all I could do. Blasted as much as I could, filled, feathered, DTM primed it, and then filled the holes under the seal with urethane seam sealer.
Like every other previous repair on this bus, rust blisters were ignored by the other guys, filler applied over un-sanded primer & paint, feather-edging was kept to a minimum, and every other shortcut that could be utilized, was.
Truthfully, it will probably never get done the right way, but they should get years out of the temp job.

Yup, there are a lot of paint & primer layers there!
 

Attachments

  • turd 10.jpg
    turd 10.jpg
    101.3 KB · Views: 2
  • turd 11.jpg
    turd 11.jpg
    89.7 KB · Views: 2
  • turd 12.jpg
    turd 12.jpg
    97.8 KB · Views: 3
  • turd 13.jpg
    turd 13.jpg
    117.1 KB · Views: 3
  • turd 14.jpg
    turd 14.jpg
    77.4 KB · Views: 3
  • turd 17.jpg
    turd 17.jpg
    105.2 KB · Views: 2
  • turd 18.jpg
    turd 18.jpg
    107.5 KB · Views: 2
  • turd 19.jpg
    turd 19.jpg
    121.8 KB · Views: 1
  • turd 20.jpg
    turd 20.jpg
    95 KB · Views: 2
Truthfully, it will probably never get done the right way, but they should get years out of the temp job.
That's exactly what I was thinking as I was reading along... "No matter what he tells them, they'll be tickled with the temporary repair and not bother to have it done right until there's a more-serious issue."
 
That's exactly what I was thinking as I was reading along... "No matter what he tells them, they'll be tickled with the temporary repair and not bother to have it done right until there's a more-serious issue."
Yeah. Most older stuff like this doesn't get the rain, wind, snow and ice that daily drivers get, so even cobbled repairs last a good length of time.
And that is why a lot of owners get hosed by the guys ".. putting in all new metal...". By the time rust shows back up, it's years past the repair.
If the previous guy (s) here had simply sand blasted the rust blisters instead of bondoing over them, I never would have had to do this this year.
It would still have been ugly and short-cut-looking, but the visible stuff would still be at a minimum.
 
A couple of good, wet coats of DTM high-build urethane primer, some seam sealer to even out the appearance of the panel seams, and it's ready for final sanding.
I had to make the seams a bit more raised than they really should be, just to even them out from top to bottom.
The paint work isn't on my list of things to do... Yay me!
 

Attachments

  • turd 22.jpg
    turd 22.jpg
    70.9 KB · Views: 0
  • turd 23.jpg
    turd 23.jpg
    56.3 KB · Views: 0
  • turd 24.jpg
    turd 24.jpg
    112.6 KB · Views: 0
The owner's wife (actually SHE is the owner, but doesn't like to drive the old bus) took on the task of painting it.
Several bodyshop quotes for masking & spraying scared them silly, so Beauti-tone rust paint, some universal 2k clear, a couple of foam rollers and a good brush led her to this result.
It's a definite 20 footer.
But, it's done, they could afford it, they're quite happy with it, and the multiple shades of orange are no more. Most importantly - to me anyway - they did the work themselves.

They asked what I thought of it.
After a minute, I said "To Mike the bodyman & painter, it's horrendous, but to Mike your friend, who knows you did the paintwork yourself, it's fantastic."
The smile on Rena's face here, is genuine.
... And I don't have to work on it anymore. ;)
 

Attachments

  • turd 25.png
    turd 25.png
    1.8 MB · Views: 5
  • turd 26.png
    turd 26.png
    2.1 MB · Views: 3
  • turd 27.png
    turd 27.png
    1.5 MB · Views: 6
  • turd 28.png
    turd 28.png
    1.6 MB · Views: 6
The Van looks great!

I did one fender on Patches last winter with the roll on Tremclad , with minimal wet sanding between coats and very poor prep work...was suprised how good it turned out! With some decent prep and primer and a lot more wet sanding between coats you could end up with a fairly decent daily driver paint job.
 

SiteLock

SiteLock
Back
Top