My 71 Duster work in progress

Ok, I ordered the nuts, took the seat out so I can start working under the dashboard and I feel dumb for not thinking about just sticking a jack or stand under the LCA to torque things.

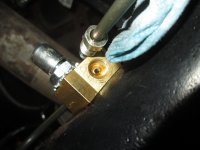
The rear brake line continues to leak at the tee, so I'm probably going to end up needing to re-make that hard line. That end must be the end that I flared, but I thought it was the other end.

As for the headers. the short version is that I just want to drive the stupid thing and go get some ice cream. The long version is ...

The PITA motor plate is just not an ideal situation, and I'm skeptical that it hasn't put the motor in an odd position to where there's always going to be a problem. There's no room to work on or around the engine, and I don't even think I can get the passenger side valve cover off without pulling the blower motor because it's sitting about 1/4" inch above the cover. Yeah I know I don't need the blower anyway but that's kind of beside the point.

Then there's the question of the engine itself. I've got no idea what kind of condition it's in or what the build is. I've never driven it to find anything out, because it didn't have any brakes. It could be a 400 out of a station wagon, a 500 inch stroker, or something in between. I've got $1 that says it's just a stock engine with a better cam.

I haven't pulled the valve covers (see blower motor above) but I can see the stamped rocker arms through the fill hole. It looks like it does have a windage tray installed though. If I end up needing to replace the engine, and eventually I will, it just makes sense to me to go with a good strong small block instead to eliminate the hassle and be done with it. It was a 318 car so all I need are motor mounts to sit it on, no funky adapter mounts or K-frame replacement needed.

That's my story, and I'm sticking to it.
 
an rb in a abody is a tight fit to begin with and honestly outside of a track only car i will never see the point so i dont blame you one bit...it just throws the whole balance of an a-body out the window
 
I think I figured out why the car didn't have an emergency brake

IMG_2738.JPG
It's kind of confusing because I had the camera upside down, so left is right. But, that bolt is supposed to be a pin. Right above it is where the e-brake mech pivots. The bolt is in the way.

I don't necessarily need the OC spring if I go with a diaphragm clutch (which I probably will) so I might just do away with it. If I can get the bolt out of there

pedal assembly.jpg
 
i wonder if it says it wont fit 71 due to a catalog error thinking its small bolt?
That wouldn't be a catalog error. All A-bodies were small-bolt through the end of '72, so they used 7/16" studs and nuts. Swaps are not catalogued.


The PITA motor plate is just not an ideal situation, and I'm skeptical that it hasn't put the motor in an odd position to where there's always going to be a problem. There's no room to work on or around the engine, and I don't even think I can get the passenger side valve cover off without pulling the blower motor because it's sitting about 1/4" inch above the cover. Yeah I know I don't need the blower anyway but that's kind of beside the point.
I briefly considered "elephant ears" (same difference as a motor plate, but with more room) way back when I had my '81 Imperial and was going to swap it to a 440. The pulley-alignment issues alone convinced me it was a bad idea, since header clearance in a J-body isn't much of an issue. Now that I'm older, the vibration transfer between engine and chassis would keep me away from it, even on a full-tilt race car. I'd be much more likely to lop the K-member brackets off a spool-type unit and then bolt those to mounts already on the engine. With the transmission installed, I'd then drop the thing into place, bolt up the transmission mount and get the engine into the best position I could wrangle. Weld the brackets to the existing crossmember and B-body-Bob's your uncle. In the case of an A-body, I'd already have the TTi headers, starter, etc. in place too so I could jockey for max clearance.

But I don't think I'd do it on an A-body... I'm just too big a fan of small blocks in all but the C & B-bodies. I only briefly entertained the idea of a big block in my '82 Imperial, and even then not very seriously.

All that being said, the engine's in the car and sorta works, so you may as well work with what you've got for now. Keep in mind, a stock 400 with a hotter cam can be a pretty fun engine, even moreso with some head milling to bring the compression up from the basement. I had .080" cut off my 440 heads, which might've been enough to get it into the mid-8s for compression with the stock pistons. I still have to CC them to know for sure, though.
 
im with you doc on the engine plate idea, i too would just get the mounts bolted to the engine and then align them to a x member, honestly no better way to do it for ANY engine swap 4 banger to v12...an engine plate is the "lazy" way out, only place i can remotely see it being "ok" is in a full tube frame chassis that has NOTHING left "oe"..but even then..how hard is it to bend up a couple tubes for pads..even if you need the pads to acept a wide viraty of brands i still cant see a "plate" being better...IMO the only time you can get a plate being better is for miss matched brands to missmatched bellhousing..at that point..sure its better

im also with you on the LA's they are just too much fun..even in a truck...of course im putting a 440 in the ramp truck but i think the only reason why is i have it....and a slew of goodies nos dual plane wiend, vintage "early" cal's OE chrysler marine aluminum pan(huge is an understatement) and assortment of purple shafts, THICK wall headers..ive even got some slugs, and finnaly found the correct bellhousing for 200$ and got the flywheel(which is no easy feat) for FREE....castiorn industrial style bell...its like the fates came together for it
 
We're all in agreement on small blocks then. In an A or E body, they're the ideal engine IMO.

I've got a feeling I'm going to end up pulling the steering column to fix this OC spring CF and will then have a can of worms to deal with out of that. I had a similar rig job on a clutch pedal in a b-body and that snowballed until I had the windshield and dash out of the car to make it right.

I figure the story went something like the clutch pedal install had them remove the parking brake so they could get the bracket in. Then the pin was missing, so they used a bolt. Finally they went to put the parking brake back in and ran right into what I did, so they carried on and did away with it completely.
 
I didn't get the spring out, but I studied it :)

If you look at the photo you will see some spread open coils. Those gaps prevent the un-gapped coils from opening up, and I am having trouble making a difference with the washers.

But honestly, I think because those are gapped open it's real loose when the pedal is up so I think I can just take the bolt out with no interference from the spring. I used finger-vision to see a hole in the bracket behind it, so it's not blocked in, and with any luck the bolt head will fit through it. Otherwise it may be time to break out the air saw and chop it in half. Then the question becomes what is easiest to cut through, the spring or the bolt.

I went back to the front end last night, and even with the tire off I still couldn't get on the PS strut to torque it because the rad hose is in the way. I horked on it with a long wrench (1" nut) until it was solid, then turned a little more until I heard the rubber make a squinch sound and called it good. It felt about as tight as the other side, and ain't going anywhere anyway with the roll pin in it. Which, speaking of, a big cotter pin works just as good as a roll pin, right?
 
That spring will bite you, and hard. I would highly suggest getting a prybar in there and removing it from one end or the other rather than trusting it won't give you any trouble. It will. Don't risk it; that shit hurts.

I have yet to see a fully-relaxed over-center spring with open coils, and I have at least six, possibly seven sets of clutch pedals for various models either lying around or installed in cars.
 
Understood. I was basing the slack spring on the ability to basically wiggle the spring around on either end. when the pedal is up My first worry was that while I was fighting with it, the pedal would go from up and spring slack to pedal down and spring tight unexpectedly.

The b-body mentioned above had a dent in the floorboard where the pedal went down with the linkage disconnected. I had the carpet out when that happend and it flat scared the crap out of me. This one isn't that bad but I've don't doubt it could break bones if the pedal came down on a hand or foot. Mostly I keep the disconnected pedal on the floorboard and well clear of it in other cases. So I'm definitely proceeding with caution.
 
OK I had it backward, the spring is slack when the pedal is all the way down. I double-checked it, even made a video of it as proof of due diligence, and just took the bolt out. Booyah.

It was still a PITA getting the cable clamped in because of the bracket that is around the spring but it's done. I bled the MC and put that on too but still have to bleed the brakes. Oh yeah and I've got to fix that brake line leak at the tee.

I've got a vac bleeder, do I just pump that until no air comes out, or is pumping the pedal still required?

I typically run a hose from the bleeder into a mason jar with a little brake fluid in it, and put the jar where I can see it from the driver's seat. Then open the bleeder and pump the pedal until there are no more bubbles.
 
Even with the pedal on the floor, all my over-center springs are still under considerable tension. Looking at the photo of yours again, it appears damaged. All of the coils should be evenly spaced. My guess is a prior owner got tired of trying to fight the thing into position and bent yours. They're not actually that difficult to install/remove, but having the pedals installed during the process makes it much easier and safer.

I've never actually used a vacuum bleeder, but I would assume your method would be correct. I know a lot of guys that have/had them but never used one myself.

When I was repairing lines on my Dakota, I had nobody to help me bleed the system. Before I was even done bnding and flaring, I purchased a Motive Products brake bleeder that I've used ever since. It's the cat's pajamas, well worth the ~$70 it cost at the time. Stretch liked mine so much his wife bought him one for Christmas the year he'd borrowed it, and after using Stretch's one time our sister shop had to have one as well. Stretch and the other shop got the complete kit with all adapters; I just bought the one that fits all the '78-later Chrysler plastic-reservoir cylinders. Install cap, pump up a wee bit of pressure, bleed in the correct order, and you're done... fast and easy, just like your prom date.
 
sounds like the one you have doc is a push thru not pull thru?...if so those are MUCH easier to work with..and have less...hicups, but also dont work well in some euro aplications..not saying bad things jut ive run into situations where you need suck over blow and other situations where neither will work alone

if you have a vac setup theres a few things ive found to make it work 90% of the time without hassle...first and formost remove each bleeder and wrap ONLY the thread with teflon tape, and thread them back in and snug them up..dont tighten, if your going to bleed the master first i recomend just doing the "bench bleed" method ON the car..ie run lines off the side and back up into it

the reason behind the teflon on the bleeders is to keep air from getting sucked passed the threads and tricking you into thinking your getting nowhere....besides the threads are NOT what a bleeder seals it bottoms outs..and "if/when" you do tighten them up fully you will shred the tape enough to useualy making anouther vac bleed useless without re-taping

start with the longest line first , re-check n fill master, do next longest etc, recheck..when you think your done DO NOT tighten everything up...cycle the pedal SLOWLY a few times, then go back and pull about 1/4 cup from the longest line...if no air or atleast no big air, your done..tighten everything, if air re-check all of them
 
I've never had a problem with doing it with the mason jar but I'm sure I waste a lot of fluid. It' can be hard to see and you don't want to quit 1 or 2 pumps shy of done. I bought the vac bleeder and used it to draw all the fluid out of the front lines because they were dripping everywhere while I worked out the hose to body situation.

I have read about situations where something goes wrong in the prop valve while bleeding and it gets off center or something but also haven't found any details on how it happens, only warnings that it can. Which might actually mean that it can't.

I've got the e-brake cabled and adjusted now. Just came in to get my camera to take a photo of the end of the leaky line. It's the only way I can really see it TBH. I'd be helpless in some instances without a camera.
 
Last edited:
I've never had a problem with doing it with the mason jar but I'm sure I waste a lot of fluid. It' can be hard to see and you don't want to quit 1 or 2 pumps shy of done. I bought the vac bleeder and used it to draw all the fluid out of the front lines because they were dripping everywhere while I worked out the hose to body situation.

I have read about situations where something goes wrong in the prop valve while bleeding and it gets off center or something but also haven't found any details on how it happens, only warnings that it can. Which might actually mean that it can't.

I've got the e-brake cabled and adjusted now. Just came in to get my camera to take a photo of the end of the leaky line. It's the only way I can really see it TBH. I'd be helpless in some instances without a camera.
OK the flare looks OK I think.


IMG_2756.JPG

I don't see why it is leaking.

This shows the clearance between the blower motor and the valve coverIMG_2755.JPG

And this is how it looks with tires on it. I haven't put the centers on the wheels yet to avoid beating them up accidentally.

IMG_2754.JPG
 

Attachments

  • IMG_2758.JPG
    IMG_2758.JPG
    2.5 MB · Views: 1
if that flare is leaking, but looks fine, nip it off..just the minimum and re-do it but this time dont fully crush it back in let the fittings finish he crush...had the same one leaking on the preachers rolled 69 fish, and that was my fix for it..was leaking at the prop valve and on the rear axle, re-flaring but not fully flaring the second step worked..mind you i was working with dot5 which made it twice the pain
 
I cranked down on it this time, and the fitting's not leaking.

I'm trying the vacuum bleeder, with the hose zip-tied to the bleeder screw.

At this point, if I didn't know better I'd say it's making air. OTOH there were a lot of parts replaced so maybe there really is that much air in the system. At least it's easy work, now that the car's on stands again and the tires are off.
 
I gave up on the vac bleeder. It only took a few minutes to get out the mason jar and bleed them the old fashioned way. It's got brakes now, both foot and parking.

It felt good to start it up and let it run for a while, now that the tires are on the ground and it has brakes so I can get all the implausible worries out of my head. It started up easily, held plenty of oil pressure, no smoke, and no fuel hanging in the air.

I'm still skeptical though. I had a car that held a ton of OP with the engine warmed up in the garage that would go to zero at stops once I drove it enough for the engine to get good and hot.

Next stop, fender town.
 
Does anyone know what kind of connector I need to hook up the e-brake switch? I found a disconnected wire of the right color, but there's no end on it. It's a bullet style AFAICT but I'm unsure if normal parts store connectors will work or not.
 
I'm not sure, and I can't look since the car's in the trailer and I can't get into it easily. However, if it is in fact a bullet connector, I learned during my jumper-harness fabrication marathon last summer that they are not the same as "off the shelf" universal parts. The male ends are either loose or too large. Since I had a bunch of extra factory wiring lying around, I did not investigate aftermarket availability (such as AuVeCo) of the right size parts.
 
I'm not surprised it was cut off. The weird connector was probably hard to unplug but easy to snip.

I'm trying to avoid taking the switch off to match something up, now that I've got the mech installed under the dash. I might be able to pull the pin at the dash and drop it down to get to it though. I haven't tried that yet. Heck if I take it off I guess I could solder a pig tail to it and be done with it. It's just a ground deal.
 

SiteLock

SiteLock
Back
Top