My 71 Duster work in progress

After originally installing a reman factory cylinder that failed while sitting over the winter, this is how I ultimately solved the master-cylinder issue. I wasn't crazy about the deviation from the OE look, but it's not terrible and the weight savings is significant. I could not find a new unit in the correct bore size, but I'm very happy with the pedal feel and effort with the slightly-larger bore (1-1/32" v. OE 15/16").
 
I did not buy Dr. Diff's master cylinder. The adapter was, and still is, $38 w/free shipping on eBay; the master cylinder sells for around $58 walk-in at my store (Dorman #M99294). I'm 90% sure it's the same cylinder everyone else sells, but Dorman offers it with a lifetime warranty (and I'm the store manager 😁). By the time sales tax was included, I was into the whole deal for under a C-note, since I was able to re-use my OE pushrod and the Dorman part came with the rubber retaining ring.

My Challenger is also factory manual brake, and I've been considering this sneaky bastard for that car. Even at "just" 3.2lb, though, it's significantly heavier than the Dorman unit on the Valiant. I don't think that one even weighs a full pound.
 
I'm not that worried about weight saving. I'm undoing a lot of that on my road runner. I don't think you've ever seen what they did to it.

Check the trunk lid out
IMG_4386.jpg

Top and bottom of the rad support has speed holes

IMG_1955.jpg


Notice anything missing? This is not a post car.2007-03-11 125.jpg

That's just skimming the surface. They (Arlen Vanke's shop) treated the car like the stamping contours were "cut here" lines. According to the guy I got the car from, the fenders, hood, seats, intake/carbs were sold in a yard sale.

The car's an A12. I've got the biggest part of a complete 69 Satellite stashed in my garage to make it streetable again. Lots of welding yet to do but I think it's going to a bodyshop next. There's a guy not far from here with a shop whose family is and has been renowned for Mopars here. It's hard for me to trust when it comes to something like this though.

IMG_4379.jpg

Anyway, I ordered a new 73-up MC from rock auto, it's supposed to be here tomorrow.
 
I'm not that worried about weight saving. I'm undoing a lot of that on my road runner. I don't think you've ever seen what they did to it.

Nope, that's the first I've seen of the car. I sorta love it, other than the hood.

I am interested in saving weight, in any way that doesn't involve carving up my car like that. That's a bunch of work. The bright side is that what's there looks very solid so you've got a lot with which to work. That butchered interior side panel is actually pretty easily replaced, etc. I know about the process because my friend is restoring far worse. His car was originally triple green with a column-auto 318, but it's a '68 Charger... and it was his first car, purchased the first time when he was 15. The second time came 30 years later, and it shows every minute of it. :oops:


Anyway, I ordered a new 73-up MC from rock auto, it's supposed to be here tomorrow.

As long as you didn't order the Cardone. Please tell me you didn't order anything made/remanufactured by Cardone.
 
The car taught me to weld, but I'm not confident in welding parts that you can see.

The car came from Akron OH and spent several years on the street which was plenty to get a little bit of rust started but the floors and frame are clean as they could be. The dummies also trimmed the front edge of the wheel well all the way back so you get to cut a lot (all) of the quarter off to get to that.

As for the hood, that and all the other fiberglass stuff was sold years ago and I bought a factory hood for it. Got a repop air cleaner and a modern 6 pack set up for it too. I just need someone I can pay to do the metal work, but those guys are hard to find around here. I cant imagine it would take more than a month for someone to turn it around and have it in primer.

Here's my favorite part of it all. That's the cowl.

2007-03-11 144.jpg
 
They cut out the cowl under them though. That's why they filled in the top.

They even cut metal off the back side of the dash board, cut a rectangle out of the rockers under the sill plates, and cut metal out under the kick panels. The longer you look, the more you find. Then it becomes a question of figuring out what has to be fixed and what can be left alone.
 
Well, it's a real A12 car and if you've got the proof of that, it probably should all be fixed. It's a lot of work but ultimately worth it, I would think. I don't know what your exact plan is, but a solid A12 shell has got to be worth having whether you want to do a full-tilt paint-daub style restoration on it, a period street-racer hot rod, or whatever.

Were it my car, and obviously not, I'd be looking to keep as much OE metal on it as possible rather than wholesale swapping of sheetmetal... but in some cases (like the butchered side structures) it's way more work and may not ultimately be worth the effort. Double-edged sword, really... but as you start to disassemble the Satellite, you'll get a feel for how they went together originally. It's not nearly as bad as it seems.
 
I've got a clear WV title in my name, the VIN tag, the quarter lip stamp, and the radiator yoke stamp with a speed hole through part of it. It's definitely a real A12, but no fender tag and no original parts pretty much knocks it out of the get rich quick arena. It does still have the Dana, but it's got 5.13 gears in it. I bought a factory hood for it, and a Snobar repop air cleaner.

The Satellite's already apart and a lot of metal has been welded back into the A12. I figured out real quick that the metal has contours stamped into it so the parts go together in one specific way. I really shouldn't even start thinking about butt welding up the side of a car, but I can plug weld like a mo-fo.
 
funny thing doc on that MC you used on the valiant, i too was deeply worried about the effected look..especialy on my 58 ford, but i had ZERO good options when i went from single pot drums to disc/drum..found a 90s ford truck..same bolt patern as the old ford car...i too was suprised it doesnt actualy look out of place...and im HUGE on the oversized MC's makes a huge differance on feel and feedback, on my alfas i swap in a BMW unit thats a 5-10mm larger and whoa does it wake up the brakes
 
The MC came today, but I took one look at the car sitting up on jack stands and decided getting it back on the ground should be my priority. I blasted one wheel so far. I bought one of those plastic pre-made vac cyclone deals and it works great.

Choices for tires are limited - 245-70R14 and 275-60-15, Cooper and BFG are all I've found so far. The inspection sticker on the window is 12 years old, and I've heard stories about radials failing after N years (N=6 in the story I heard_ The guy who owned it died in 2017, so that's 4 years there. The tires are showing some sidewall cracking near the tread
 
sidewall cracking is where you draw the line especialy if you plan to be doing any time over 40mph, ...if its just an intown cruiser that never see's freeway speeds then you can test your luck fairly safely as a blow out at those speeds isnt even likely to do any actual damage

to be honest..when i see sidewalls cracking i dont care how new they are..they done if sustained freeway speeds are needed...and ive seen 2 and 3 year old tires start cracking

of course on the other side of that ive seen 10 and 15 year old tires that are still going strong with no cracking..how the tires are stored can change the life span entirely ..with 1 thing in mind they all get harder with age
 
sidewall cracking is where you draw the line especialy if you plan to be doing any time over 40mph,
I won't be driving it slow.

My back and legs are killing me from house hunched over the blast cabinet. I really need ot replace the plexiglass and add more lights. I've got about 1-1/2 of four wheels done. I'm hoping the rear wheels aren't as trashed as the front ones I got so they'll go faster. I'll know as soon as I take time to go to the tire shop.
 
Coincidentally, I too will be sandblasting wheels for an A-body soon.

If you're considering adding lights a cheap 12V, 6A power supply and strip LEDs work very well. I bought some angled aluminum channel to rivet into my blast cabinet so the LED strips would be at a 45° angle, pointing toward the work. There'll be one each across the back and front. The ultra low profile means they'll never be in the way.
 
Right now I'm using a magnetic goose neck light from Harbor Freight that uses 3 AAA batteries IIRC. It's unusable for anything else now that it's suffered hours of debris and abrasives.

I've got parts to rig up a 110v spot light in there but decided to make do with what I have instead of delaying progress.
 
do yourself a favor doc, add a removeable/replaceable strip of plexi over the led's....abrasive is MEAN
if youve got a top light get the brightest led you can for it, if you dont....think about cutting a full length hole in the top for a mini hood and led t12 or t8 again plexi under it

with all the hours ive logged on my big cab theres a few other things.....find a stool you like and plop it down in front of the cab, now raise said cab till your comfortable and bad the bottoms of the glove inlet so you can more comfortably rest your arms there

major light needs to come from the down, but docs on the right track with the 45deg..imo each corner of the sides would be a bonus...but the darkest working pit..is under the gloves, so if you could find a way to put light just above the tray under the gloves you would be more productive

im still on a hunt for fixing optimal dust flow...in the back and out the side doesnt cut it..even if thats how the cab was built i feel like here needs to be some type of full circle in/out in the working space(think bbq burner ring)...my new theory is the "IN FLOW" needs to come from below the tray with a top out around the light to minimize media removal and maximize dust evac
 
I've got parts to rig up a 110v spot light in there but decided to make do with what I have instead of delaying progress.

I'm thinking that would get uncomfortably hot in very short order. My cabinet has an incandescent fixture in it; I used an LED "bulb" instead. My hands get sweaty enough in the gloves without a 75W heater in the corner.


do yourself a favor doc, add a removeable/replaceable strip of plexi over the led's....abrasive is MEAN

The 45° channel comes with a translucent diffuser cover, but it's thin plastic that I don't expect will last forever in such an environment. However, the LEDs themselves are encased in very durable water-clear silicone. That will eventually turn translucent as well, but as far as wear it should last longer then the LEDs themselves.

As far as evac, I'm using the original port with a paint-mask filter installed as an inlet, in the back of the housing on the left side. The vacuum connection is on the right side, near the rear. It has a nipple that extends inside the cabinet, which accepts a mid-'60s "mushroom-style " breather cap so it draws from the wall rather than the main space. I connect my 6HP wet/dry to it, via my home-made dust cyclone. I have issues with neither visibility nor media loss. The media hits the cabinet wall and falls; the dust is light enough to make the turn into the breather cap.

In order to end this thread hijack and return to Dusters rather than dust collectors, I'll start another thread detailing the modifications I've made to my sandblasting cabinet, including one that virtually eliminated suction-side jams/stalls at the gun pickup tube.
 
I went ahead and put the flood light in the cabinet, with an LED bulb. Much better. Now i need to replace the plexiglass so I've got more than just a small area I can see through. I should have the rear bumper on it in a day or two now that I've blasted and painted the brackets.
 
Putting the bumpers on and I think I need a tip or two.

The bumper has 4 brackets. Two main brackets on either side of the license plate, that bolt to the rear crossmember, and two small C-shaped brackets in the corners that bolt up inside the trunk. I bolted them all to the bumper, and noticed that the small C-shaped brackets can move side to side and rotate, since they only have one bolt in a slotted hole. So, pretty much anywhere I bolt them to the bumper is a guess at best. It doesn't look like I can bolt them to the bumper after the fact either.

So yeah, if you have any ideas about how to install the thing, I'd sure appreciate it.

FWIW, it's not in the factory chassis, and I only found an illustration of the parts in the parts book that showed me how the brackets are oriented. I found a link to a pdf of the body manual in a post on FABO, and thought that should cover it, but all that did was take me to a highjacked A-body Joe website. and send my virus scanner into overdrive. I also tried using the wayback machine on the URL to find it, with no joy.

I searched multiple times over multiple days and not once did I find an explanation of how to do it. I finally decided that the brackets must bolt to the bumper first, because I could not find a single photo of a Duster with the brackets bolted to the body and the bumper off. It's like trying to find out the secret handshake of the Freemasons.
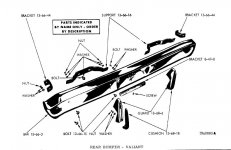
rear bumper parts.jpg
 

SiteLock

SiteLock
Back
Top