You are using an out of date browser. It may not display this or other websites correctly.
You should upgrade or use an alternative browser.
You should upgrade or use an alternative browser.
Rusty's not very quiet cuda progress
- Thread starter mopar_man
- Start date
RUSTY Cuda
In over my head!
So far I think I got all the ones I hooked up clean, but there may be more under the dash, still a bunch a spagetti hangin under there! :toot: Rich.
RUSTY Cuda
In over my head!
Got almost everyting on the exterior buffed out, pass side from body line down needs the second swirl remover job & wax, still have to deal with all the seams, the door jambs & such ,but it's lookin much better! :giggedy: Rich.

RUSTY Cuda
In over my head!
Was having a lot of trouble getting the swirl marks out with the buffer, so I got an orbital waxer, best 24 bucks I ever spent on the car, I LOVE this thing used it & maquires swirl remover then yellow wax, mind you I still have scratches & the other defects to touch up, but this got out most of the swirls & some of the lighter scratches! ")
Attachments
Last edited:
RUSTY Cuda
In over my head!
This is the area I'm most proud of, only some tiny defects & runs on the edges of which I got most out, but the roof took the least work & came out the best!:bravo:

RUSTY Cuda
In over my head!
So I moved my phoney turf over to get me out of the mud while I run the drainage pipe, now she's back on the turf! Tomorrow I hope to pick up the trunk lock & get that all working, maybe put a few more dodads on!") Rich.
Rich.

Rich.
RUSTY Cuda
In over my head!
SHINY!

Nice work, Rich!
Nice work, Rich!
RUSTY Cuda
In over my head!
Thanks guys, been a long haul & yes I do remember every last one of those pieces, :toot: kinda miss that stage, seemed progress was moving at a better clip, well soon enough if I can't afford to buy the interior this year I may start tearing into the 74! [smilie=2: Don't cost nothin to cut out the rotted metal.I even have some metal left over for patches! 340 bros be ready, I may need my welder back before 2010! :shifty:Rich.
greg340 "GREGGLES"
sleeping in a vat of jello
that looks great!!!!!!!!:bravo:
RUSTY Cuda
In over my head!
Oh crap, there's no pics on this page, oh well you twisted my arm, just one more for tonight I promise!:toot: Rich.

RUSTY Cuda
In over my head!
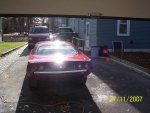
No burnouts in my driveway, I gotta keep a low profile,2 cars on the dirt, painting & whatnot outside, my business is out of the garage, no extra attention needed here!
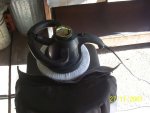
Those tires have been sittin for many years,not as rotted as the 73's set but I wouldn't go too far on those, I don't even wanna think about how much there gonna cost me! Rich.
Rich.
Those tires have been sittin for many years,not as rotted as the 73's set but I wouldn't go too far on those, I don't even wanna think about how much there gonna cost me!
Rich.RUSTY Cuda
In over my head!
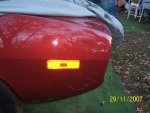
Start with the bad, no trunk lock at napa, they had the same uiniversal that I couldn't see a way to make it work, so out came the dremmel & I made the hole larger, so I get that all in & go to put the rear side markers & one is upside down, another flaw in the repro skins, the notches in the hole both go towards the front, checked the other car & one goes towards the rear(no left & right markers!) you'd have to look real close, a little wider on top instead of the bottom & the writing is upside down!:doh:front markers went in just fine!
Amazing how dirty the inside of everything got thru the paint process, i've got a lot of cleaning to do!
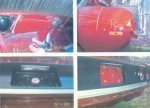
so liscense light housing is in, after breaking a mounting pin of one, glad I had some extras, little rubber bumpers are on for the plate mount & the plate mount is on & ready. trunk now opens with the key & back cover is on!
Amazing how dirty the inside of everything got thru the paint process, i've got a lot of cleaning to do!
so liscense light housing is in, after breaking a mounting pin of one, glad I had some extras, little rubber bumpers are on for the plate mount & the plate mount is on & ready. trunk now opens with the key & back cover is on!