Rusty's not very quiet cuda progress

Ok already did the sway bar, strut rods & ball joints, I just snugged what I thought were the moving parts.
Should I back off on those before I set the car down, even that will be quite a while. down the road?
So I got the torsion bar cups & clips, went out to attempt those & found the bars still in primer, so I got those painted.
20230331_133206.jpg20230331_133548.jpg20230331_144535.jpg
 
Before I screw that up anything I need to know, coat the ends with grease. Should I set the pivot to where the swing arm touches the adjustment bolt & then just back off a little if needed to match the angles?
How much thread should I stick up in there?
Anything I'm missing?
 
Ok already did the sway bar, strut rods & ball joints, I just snugged what I thought were the moving parts.
Should I back off on those before I set the car down, even that will be quite a while. down the road?
So I got the torsion bar cups & clips, went out to attempt those & found the bars still in primer, so I got those painted.
View attachment 25159View attachment 25160View attachment 25158
Torque the strut rods, the LCAs, and the UCAs only with weight on the wheels. I stuck jackstands under the rear end and set the front tires on ramps to give me a little more room but still not as much as I would wish for.
 
Before I screw that up anything I need to know, coat the ends with grease. Should I set the pivot to where the swing arm touches the adjustment bolt & then just back off a little if needed to match the angles?
How much thread should I stick up in there?
Anything I'm missing?
You're talking about the torsion bars? I usually start with screwing the bolt in until it's flush with the bottom of the LCA, then measure and adjust to taste from there.
 
OK in the meantime I watched a few videos & read a few posts & with your help here's the plan.
First loosen the strut rods & the sway bar, uca's & lca's are just snugged.
grease the ends, pull the adjustment bolt out till it's flush with the block it goes thru.
Then only the ball joints will be torqued, do I have to back those off too?

anything else to look for?
 
Letting money walk out the door for a lack of checking all the parts is a good way to be poor (y)
Mr. Wrenchgood will quickly realize he's dealing with all-new parts, so there's no money leaving. There's nothing to sell him. If the car made it there, he'd be in the right to assume that all those parts are fully & correctly assembled. Unless he's going to try the "your entire front end needs to be replaced" scam, he'll most likely do his assigned work and move onto the next one. Other than checking for bad parts, an alignment doesn't involve the strut rods, ball joints, or steering arms. If the nuts are present with cotter pins in 'em, I'd assume they're torqued to spec--why else would one pin them?

Final torque on the ball joint stud nuts, LCA pivots, strut rods, and swaybar components is done with full weight on the suspension at ride height, so just snug those for the moment. The lower ball-joint bolts (to the knuckle), upper ball joint into the control arm, tie-rod end and steering-arm stud nuts can be torqued now. The tie-rod sleeves and UCA cam bolts should just be snugged since they'll need to be finagled during the alignment.

You can not have it aligned prior to torquing everything other than the UCA cam bolts and tie-rod sleeves. Well, you can but you'll damage new parts.

Set ride height using the FSM procedure. You can fudge it a bit up/down per your taste, but don't get crazy with raising/lowering. Among other potential issues, you'll venture into bump-steer territory.
 
OK add in loosen the ball joints! So all the little things I thought I could get out of the way have to be undone, that's some progress for you!
 
Before I screw that up anything I need to know, coat the ends with grease. Should I set the pivot to where the swing arm touches the adjustment bolt & then just back off a little if needed to match the angles?
How much thread should I stick up in there?
Anything I'm missing?
Don't forget, torsion bars are side specific as per markings on the ends.
 
Yep that one I got & at least they are stamped, now on a car left is drivers side like your sitting in it!
Not looking at it from the front!
 
Yep that one I got & at least they are stamped, now on a car left is drivers side like your sitting in it!
Not looking at it from the front!
Correct. LH is the driver's side, RH is the passenger's side. The torsion bars can be flipped end-for-end without issue, but they are specific to the side of the car.

Remember to pack the rear sockets and boots full of grease, and to lightly grease the control-arm end. Don't install them dry!

FWIW before you get carried away on the rear end, don't torque the spring hangers until there's weight on the wheels
To clarify this: You can torque the nuts that secure the spring hangers themselves to the frame, but if there's a bushing involved (both ends of the shackles, front spring eye) do not torque it until the suspension's supporting the full weight of the car on level ground (or on level tire stands/ramps).
 
Glad I reread some of this, the ball joints to the knuckle were a bear to do as out in the open as they are now, I was wondering how the heck I was going to do that with tires on, on the ground, I can't even fit under the car !
So I can leave those they are the only nuts I pinned, I'll loosen the others & attempt the bars next trip out on the car.
I want to get the tarp back on the tent first, maybe attempt that tomorrow if it's not too windy, hoping my son is around, did it alone last time & it was not fun!
 
Ok loosened the struts & the shocks & took a few turns off the LCA pivot nut.

Torsion bars are in but it was quite an adventure.
getting the boots on is nasty, I ruined one trying to stretch it with long needle nose pliers, had it almost on & the pliers slipped & put holes in the boot, luckily one old boot was decent & the managed to go on by hand., was able to tap that one into the LCA with a small hammer.
I spun the lca pivot arm so it rested on the adjustment bolt, backed all the way out, luckily that matched up to the grooves in the frame & the bar.
Filled the cavity with grease & put the boot on..........20230402_143435.jpg20230402_144122.jpg
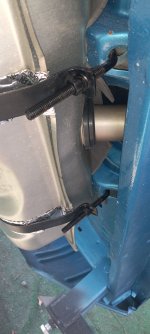
Wasn't sure about this, the retaining clip was in the groove but way off the bar, I grabbed the bar & it slid back to the pin so I tapped it a few time, clip seems to hold. 20230402_135849.jpg
On the second bar I went searching for something tapered that was just a tad bigger than the end of the bar, almost cut up one of my rakes, that metal end they put on looked pretty good, but I found a shop vac extension that looked good, not that small at the skinny end, but with it leaning on the ground I was able to force the boot on, greased everything up & slid it right on the bar! This side I had to pound into the lca with a lump hammer.
Clip is closer to the bar, but this one wasn't sliding back easy!
Rube Goldberg does it again! 20230402_142411.jpg
Snugged up the adjustment bolts, greased the clip side & the bars be in! 20230402_150217.jpg
Oh yea, I did grease the LCA ends.
 
OK tarp is up & I'm still breathing! 20230403_150634.jpg
So I had a little time left & mounted the vapor return tank........20230403_150600.jpg
But seems somethings out of wack, I think I need the one off the top facing the other side, I only have 5 hoses & 11 tubes, I faced it that way because of the one on the sending unit, but I don't think the old sender had a return line? 20230403_151613.jpg
So I laid the hoses out, 4 defiantly got to the gas tank & the last one looks like it came off the top (facing the other way) to the return from up front? 20230403_151952.jpg
these are gonna be fun! 20230403_150608.jpg
So what do I do with the one off the sending unit?
 
Picked up my fuel line yesterday after going a few miles to a guy in towns Napa store & finding it GONE, I went to auto zone 5 blocks from my house!!! Go figure!
So I got all the original lines replaced on the vapor return system & supply with grounding clamp...........20230406_152619.jpg
As I thought these were a battle royale! 20230406_152630.jpg
One connection up front & I also slid some hose over the lines where they go through the frame, they were so close to rubbing I was worried about vibration rubbing a hole through them? 20230406_152651.jpg20230406_152724.jpg
 

Attachments

  • 20230406_152813.jpg
    20230406_152813.jpg
    1.7 MB · Views: 2
Now I have 2 more questions,
Blocking off that return line on the sender, can I just leave that cover over it & will that affect the operation of the unit?

& the gas tank straps, I've almost bottomed out the J bolts & there's still a tiny gap on the flat part towards the front of the tank? 20230406_152813.jpg
 
I don't think you'll have a problem with the return line being capped per se, as long as the vent line is correctly routed to the charcoal canister. However, that red cap probably isn't fuel-resistant and will rot away in gasoline vapor before too long. Dorman and Standard Motor Products both make "rubber" vacuum caps that will last much longer, but not forever. When you notice a fuel smell in the garage that you just can't track down, that'll be the first place to look.

I would not suggest a "permanent" solution that would disable the return line forever, though. If you find yourself having issues in hot weather with vapor lock, a regulator with return line up at the engine can solve a lot of those problems. I had to do that on my Charger when it was still a ThermoQuad, but it cleared up after I installed the Six Pack. Never could figure out why.
 
On the other car, the sender had no return, I set up that "Seperator" in front of the tank, but then I ended up capping it in the engine bay. I didn't put the canister back because the carb was not original & I couldn't figure out what to hook it all up to.
It had a locking gas cap, not sure if that was vented, but I didn't have any issues, but really didn't ever drive it in traffic in hot weather???

K , maybe a short piece of fuel line with a bolt clamped into the other end?
 
Whether the gas cap is vented has nothing to do with vapor lock. Vapor lock is when the fuel in the lines gets warm enough to evaporate and build pressure in the system. Fuel can't flow through the pump or into the carb and the engine stalls and won't restart until it's sufficiently cooled. My Charger would (and did) vapor lock with no fuel cap on it.
On that car, I installed a 3-port regulator (one inlet, one regulated, one return--how a usual Holley regulator is designed to be used) "after" the carb. The fuel line went from the fuel pump, which was electric in my case, up toward the carb. I put the regulator at the passenger's-side rear of the carb. One outlet went to the carb inlet, the other got a hose barb. A length of hose connected that barb to the OE fuel-return line to the tank. When the needles and seats were closed, the fuel went out the regulator and back to the tank to mix with the cooler fuel stored there. Constantly-flowing fuel doesn't sit in the lines and absorb the heat required to vaporize it.
On my installation, I filled the barb with solder and drilled a 3/32" hole through the solder. That hole is smaller than the combined needle/seat area of a ThermoQuad, so when the floats drop the carburetor was the path of least resistance for fuel to follow. It may have been overkill, but it never starved on hard acceleration runs and it never vapor-locked again. My fuel pump was also quieter, which would indicate it wasn't working as hard and would probably have a long service life. Too bad I blew the engine. 😂
Modern fuel is much more prone to vapor lock, particularly anything with ethanol and specifically low-octane regular. If you find instances where the car stalls on hot days and won't restart even though there's no apparent mechanical problem, vapor lock is the most-likely suspect.

By no means am I saying you need to do this, I'm just pointing out why I wouldn't permanently plug/disable that line. You might find out you need it. You can do the bolted hose trick or get a black vacuum cap that looks like it's made of fuel hose (thick rubber).

On the canister: One line is for the carburetor's bowl vent, one is for vacuum, and one returns to the separator in the tank if memory serves. I'm not 100% sure about the vacuum--I never paid that close of attention whilst ripping them out!
 

SiteLock

SiteLock
Back
Top